
はじめに
`numpy`を使うと複雑な計算ができるようになるが、機会学習でよくつかう計算についてまとめた。
x転置x
.dotの後に、掛けるものを2つ置けばよい。 
XtX= np.dot(X.T,X)
print(XtX)
逆行列
 linear algebra(リニアアルジェブラ): 線形代数
numpyの場合は、linalg.invを使って描写する。
XtX_inv = np.linalg.inv(XtX)
print(XtX_inv)
`numpy`を使うと複雑な計算ができるようになるが、機会学習でよくつかう計算についてまとめた。
.dotの後に、掛けるものを2つ置けばよい。
XtX= np.dot(X.T,X)
print(XtX) linear algebra(リニアアルジェブラ): 線形代数
numpyの場合は、linalg.invを使って描写する。
XtX_inv = np.linalg.inv(XtX)
print(XtX_inv)
AWS SQSを使ったシステムを作る際、ローカル環境で手軽にSQSがいじれれば非常に便利だ。今回、Dockerを用いてSQS互換の環境を作った。
docker imageの作り方、localでの起動方法までまとめている。
SQSのinterfaceに適合したアプリケーションがある。
https://github.com/softwaremill/elasticmq
これをそのままDockerの中に入れ、ポートを開いて`ENTRYPOINT`を起動すれば、SQS互換のdocker imageを作成することができる。
FROM java:8

ADD https://s3-eu-west-1.amazonaws.com/softwaremill-public/elasticmq-server-0.15.3.jar /elasticmq/elasticmq-server-0.15.3.jar
EXPOSE 9324
ENTRYPOINT ["java","-jar","/elasticmq/elasticmq-server-0.15.3.jar"]
ビルド方法はこちら。
`docker build -t tsukada/elasticmq:0.15.3 .`
そのimageを用いて起動する。ローカルの9324 portがコンテナ内の9324 portにそのままマッピングさせた。
`docker run -d –name=elasticmq -p 9324:9324 tsukada/elasticmq:0.15.3`
起動確認
% docker ps
CONTAINER ID        IMAGE                      COMMAND                  CREATED             STATUS              PORTS                    NAMES
cb1023027390        tsukada/elasticmq:0.15.3   "java -jar /elasticm…"   3 seconds ago       Up 2 seconds        0.0.0.0:9324->9324/tcp   elasticmq
起動成功。localhost の 9324 portとのマッピングも成功した。
aws sqs create-queue --queue-name test --endpoint-url http://localhost:9324
{
    "QueueUrl": "http://localhost:9324/queue/test"
}
ここで表示される`QueueUrl`が、メッセージの送受信などで必須情報となる。
作成したキューにメッセージを送信する。
`–queue-url` オプションが必要になる。ここではキューを作成した際に作られた`QueueUrl`を入力する。
aws sqs send-message --queue-url http://localhost:9324/queue/test --message-body 'tsukada hoge. Hello world' --endpoint-url http://localhost:9324
{
    "MD5OfMessageBody": "c5ec7b6e06ad8b6faf949efb02e2f406",
    "MessageId": "83a36e5f-1d40-4da8-84eb-b37a8c864541"
}
送信が成功すると、メッセージ本文の MD5 ダイジェストとメッセージ ID が表示される。
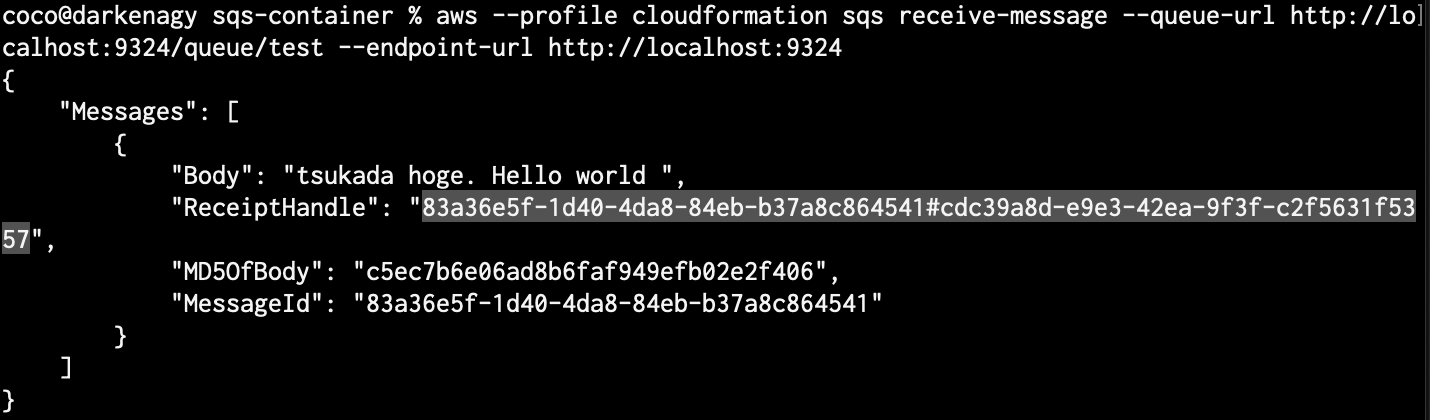
aws sqs receive-message --queue-url http://localhost:9324/queue/test --endpoint-url http://localhost:9324
{
    "Messages": [
        {
            "Body": "tsukada hoge. Hello world ",
            "ReceiptHandle": "83a36e5f-1d40-4da8-84eb-b37a8c864541#58efa4b9-8fe9-4324-aded-08b72253be1c",
            "MD5OfBody": "c5ec7b6e06ad8b6faf949efb02e2f406",
            "MessageId": "83a36e5f-1d40-4da8-84eb-b37a8c864541"
        }
    ]
}
メッセージで送信された
tsukada hoge. Hello world
を確認できた。
ちなみに、このコマンドを複数回実行しても、毎回メッセージが表示されるわけではない。
SQSには可視性タイムアウトという考えがあり、デフォルトで1度キューを表示したら、30秒間は表示されない。
この仕組みで、重複してキューが実行されるのを防いでいる。
そのような仕様だと、「見えているキュー、見えてないキュー」の件数を確認したくなる。
`ApproximateNumberOfMessages` が見えている件数
aws sqs get-queue-attributes --endpoint-url http://localhost:9324 --queue-url http://localhost:9324/queue/test --attribute-names ApproximateNumberOfMessages
{
    "Attributes": {
        "ApproximateNumberOfMessages": "1"
    }
}
`ApproximateNumberOfMessagesNotVisible`を `–attribute-names`に指定することで見えなくなっているキューの件数を表示することができる。
aws sqs get-queue-attributes --endpoint-url http://localhost:9324 --queue-url http://localhost:9324/queue/test --attribute-names ApproximateNumberOfMessagesNotVisible
{
    "Attributes": {
        "ApproximateNumberOfMessagesNotVisible": "0"
    }
}
これらのオプションについては公式ドキュメントで綺麗に整理されている。
不要になったメッセージは削除した方が良い。削除コマンドは以下の通り。
aws sqs delete-message --endpoint-url http://localhost:9324 --queue-url http://localhost:9324/queue/test --receipt-handle "****"
`–receipt-handle` には、メッセージを受信した際に記載されている`ReceiptHandle`を指定する。
receive-message (メッセージを受信)した際、した際に確認できる ReceiptHandle はこのような感じに表示される。`.jq` コマンドなどを利用すれば簡単にシェル化できそうだ。
QueueUrlsを確認できるのはもちろんキュー作成時だけではなく、確認用のコマンドも用意されている。
aws sqs list-queues --endpoint-url http://localhost:9324
{
    "QueueUrls": [
        "http://localhost:9324/queue/test"
    ]
}
https://qiita.com/tsukapah/items/0ba64ac734e885f6e8e8
https://qiita.com/tcsh/items/7781fe238df82fc030d2
AWSについて体系的に学ぶことができるのでおすすめ。

既存の lambda をダウンロードし、コンソールを使わず sam を用いて管理する方法をまとめた。deploy 方法から注意事項までを記載。
lambda をダウンロードすると大きく2つに分けてダウンロードすることができる。
sam のドキュメントについてはこちら
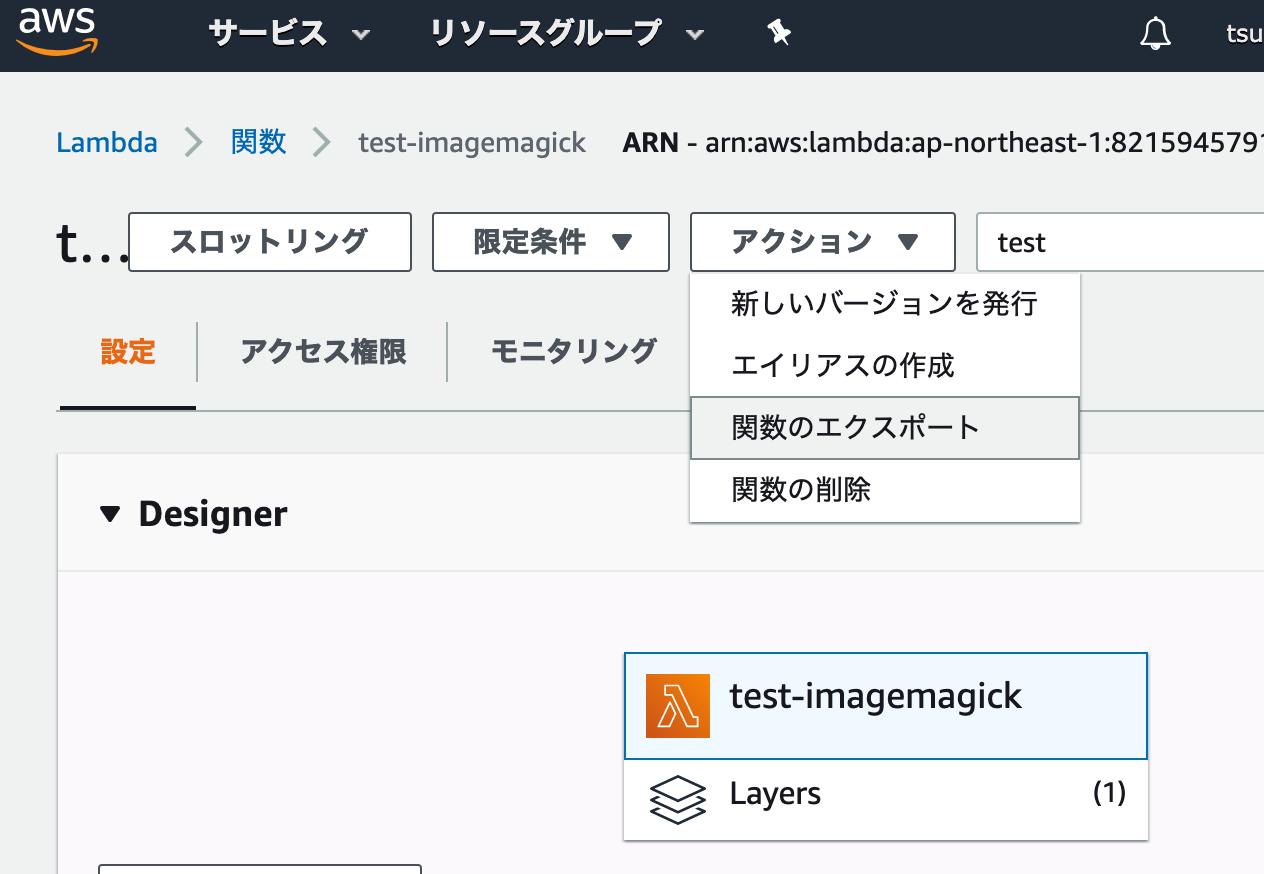
関数のエクスポートを押下すると、
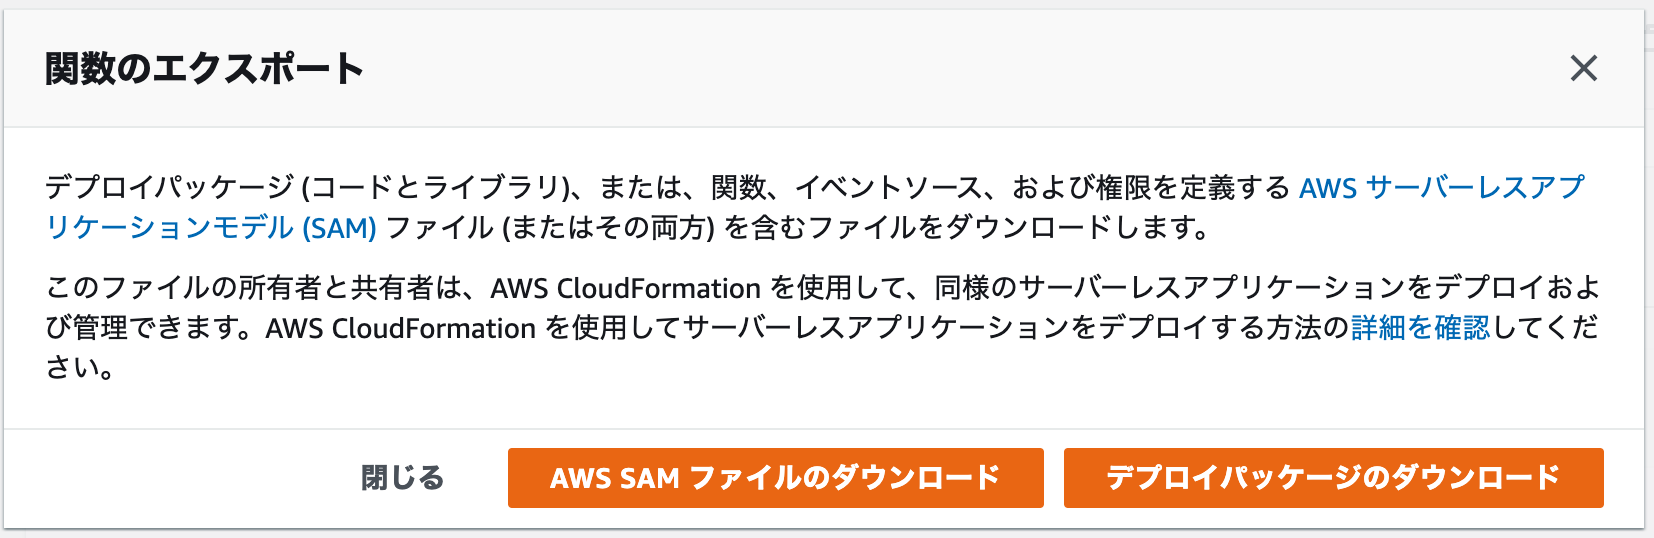
が選択できる。
端的に言うと
だ。両方ダウンロードする。
公式ドキュメントの手順を準拠すると、 sam のインストールは以下の通りとなる。
brew tap aws/tap
brew install aws-sam-cli
今回は python3.8 を利用するので以下のように設定した。
ダウンロードした zipファイル は unzipコマンドなどで解凍しておく。
sam init


	SAM CLI now collects telemetry to better understand customer needs.

	You can OPT OUT and disable telemetry collection by setting the
	environment variable SAM_CLI_TELEMETRY=0 in your shell.
	Thanks for your help!

	Learn More: https://docs.aws.amazon.com/serverless-application-model/latest/developerguide/serverless-sam-telemetry.html

Which template source would you like to use?
	1 - AWS Quick Start Templates
	2 - Custom Template Location
Choice: 1

Which runtime would you like to use?
	1 - nodejs12.x
	2 - python3.8
	3 - ruby2.5
	4 - go1.x
	5 - java11
	6 - dotnetcore2.1
	7 - nodejs10.x
	8 - nodejs8.10
	9 - python3.7
	10 - python3.6
	11 - python2.7
	12 - java8
	13 - dotnetcore2.0
	14 - dotnetcore1.0
Runtime: 2

Project name [sam-app]:

Cloning app templates from https://github.com/awslabs/aws-sam-cli-app-templates.git

AWS quick start application templates:
	1 - Hello World Example
	2 - EventBridge Hello World
	3 - EventBridge App from scratch (100+ Event Schemas)
Template selection: 1

-----------------------
Generating application:
-----------------------
Name: sam-app
Runtime: python3.8
Dependency Manager: pip
Application Template: hello-world
Output Directory: .

Next steps can be found in the README file at ./sam-app/README.md

coco@darkenagy sam %
ダウンロードした yamlファイル を、 template.yml と言うファイル名に変更する。
mv test-imagemagick.yaml template.yml
requirements.txt も必要になるので、作成する。使わない場合でも空のファイルを用意する必要があるので、 touch するなり作成する。
touch requirements.txt
以下のように表示されれば成功。
sam build
Building resource 'testimagemagick'
Running PythonPipBuilder:ResolveDependencies
Running PythonPipBuilder:CopySource

Build Succeeded

Built Artifacts  : .aws-sam/build
Built Template   : .aws-sam/build/template.yaml

Commands you can use next
=========================
[*] Invoke Function: sam local invoke
[*] Deploy: sam deploy --guided
ちなみに、sam コマンドでも、.aws 配下の profile を読み込むことも可能。
`sam build –profile cloudformation`
エラーが発生した場合は debugモード で確認することができる。
sam build --debug
あとは invoke するなり、deploy するなりすればよい。
`sam deploy –guided`コマンドを利用することで deploy が可能。
% sam deploy --guided

Configuring SAM deploy
======================

	Looking for samconfig.toml :  Not found

	Setting default arguments for 'sam deploy'
	=========================================
	Stack Name [sam-app]:
	AWS Region [us-east-1]: ap-northeast-1
	#Shows you resources changes to be deployed and require a 'Y' to initiate deploy
	Confirm changes before deploy [y/N]: y
	#SAM needs permission to be able to create roles to connect to the resources in your template
	Allow SAM CLI IAM role creation [Y/n]: y
	Save arguments to samconfig.toml [Y/n]: y

	Looking for resources needed for deployment: Found!

		Managed S3 bucket: aws-sam-cli-managed-default-samclisourcebucket-1dc492sz2bqu7
		A different default S3 bucket can be set in samconfig.toml

	Saved arguments to config file
	Running 'sam deploy' for future deployments will use the parameters saved above.
	The above parameters can be changed by modifying samconfig.toml
	Learn more about samconfig.toml syntax at
	https://docs.aws.amazon.com/serverless-application-model/latest/developerguide/serverless-sam-cli-config.html

	Deploying with following values
	===============================
	Stack name                 : sam-app
	Region                     : ap-northeast-1
	Confirm changeset          : True
	Deployment s3 bucket       : aws-sam-cli-managed-default-samclisourcebucket-1dc492sz2bqu7
	Capabilities               : ["CAPABILITY_IAM"]
	Parameter overrides        : {}

Initiating deployment
=====================
Uploading to sam-app/9a97ece5eb5fac3dd9dff84a97110722  9611 / 9611.0  (100.00%)
Uploading to sam-app/cac8e2252620a466ff8e4becb2d4a8ed.template  638 / 638.0  (100.00%)

Waiting for changeset to be created..

CloudFormation stack changeset
---------------------------------------------------------------------------------------------------------------------------------------------------------------------------------------------------------
Operation                                                           LogicalResourceId                                                   ResourceType
---------------------------------------------------------------------------------------------------------------------------------------------------------------------------------------------------------
+ Add                                                               testimagemagick                                                     AWS::Lambda::Function
---------------------------------------------------------------------------------------------------------------------------------------------------------------------------------------------------------

Changeset created successfully. arn:aws:cloudformation:ap-northeast-1:821594579130:changeSet/samcli-deploy1578156109/01d374f5-800c-438e-b4cb-4f25d8d0bc4d


Previewing CloudFormation changeset before deployment
======================================================
Deploy this changeset? [y/N]:
問題なければyを押す。
2020-01-05 01:42:01 - Waiting for stack create/update to complete

CloudFormation events from changeset
---------------------------------------------------------------------------------------------------------------------------------------------------------------------------------------------------------
ResourceStatus                                     ResourceType                                       LogicalResourceId                                  ResourceStatusReason
---------------------------------------------------------------------------------------------------------------------------------------------------------------------------------------------------------
CREATE_IN_PROGRESS                                 AWS::Lambda::Function                              testimagemagick                                    -
CREATE_IN_PROGRESS                                 AWS::Lambda::Function                              testimagemagick                                    Resource creation Initiated
CREATE_COMPLETE                                    AWS::Lambda::Function                              testimagemagick                                    -
CREATE_COMPLETE                                    AWS::CloudFormation::Stack                         sam-app                                            -
---------------------------------------------------------------------------------------------------------------------------------------------------------------------------------------------------------

Successfully created/updated stack - sam-app in ap-northeast-1
成功すれば以下の通り作成される。
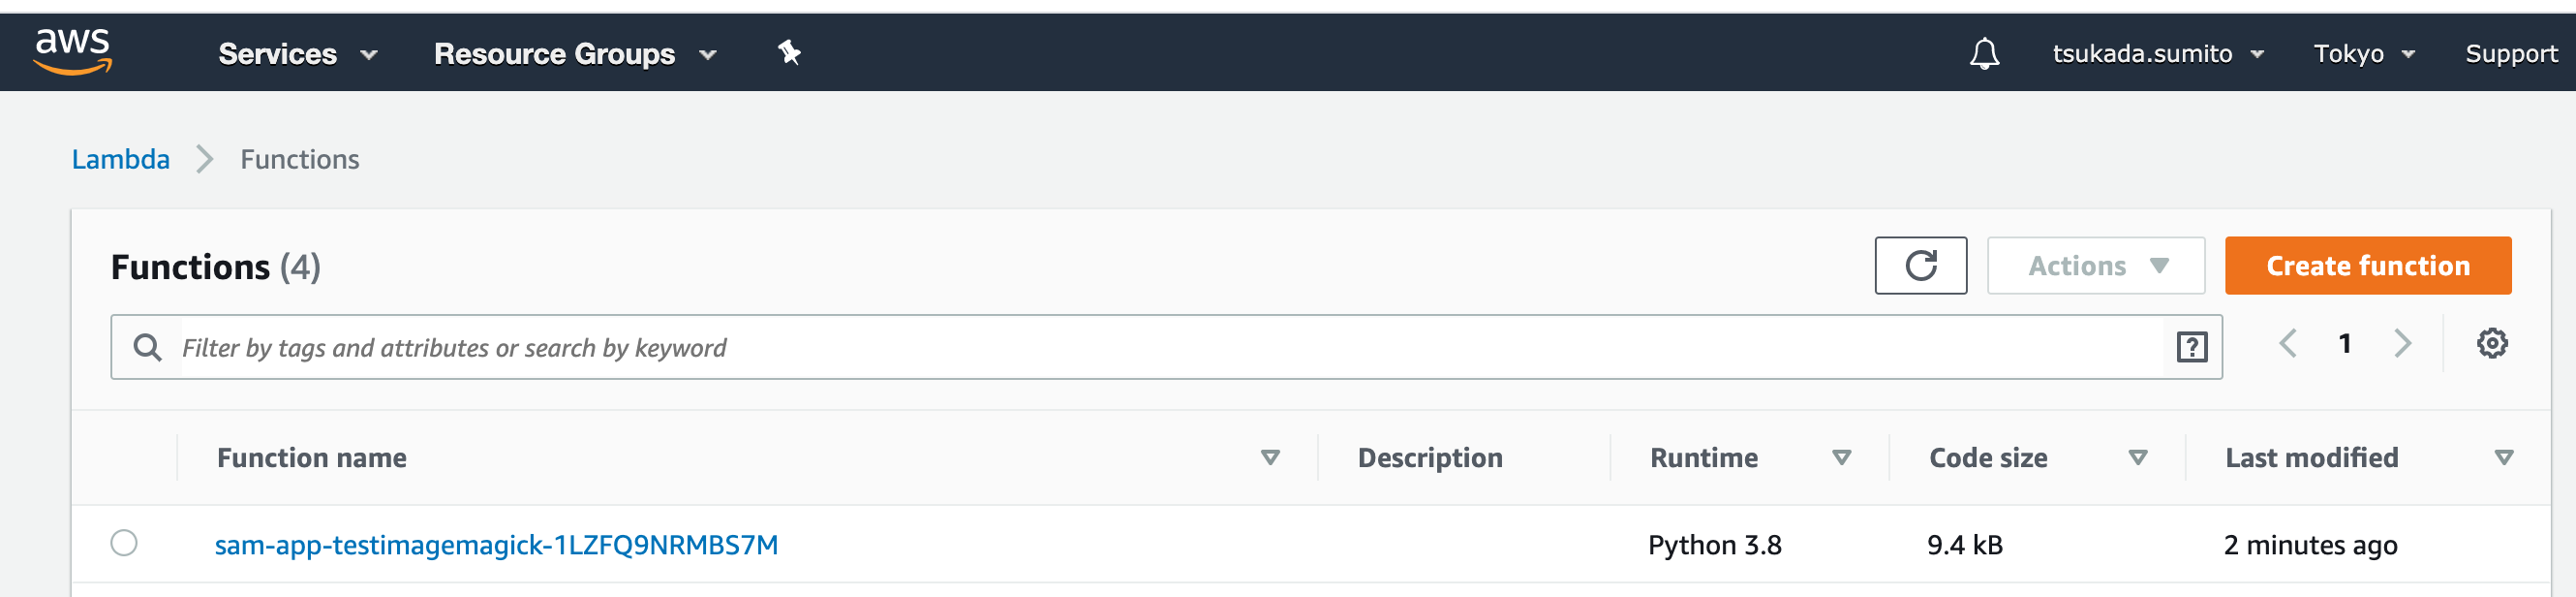
function name が、意図した名前と違う場合、明示的に指定することができる。
AWSTemplateFormatVersion: '2010-09-09'
Transform: 'AWS::Serverless-2016-10-31'
Description: An AWS Serverless Specification template describing your function.
Resources:
  testimagemagick:
    Type: 'AWS::Serverless::Function'
    Properties:
      FunctionName: test-imagemagick-123
      Handler: lambda_function.lambda_handler
      Runtime: python3.8
      CodeUri: .
      Description: ''
      MemorySize: 128
      Timeout: 3
      Role: 'arn:aws:iam::123:role/lambdaExecution'
      Layers:
        - 'arn:aws:lambda:ap-northeast-1:123:layer:image-magick:2'
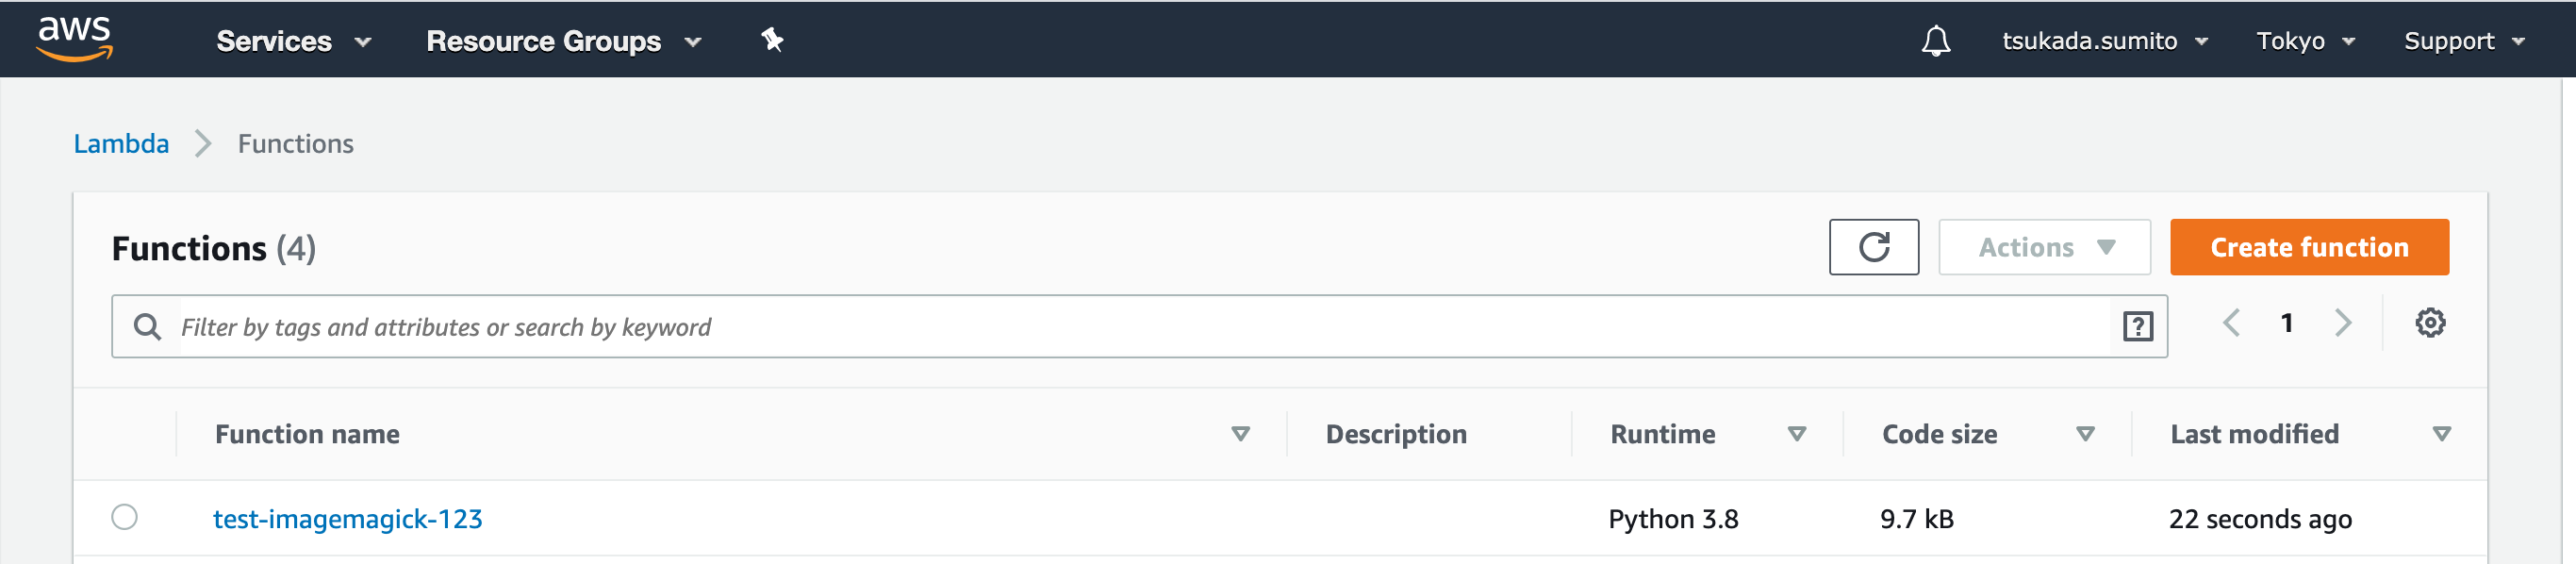
template.yml で`FunctionName`を指定する。
再度`sam build`、 `sam deploy` を行うと、新しい lambda function に置き換わる。
手動で作り上げた lambda を sam を用いて上書いて管理することはできないのか。
結論、そのままはできない。
現在自分が動かしているものについては、手動で作った lambda は削除し、その後 sam を用いたdepoloy に切替えるなどして対応している。
https://dev.classmethod.jp/cloud/aws/cloudformation-import-existing-resources/
しかし、CloudForomation で手動で作成したリソースをインポートできるようになったので、これを使えばできるかも。(未確認)
試したことある人いたら twitter でもご一報ください。

AWS lambda(Python 3.8)で画像処理ツールのimagemagickを動かした。
install方法からlambda内でimagemagickの動かす際のコードまでを紹介。
imagemagick は動的に画像を編集する古典的なツール。こちらの記事によると、なんと1987年から開発されている。wikipediaを確認する限り、Photoshopのリリースが1990年だから、その古さに驚かされる。
しかしこのツール、度重なる脆弱性は報告されているものの、画像編集の機能としてまだまだ現役として使っているプロジェクトも存在する。
今回はそのimagemagickをlambdaで。Python 3.8のランタイムから使う方法を紹介する。
ありがたい事にServerlessを支援し積極的に情報発信をしてくれている団体がいる。
彼らが作ったlambdaの`binally layer`をCloudFormationでdeployする機能も提供してくれている。
https://serverless.pub/lambda-utility-layers/
GitHubはこちら
https://github.com/serverlesspub/imagemagick-aws-lambda-2
こちらを`git clone`して、`make all` すればimagemagickのlambdaの`binally layer`ができる。
その方法を使ってもよいのだが、
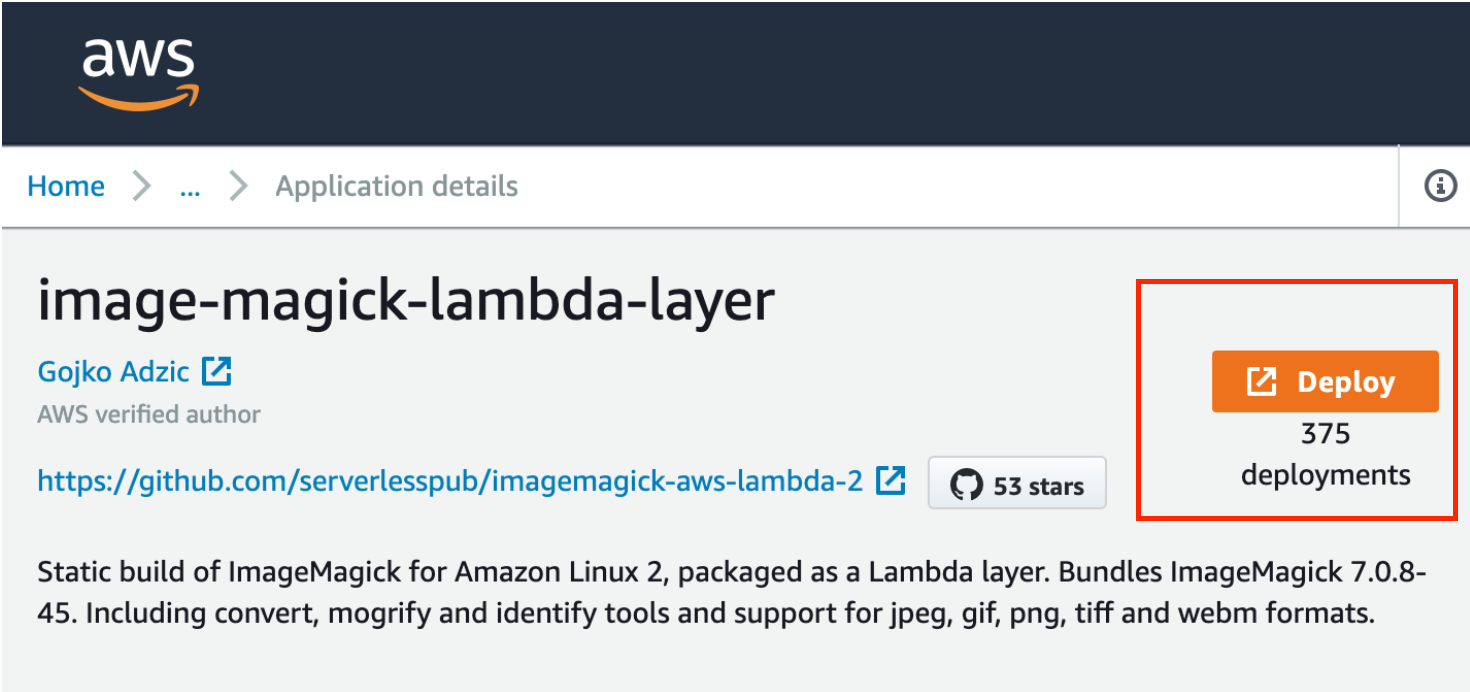
実は以下のページからDeployボタンを押せば、それだけで自動でCloudFormationが自分のAWSで動き、lambdaの中に`binally layer`が作成されることもできる。

しかし、注意すべきはここの部分。
要約すると、nodejs10.xランタイムのようなAmazon Linux 2で使えるよ。とのこと。PythonのPの字も見当たらない。
対象外かと思い当初諦めていた。
そんな中、最近、`Python 3.8`ランタイムがlambdaで使えるようになった事を知り、公式ドキュメントを読んでみると、今までのPythonで使っていたOSとは異なり、`Amazon linux2`がベースとなっていることがわかった。
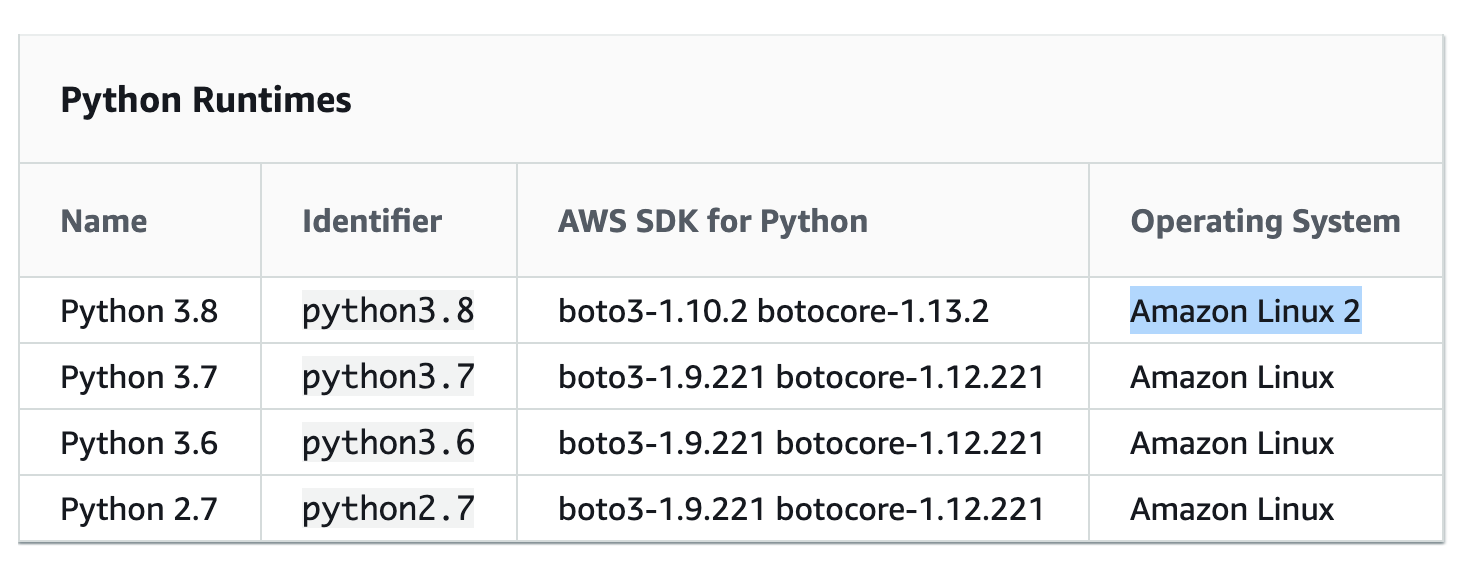
node.jsに絞っているのはAmazonLinux2がベースのように見受けられたため、これはlambdaの中でPythonでもimagemagickを動かせるかもと思い今回試す事にした。
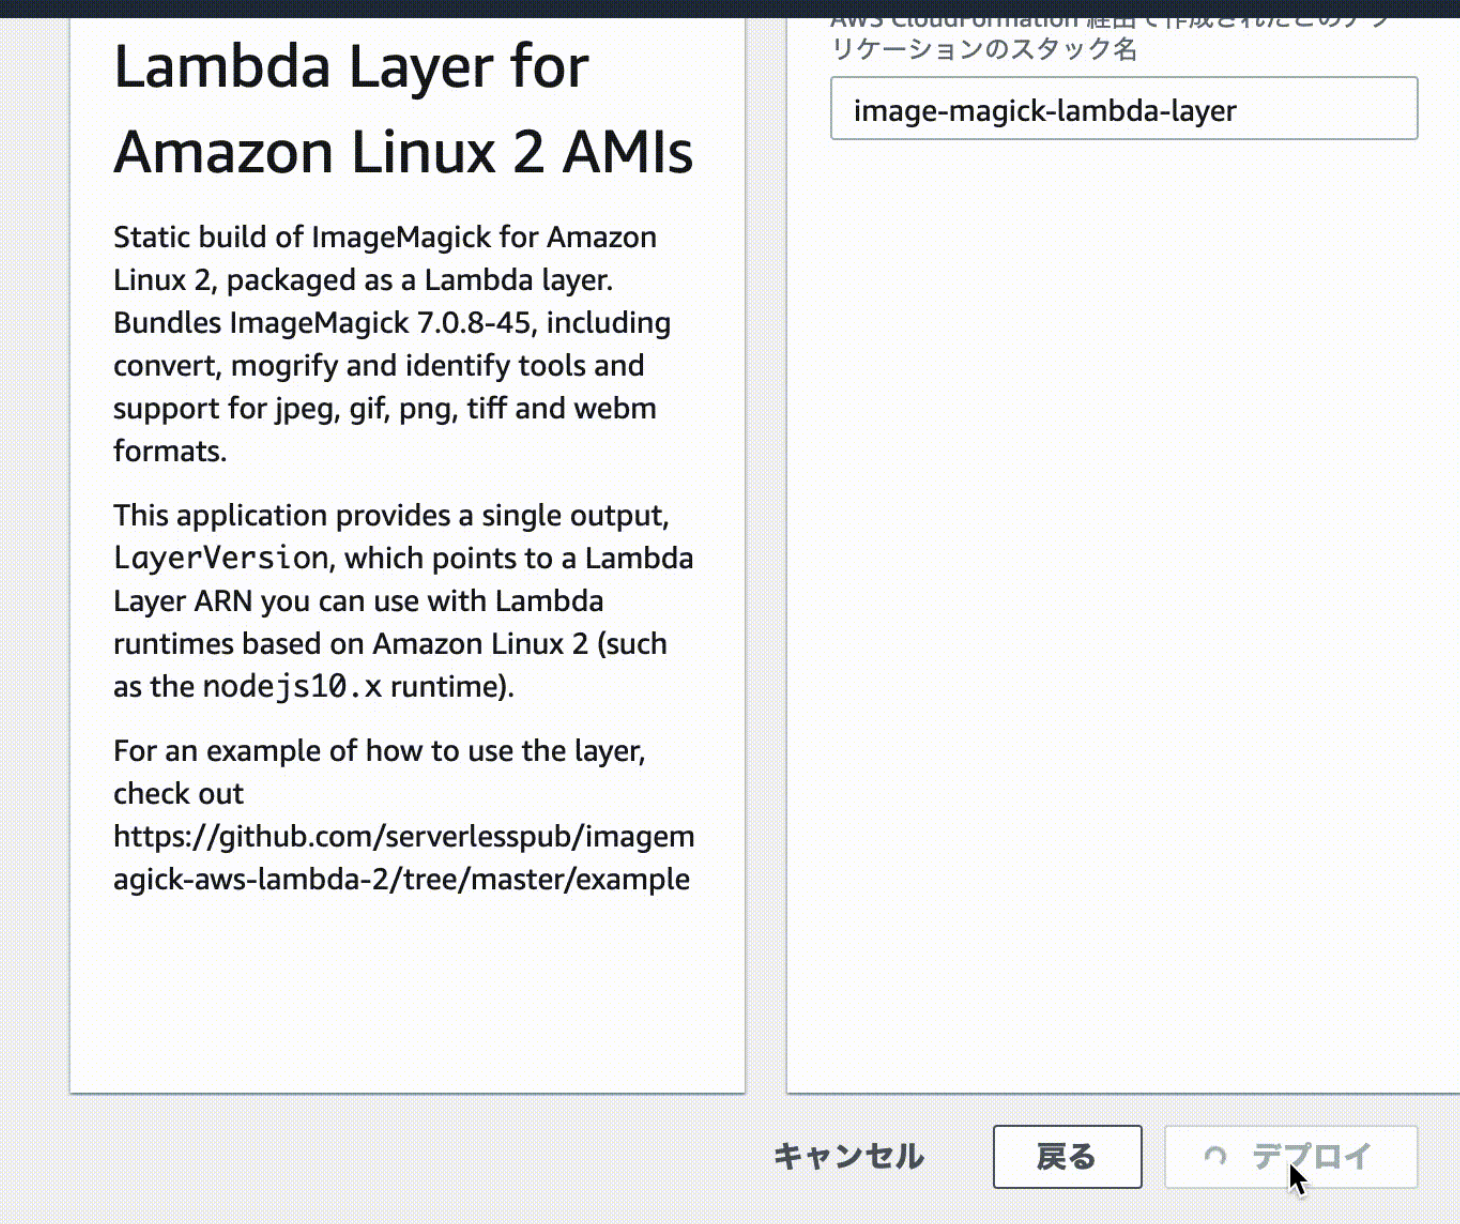
を開きDeployボタンを押す。
しかし、この時点でいきなりDeployされるわけではない。
DeployはCloudFormationによって行われる。CloudFormationのスタック名確定させたら(デフォルトでもよい)デプロイを押下。
しばらくすると、AWS LambdaのLayersに新たに`image-magick`が登録される。

Lambda関数から、Layersを選択する
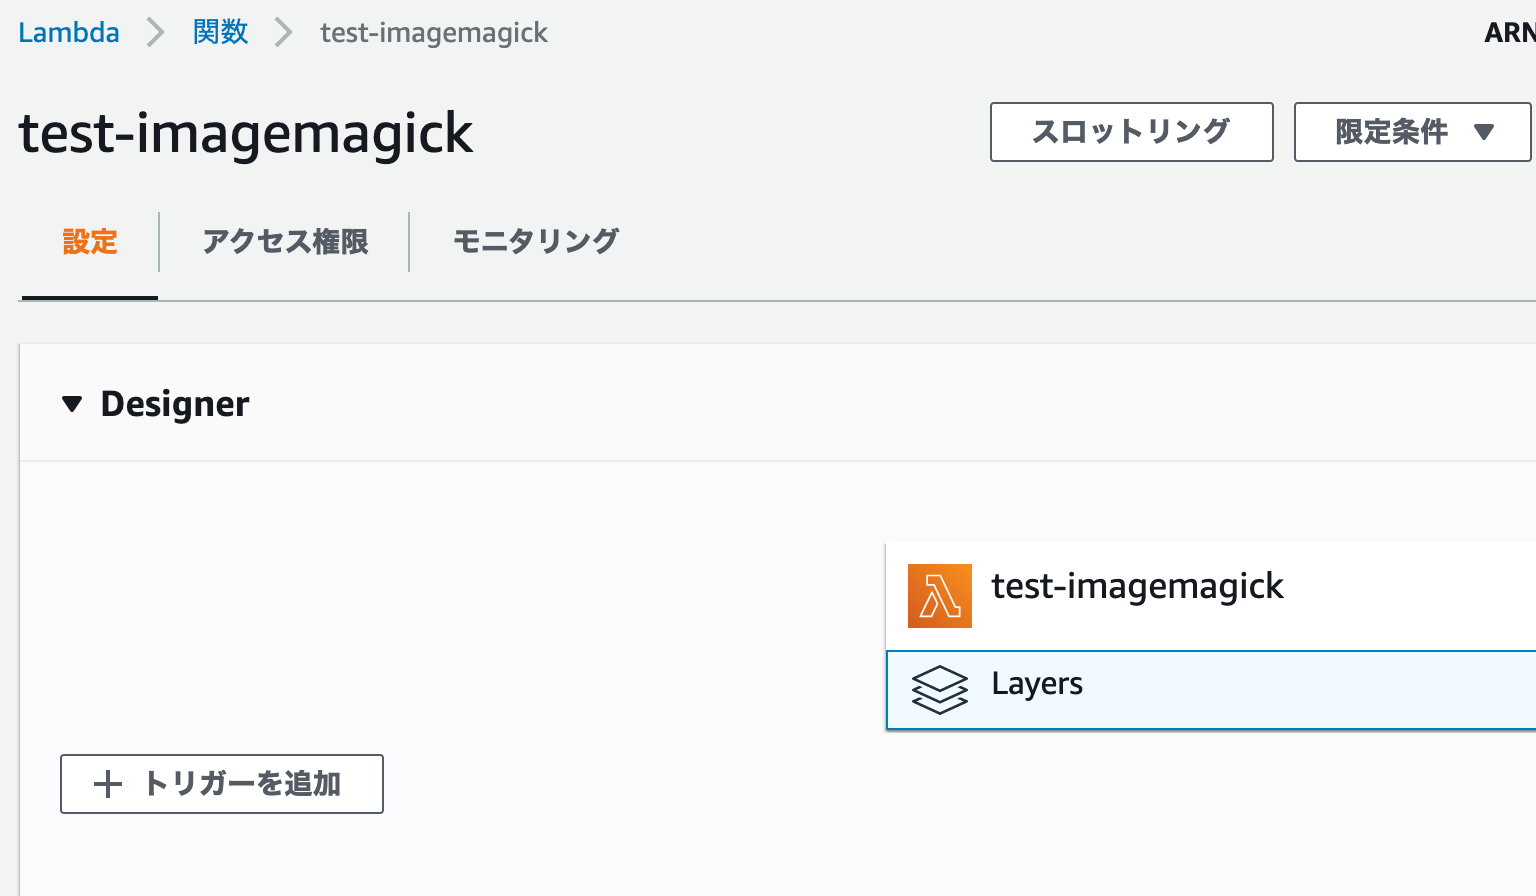
レイヤーの追加ボタンを押し、imagemagickを選択する。
レイヤーに表示されない場合は、以下のようにARNを直接入力する。
これで下準備は完了
ここからがPythonからimagemagickを使えるかの確認。
今回はシンプルにversionを表示させることで使える事にしたい。
コードはこちら。
import json
import subprocess

def lambda_handler(event, context):
    subprocess.check_call(['convert', '-version'])

    return {
        'body': json.dumps('Hello from Lambda!')
    }
subprocessを使って、Pythonから、lambdaが動いているOS側のコマンドを実行する。
imagemagickをinstallすると使えるようになる`convert`コマンドを叩く。
結果は以下の通り
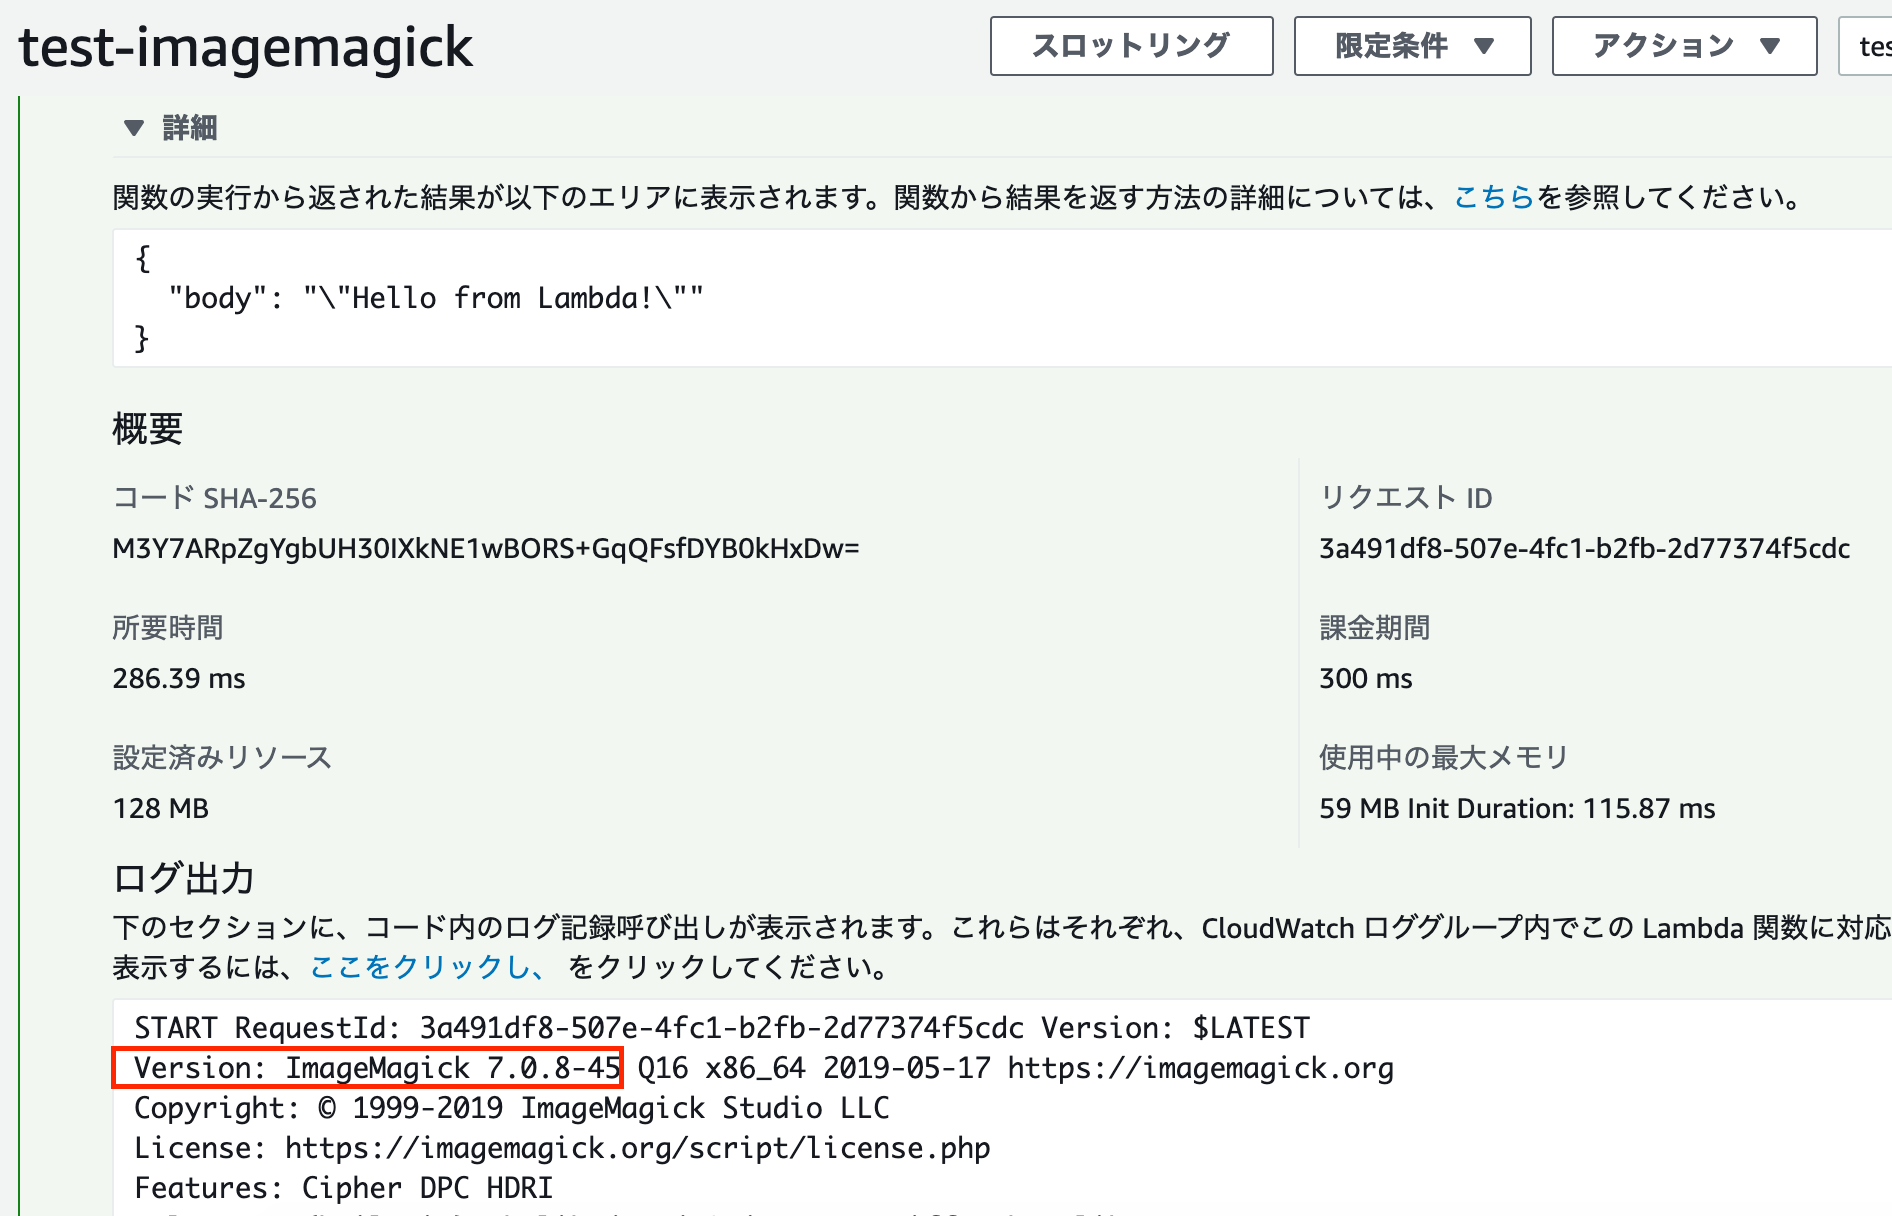
無事imagemagickのversionを確認できた。
私が実施した際はレイヤーの追加ボタンを押しても選択肢としてimagemagickが表示されなかった。
これは、CloudFormationによって作られるimagemagickのレイヤーがnode.jsに限定しているため。不便なのでpull reqを出してmergeしてもらった。
https://github.com/serverlesspub/imagemagick-aws-lambda-2/pull/18/files
今はレイヤー選択画面から互換性のあるレイヤーとして選択できるはずだ。

Cloud Storageにuploadされると、イベントフックでCloud functionsが実行されサムネイル作成処理が走る処理を作った。
gcloudコマンドのインストール。既に設定済ならスキップを。
https://cloud.google.com/storage/docs/gsutil_install?hl=ja
バケットの作成。今回は変換対象、変換後の格納先を作成。
export YOUR_INPUT_BUCKET_NAME=tsukada-input
gsutil mb gs://$YOUR_INPUT_BUCKET_NAME

export YOUR_OUTPUT_BUCKET_NAME=tsukada-output
gsutil mb gs://$YOUR_OUTPUT_BUCKET_NAME
sample productをダウンロード。deploy。
mkdir project
cd project
git clone https://github.com/GitSumito/cloudfunctions-imagemagick-on-gcp
cd cloudfunctions-imagemagick-on-gcp

# deploy
gcloud functions deploy ImageConvert --runtime go111 --trigger-bucket $YOUR_INPUT_BUCKET_NAME --set-env-vars THUMBNAILED=$YOUR_OUTPUT_BUCKET_NAME
`gcloud functions deploy`の後ろは、実行する関数名を入力する。
また、引数として `(ctx context.Context, e GCSEvent)` を受け付ける必要があるので注意。
Cloud Functionsのコマンドでは予め`–trigger-bucket`というオプションが用意されていて、任意のバケットを指定すれば簡単にイベント処理を紐付けることができる。便利。
deployコマンドを実行すると
` Deploying function (may take a while – up to 2 minutes)…⠼ `
と表示され、しばらく待つ。
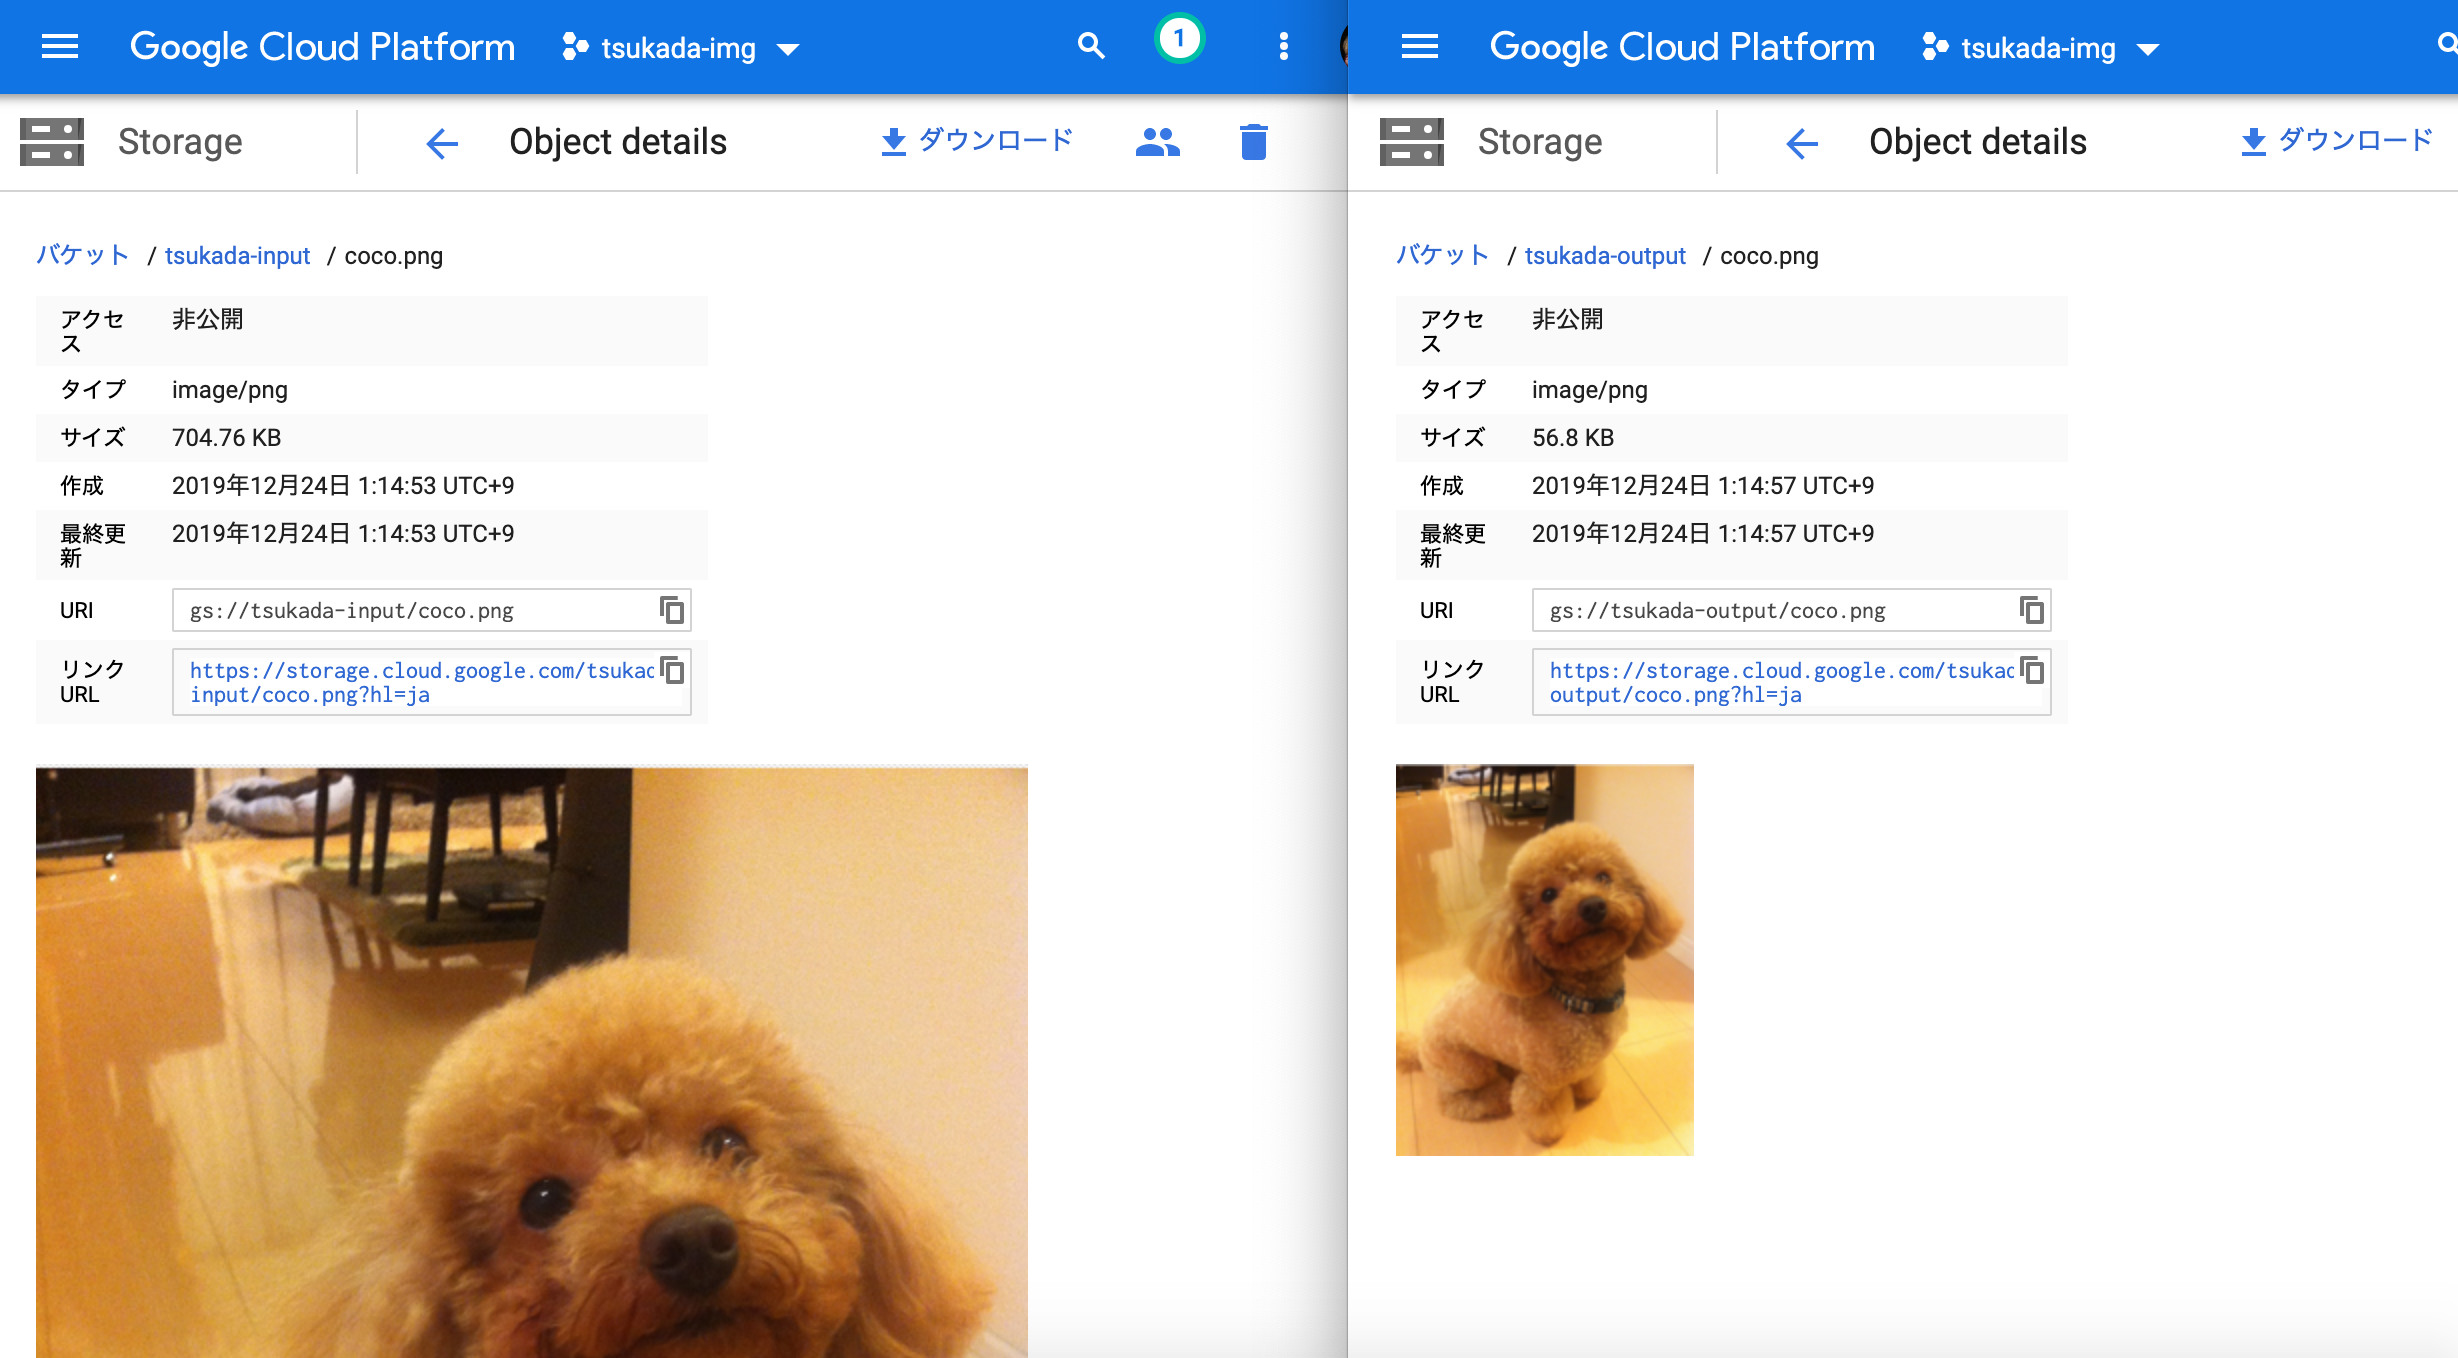
左がアップロードしたオリジナルの画像。
右側がEventを検知して、Cloud Functionsが実行され、サムネイル作成された画像。
使ってみると非常に簡単にイベント駆動処理を作ることができた。使い方次第では活躍しそう。

useradd コマンドで作成したユーザでログインできない。
Permission denied (publickey,gssapi-keyex,gssapi-with-mic). というエラーが出た際の対処。
以下の手順でアカウントを作成した。
useradd sumito.tsukada鍵の作成
ssh-keygen -t rsa作成された秘密鍵を、接続元サーバにコピー
~/.ssh/id_rsa接続元で権限は 400 とした。
いざsshしてみようとしたら
Permission denied (publickey,gssapi-keyex,gssapi-with-mic).が発生。
接続先のサーバに `.ssh/authorized_keys` が存在していない。
接続先のサーバで公開鍵をコピーし、権限を644に設定する。
cp .ssh/id_rsa.pub .ssh/authorized_keys
chmod 644 .ssh/authorized_keys
http://dqn.sakusakutto.jp/2012/01/sshpermission_denied_publickey.html

Macで撮ったmovファイルをgifに変換する方法を紹介。
気がついたらショートカット1発で動画が録れるようになっていた。Mojave から `command + shift + 5 ` で動画のスクリーンショットを録ることができる。
しかし、デフォルトではmovファイルとして出力される。mov画像は容量も大きくなるし、軽くて使い勝手の良いgitにしたいことがある。
`ffmpeg`を使う。
まだインストールしていなければインストールする。brewコマンドで一発。
brew install ffmpeg
ffmpeg -i [変換元movファイル] -r 24 [変換後gifファイル]
例)
ffmpeg -i ~/Desktop/画面収録\ 2019-12-22\ 23.47.33.mov -r 24 chrome.gif
以下の通り。非常に軽量なのでサイトに載せることも容易になった。
今日からgif多めのブログになりそうだ。
ターミナルからGoogle chromeを起動する方法を紹介。起動シェルに登録すれば1行で任意のページを開くことができる。
実は、macのopenコマンドの後ろに` -a` オプションを付ければ任意のアプリケーションで起動することができる。

起動シェルにaliasを登録する事で、もっと短くすることができる。
`vi ~/.zshrc`
以下の行を追加
alias chrome="open -a 'Google Chrome'"
その後、sourceコマンドで`~/.zshrc`を再読み込みさせる。
source ~/.zshrc
これで、`chrome https://tsukada.sumito.jp` と入力すると、上記と同じ結果になる。
例えばmacに標準搭載のPreviewなど登録すると便利。
alias preview="open -a 'Preview'"
`source` コマンドで読み込ませればよい。

awsコマンドを実施中に遭遇。versionが求められているものと違うようだ。
Encountered while executing aws command. The version seems different from what is required.
ERROR: boto3 1.9.226 has requirement botocore<1.13.0,>=1.12.226, but you'll have botocore 1.13.37 which is incompatible.
awscliを最新にする
Update awscli
pip3 install awscli --upgrade --user
その後、botocore、boto3をuninstall
Then uninstall botocore, boto3
pip3 uninstall botocore

pip3 uninstall boto3
再度botocore、boto3をinstall
Install botocore and boto3 again
pip3 install botocore

pip3 install boto3
以上。
That’s it.

firebase functionを使えるようにした際、知らず知らずにESLintを有効にしてしまっていた。今回は対処した際の方法を紹介。
firebase deploy

=== Deploying to 'auth-xxx'...

i  deploying database, functions, hosting
Running command: npm --prefix "$RESOURCE_DIR" run lint

> functions@ lint /Users/coco/Documents/firebase-auth/functions
> eslint .


/Users/coco/Documents/firebase-auth/functions/index.js
  31:7   error    Expected return with your callback function                     callback-return
  38:24  warning  Use path.join() or path.resolve() instead of + to create paths  no-path-concat

✖ 2 problems (1 error, 1 warning)

npm ERR! code ELIFECYCLE
npm ERR! errno 1
npm ERR! functions@ lint: `eslint .`
npm ERR! Exit status 1
npm ERR!
npm ERR! Failed at the functions@ lint script.
npm ERR! This is probably not a problem with npm. There is likely additional logging output above.

npm ERR! A complete log of this run can be found in:
npm ERR!     /Users/coco/.npm/_logs/2019-12-10T15_36_22_429Z-debug.log

Error: functions predeploy error: Command terminated with non-zero exit code1
darkenagy:firebase-auth coco$ cat /Users/coco/.npm/_logs/2019-12-10T15_36_22_429Z-de
ESLintで引っかかっているようだ。
そもそも、本当にESLintを有効にしたんだっけ。。
どのようにfirebase functionを有効にしたか振り返る。
firebase init functions

     ######## #### ########  ######## ########     ###     ######  ########
     ##        ##  ##     ## ##       ##     ##  ##   ##  ##       ##
     ######    ##  ########  ######   ########  #########  ######  ######
     ##        ##  ##    ##  ##       ##     ## ##     ##       ## ##
     ##       #### ##     ## ######## ########  ##     ##  ######  ########

You're about to initialize a Firebase project in this directory:

  /Users/coco/Documents/firebase-auth

Before we get started, keep in mind:

  * You are initializing in an existing Firebase project directory


=== Project Setup

First, let's associate this project directory with a Firebase project.
You can create multiple project aliases by running firebase use --add,
but for now we'll just set up a default project.

i  .firebaserc already has a default project, using auth-xxx.

=== Functions Setup

A functions directory will be created in your project with a Node.js
package pre-configured. Functions can be deployed with firebase deploy.

? What language would you like to use to write Cloud Functions? JavaScript
? Do you want to use ESLint to catch probable bugs and enforce style? Yes
✔  Wrote functions/package.json
✔  Wrote functions/.eslintrc.json
✔  Wrote functions/index.js
✔  Wrote functions/.gitignore
? Do you want to install dependencies with npm now? Yes

> protobufjs@6.8.8 postinstall /Users/coco/Documents/firebase-auth/functions/node_modules/protobufjs
> node scripts/postinstall

npm notice created a lockfile as package-lock.json. You should commit this file.
added 344 packages from 245 contributors and audited 869 packages in 11.579s
found 0 vulnerabilities


i  Writing configuration info to firebase.json...
i  Writing project information to .firebaserc...

✔  Firebase initialization complete!


   ╭───────────────────────────────────────────╮
   │                                           │
   │      Update available 7.8.1 → 7.9.0       │
   │   Run npm i -g firebase-tools to update   │
   │                                           │
   ╰───────────────────────────────────────────╯
しっかりESLintを有効にしてた。
firebase.jsonを確認する
cat firebase.json
{
  "database": {
    "rules": "database.rules.json"
  },
  "hosting": {
    "public": "public",
    "rewrites": [
      {
        "source": "**",
        "function": "firebaseAuth"
      }
    ],
    "ignore": [
      "firebase.json",
      "**/.*",
      "**/node_modules/**"
    ]
  },
  "functions": {
    "predeploy": [
      "npm --prefix \"$RESOURCE_DIR\" run lint"
    ]
  }
}
黄色の箇所を削除し、再度“` firebase deploy“`を行うと、ESlintが行われずdeployされる。