IDEA Note

  • VyOSでルーティングを設定する

    VyOSでルーティングを設定する

    はじめに introduction

    CiscoライクなオープンソースのVyOSというOSSのrouterがある。
    メインのクラウドがAWSやGCPであればVyOSを使わなくてもよいが、さくらインターネットなどで作業をする際は、まだまだVyOSのお世話になることが多い。よくある手順をまとめた。

    There is an OSS router called Cisco-like open source VyOS. If your main cloud is AWS or GCP, you don’t need to use VyOS, but when you work on the Sakura Internet, there are still many things to take care of for VyOS. Summary of common procedures

    前提条件 Prerequisites

    IPは以下の通り

    IPs are below

    IP
    Global IP 200.20.0.2
    host192.168.0.11
    接続元IP100.10.0.1

    GlobalIPを追加する Add GlobalIP

    追加するシステム(サーバ)に新しいGlobalIPを追加。今回は200.20.0.2/32を新しく追加する

    New GlobalIP is added to the system (server) to be added. Add 200.20.0.2/32 this time.
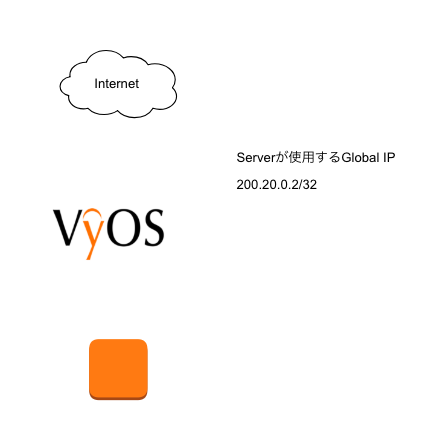
    # 使用するグローバルIPを定義
    # Define global IP to use
    set interfaces ethernet eth0 address '200.20.0.2/32'

    ポートフォワードの設定 Port forward settings

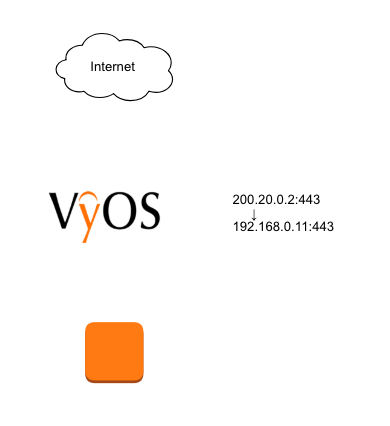
    “` 200.20.0.2:443“` に来たアクセスを、“` 192.168.0.11:443 “` に送る。今回はポートの変換を行わないが、この設定を変更することにより、サーバに届くポートを変更することが可能。

    Send the access that came at “` 200.20.0.2:443“`  to “` 192.168.0.11:443“`. This time, port conversion is not performed, but it is possible to change the port that reaches the server by changing this setting.
    set nat destination rule 100 destination address '200.20.0.2'
    set nat destination rule 100 destination port '443'
    set nat destination rule 100 inbound-interface 'eth0'
    set nat destination rule 100 protocol 'tcp'
    set nat destination rule 100 translation address '192.168.0.11'
    set nat destination rule 100 translation port '443'

    ※ rule 100の番号はユニークな値にすること

    * The rule 100 number must be a unique value.

    Firewall設定 Firewall settings

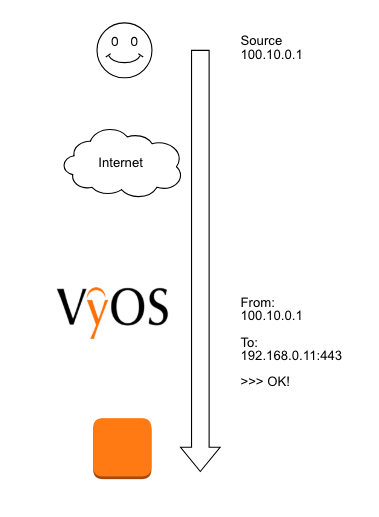
    設定したルーティングを全ての人に使わせず、限られた人のみ使わせたいことがある。今回は接続元のIPを限定する方法。 接続元 “` 100.10.0.1 “` からの接続のみ、“` 192.168.0.11:443 “` へ接続許可する

    There are times when you want to use only the limited people without using the set routing. This time, the method of limiting the connection source IP. Only connections from the connection source “` 100.10.0.1“`  are allowed to connect to “` 192.168.0.11:443“`
    # インターネット側からVyOSに対するファイアウォールを設定
    # Set firewall for VyOS from internet
    
    # 接続元100.10.0.1からの接続のみ、192.168.0.11:443へ接続許可
    set firewall name FW-eth0 rule 100 action 'accept'
    set firewall name FW-eth0 rule 100 destination address '192.168.0.11'
    set firewall name FW-eth0 rule 100 destination port '443'
    set firewall name FW-eth0 rule 100 protocol 'tcp'
    set firewall name FW-eth0 rule 100 source address '100.10.0.1'

    ※ rule 100の番号はユニークな値にすること

    * The rule 100 number must be a unique value.

    アウトバウンドのIPを設定 Set outbound IP

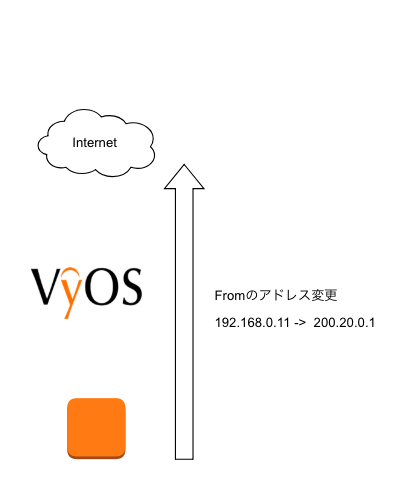
    この設定をしないと、インターネットの外にパケットが出て行くことができない。今回は“` 192.168.0.11“` のローカルIPを、グローバルIP “` 200.20.0.2 “`に変換する。

    Without this setting, packets cannot go out of the Internet. This time, the local IP of “` 192.168.0.11 “`  is converted to the global IP “` 200.20.0.2“`
    set nat source rule 100 outbound-interface 'eth0'
    set nat source rule 100 source address '192.168.0.11'
    set nat source rule 100 translation address '200.20.0.2'
    

    ※ rule 100の番号はユニークな値にすること  

    * The rule 100 number must be a unique value.
  • Docker版 redashをv5 (5.0) へupdate!

    Docker版 redashをv5 (5.0) へupdate!

    はじめに

    redash v5 (5.0)がリリースされた。

    https://discuss.redash.io/t/v5-beta-is-now-ready/2240

    今までは4.0.0-rc.1(ほぼlatest)を使っていたが、v5へupdateしたときの手順を記す。

    手順

    PostgreSQLのバックアップを取得

    docker ps
    docker exec -it redash_postgres_1 /bin/bash
    pg_dump -U postgres postgres | gzip > /tmp/redash_backup.gz
    exit
    docker cp redash_postgres_1:/tmp/redash_backup.gz .

    redashの停止

    # docker-compose -f docker-compose.production.yml down
    Stopping redash_nginx_1    ... 
    Stopping redash_server_1   ... 
    Stopping redash_postgres_1 ... 
    Stopping redash_worker_1   ... 
    Stopping redash_nginx_1    ... done
    Stopping redash_server_1   ... done
    Stopping redash_postgres_1 ... done
    Stopping redash_worker_1   ... done
    Stopping redash_redis_1    ... done
    Removing redash_nginx_1    ... done
    Removing redash_server_1   ... done
    Removing redash_postgres_1 ... done
    Removing redash_worker_1   ... done
    Removing redash_redis_1    ... done
    Removing network redash_default

    docker-composeファイルを修正

    # diff docker-compose.production.yml docker-compose.production.yml.20180808
    10c10
    <     image: redash/redash:5.0.0-beta.b4476
    ---
    >     image: redash/redash:4.0.0-rc.1
    26c26
    <     image: redash/redash:5.0.0-beta.b4476
    ---
    >     image: redash/redash:4.0.0-rc.1
    # 
    

    今までは4.0.0rc.1を使っていたが、そこを

    https://hub.docker.com/r/redash/redash/tags/

    の最新tagに変更した

    PostgreSQLをv5用にconvert

    # docker-compose -f docker-compose.production.yml run --rm server manage db upgrade
    Starting redash_redis_1 ... done
    Starting redash_postgres_1 ... done
    [2018-08-08 01:48:59,768][PID:1][INFO][root] Generating grammar tables from /usr/lib/python2.7/lib2to3/Grammar.txt
    [2018-08-08 01:48:59,850][PID:1][INFO][root] Generating grammar tables from /usr/lib/python2.7/lib2to3/PatternGrammar.txt
    [2018-08-08 01:49:03,702][PID:1][INFO][alembic.runtime.migration] Context impl PostgresqlImpl.
    [2018-08-08 01:49:03,703][PID:1][INFO][alembic.runtime.migration] Will assume transactional DDL.
    [2018-08-08 01:49:03,736][PID:1][INFO][alembic.runtime.migration] Running upgrade 969126bd800f -> 1daa601d3ae5, add columns for disabled users
    [2018-08-08 01:49:03,745][PID:1][INFO][alembic.runtime.migration] Running upgrade 1daa601d3ae5 -> d4c798575877, empty message
    [2018-08-08 01:49:03,761][PID:1][INFO][alembic.runtime.migration] Running upgrade d4c798575877 -> e7004224f284, add_org_id_to_favorites
    [2018-08-08 01:49:03,770][PID:1][INFO][alembic.runtime.migration] Running upgrade e7004224f284 -> a92d92aa678e, inline_tags
    [2018-08-08 01:49:03,777][PID:1][INFO][alembic.runtime.migration] Running upgrade a92d92aa678e -> 0f740a081d20, inline_tags
    [2018-08-08 01:49:03,782][PID:1][INFO][alembic.runtime.migration] Running upgrade 0f740a081d20 -> 71477dadd6ef, favorites_unique_constraint


    docker-composeを起動

    # docker-compose -f docker-compose.production.yml up -d
    redash_postgres_1 is up-to-date
    redash_redis_1 is up-to-date
    Creating redash_worker_1 ... 
    Creating redash_server_1 ... 
    Creating redash_worker_1
    Creating redash_server_1 ... done
    Creating redash_nginx_1 ... 
    Creating redash_nginx_1 ... done
    # 

    update確認

    今まで使っていたURLにアクセスすると、v5になったredashに接続が可能

    v5の感想

    Queriesに”Favorites”機能が追加されたり、パラメータをブラウザ経由で設定できたりと今までより使い勝手が向上。


    APIなどの機能テストをした後、本番もupdateしていきたい

    リストア(おまけ)

    今回は使わなかったけど、万が一databaseがおかしくなった場合、バックアップから復元することになる。その際の手順は以下の通り。一度drop databaseしたあと、バックアップしたデータを流し込む

    docker cp /tmp/redash_backup.gz redash_postgres_1:/tmp/redash_backup.gz
    docker exec -it redash_postgres_1 /bin/bash
    
    psql -U postgres template1
    DROP DATABASE IF EXISTS postgres;
    CREATE DATABASE postgres;
    \q
    zcat /tmp/redash_backup.gz | psql -U postgres -d postgres
    

    5.0.0-beta.b4476 から 現在のlatestへのupdate (2018/10/3 upadte)

    5.0.0.b4754 から 現在のlatestへのupdateは、docker imageを切り替えるだけで大丈夫なようだ。

    以下のように変更し、docker composeを立ち上げるだけでよい。

    <     image: redash/redash:latest
    ---
    >     image: redash/redash:5.0.0-beta.b4476

    5.0.0.b4754 から 現在のlatestへのupdateではDBのスキーマ変更は不要。


  • aws-cliでEC2を作成しEIPを付与

    aws-cliでEC2を作成しEIPを付与

    はじめに

    よく使うコマンドで、いつもはシェルでラップしているけど、ある部分だけ抜き出して実施したいこともある

    注意事項

    ある程度は環境変数にしてある。変更しやすいように

    手順

    接続するための鍵

    SSH_KEY_NAME=tsukada.pem

    マシン情報

    IMAGE_ID=ami-*****
    sequrity_group_id=sg-*****
    subnet=subnet-*****
    
    #インスタンスタイプを定義。以下はt2.smallを使うこととする
    instance_type=t2.small


    EC2作成

    サーバ作成

    aws ec2 run-instances --key-name ${SSH_KEY_NAME} --image-id ${IMAGE_ID} --count 1 --instance-type ${instance_type} --security-group-ids ${sequrity_group_id} --subnet-id ${subnet} > create-server.json


    インスタンスにタグ付け

    # 今回立ち上げたいインスタンスの名前を定義する。
    INSTANCE_NAME=tsukada-test01
    instance_id=`cat create-server.json | jq -r .Instances[].InstanceId`
    
    aws ec2 create-tags --resources $instance_id --tags Key=Name,Value=${INSTANCE_NAME}

    Elastic IP付与

    aws ec2 allocate-address --domain vpc > ElasticIP.json

    ElasticIP にタグ付け

    allocation_id=`cat ElasticIP.json| jq -r .AllocationId`
    EIP_name=tsukada-eip
    aws ec2 create-tags --resources ${allocation_id} --tags Key=Name,Value=${EIP_name}

    ElasticIPをEC2インスタンスに紐付け

    aws ec2 associate-address --allocation-id ${allocation_id} --instance ${instance_id}
    
    SERVERIP=`cat ElasticIP.json | jq -r .PublicIp`

    接続

    ssh ec2-user@ `cat ElasticIP.json | jq -r $SERVERIP`


  • “transport: dial unix /var/run/docker/containerd/docker-containerd.sock: connect: connection refused”: unknown

    “transport: dial unix /var/run/docker/containerd/docker-containerd.sock: connect: connection refused”: unknown

    TL;DR

    dockerが高不可に陥ると本エラーが発生することがある  

    This error may occur if docker falls into high

    原因 problem

    Dockerを動かしているサーバ(ホスト)と、Dockerコンテナの通信の不通

    Communication failure between the server (host) running Docker and the Docker container

    解消 deal

    いろいろ調べたけどdocker自体を再起動するしかなさそう。

    I checked a lot, but it seems that docker itself can only be restarted.

    systemctl restart docker

    恒久対策を検討中  

  • AWSでkusanagi (wordpress高速化マシン) を使う落とし穴

    AWSでkusanagi (wordpress高速化マシン) を使う落とし穴

    はじめに

    AWSで稼働しているwordpressのmysqlが突如down!
    原因を探っていくと、高負荷時にOutOfMemoruになりOOM Killerが発動したことがわかった

    原因

    AWSのkusanagi AMIはデフォルトでswap設定されていない。デフォルトでswapの設定がされてなく、memoryがフルになると、すぐにOOM killerが発動されてしまう

    対処

    swapの設定を適切にした

    cat /proc/swaps
    dd if=/dev/zero of=/swapfile bs=1M count=2048
    chmod 600 /swapfile
    mkswap /swapfile
    swapon /swapfile
    free -m

    fstabにswapfileの設定を追加

    /swapfile   swap        swap    defaults        0   0

    加えてやったこと

    かなり簡易的な監視だけど、もし必要なミドルウェアが落ちてしまった場合、自動で立ち上げるようcronをいれた。

    * * * * * ps ax |grep -v grep | grep -q mysql || sudo systemctl start mysql
    * * * * * ps ax |grep -v grep | grep -q nginx || sudo systemctl start nginx

    その後安定稼働している

  • AnsibleError: template error while templating string

    AnsibleError: template error while templating string

    はじめに

    AnsibleのTemplateモジュールはファイルの中身に変数を入れたいときなどにとても便利。
    なお、Templateモジュールの使い方については、あだちんさんのブログが非常にわかりやすい。

    Ansible’s Template module is very useful when you want to put variables in the contents of a file.
    About how to use Template module, His blog is very easy to understand.

    https://blog.adachin.me/archives/5526  

    問題 problem

    AnsibleでTemplateの転送に失敗する

    Template transfer fails with Ansible

    TASK [setup-hosts/development/web : Add Template user-setting files] ********
    failed: [dev-web] (item={u'owner': u'cron', u'path': u'home/cron/script/backupcp.sh', u'group': u'cron', u'mode': u'755'}) => {"changed": false, "item": {"group": "cron", "mode": "755", "owner": "cron", "path": "home/cron/script/backupcp.sh"}, "msg": "AnsibleError: template error while templating string: Missing end of comment tag. String: ` '<<<<<'\n"}
    

    特定の文字列がファイル内に存在しているとAnsibleに失敗するようだ

    Ansible seems to fail if a specific string exists in the file

    対処 deal

    処理の最初、最後をそれぞれ、“` {% raw %} “` 、“` {% endraw %} “` で挟む。以下のようなイメージ

    Insert “` {% raw%}  “` and “` {% endraw%} “` at the beginning and end of processing. The following image

    {% raw %}
    #!/bin/sh
    
    echo "done"
    {% endraw %}


  • Docker: E: Unable to locate package

    Docker: E: Unable to locate package

    はじめに

    サクッと環境を構築するのに、最初にapt-get updateを省略してしまったがために、ハマってしまった。今後同じ過ちを繰り返さない為にまとめ。

    実施したDockerfile

    実にシンプル。

    ubuntuを持ってきて、wgetとnodejsとnpmでも入れて動かそうと思った。いろんなサンプルファイルではしっかりとapt-get updateの記載があったが、あえて外した。そして結果的に時間を要した。

    実施したDockerfileはこちら

    #利用するUbuntuのイメージ
    FROM ubuntu:16.04
    
    # wgetをインストール
    RUN apt-get install -y wget 
    RUN apt-get install -y nodejs 
    RUN apt-get install -y npm

    docker buildコマンド

    $ docker build -t ubuntuuuu .
    Sending build context to Docker daemon   4.57GB
    Step 1/4 : FROM ubuntu:16.04
     ---> 7aa3602ab41e
    Step 2/4 : RUN apt-get install -y wget
     ---> Running in 30312e88bc87
    Reading package lists...
    Building dependency tree...
    Reading state information...
    E: Unable to locate package wget
    The command '/bin/sh -c apt-get install -y wget' returned a non-zero code: 100
    $ 

    E: Unable to locate package

    まずネットワーク周りを疑ったが、異常はなさそうだった。

    対処

    諸々installする処理の前にapt-get updateを入れたのみ。

    #利用するUbuntuのイメージ
    FROM ubuntu:16.04
    
    # wgetをインストール
    RUN apt-get update # 追加
    RUN apt-get install -y wget 
    RUN apt-get install -y nodejs 
    RUN apt-get install -y npm

    build結果

    $ docker build -t ubuntuuuu .
    Sending build context to Docker daemon   4.57GB
    Step 1/5 : FROM ubuntu:16.04
     ---> 7aa3602ab41e
    Step 2/5 : RUN apt-get update
     ---> Running in f929ef07a958
    Get:1 http://security.ubuntu.com/ubuntu xenial-security InRelease [107 kB]
    Get:2 http://archive.ubuntu.com/ubuntu xenial InRelease [247 kB]
    
    (略)
    
    Removing intermediate container fc51f9cd4a4f
     ---> 3e9f68c18e10
    Successfully built 3e9f68c18e10
    Successfully tagged ubuntuuuu:latest
    $ 


    無事Successfullyになった。

    なぜapt-get updateが無いと失敗するのか

    憶測に過ぎないが、おそらくコンテナ版ubuntuを使わせる上で、必ず最新版のパッケージでないと使わせないというubuntu側(?)の意向のように感じる

    所感

    昨年発売され賑わっているAirPods ProだがAmazonでも販売を開始するようになり、Amazonでは今はポイントもつくようになっているようだ。自分は仕事しながら音楽聞かないが、ノイズキャンセルは気になる。

  • vixie-cronはAmazon Linuxでは利用できない

    vixie-cronはAmazon Linuxでは利用できない

    はじめに

    vixie-cronは、crontabで環境変数を設定可 (PATH、SHELL、HOME等)。それに加え、
    crontabファイルの冒頭に

    MAILTO=""

    加えるだけで、全てのメール通知を止めることができる便利なツール

    Amazon linuxでは

    しかし、Amazon linuxではvixie-cronはcronieに置き換わっている。
    https://aws.amazon.com/jp/amazon-linux-ami/2011.02-release-notes/#Obsoleted_Packages:

    anacron and vixie-cron are obsoleted by cronie

    cronieはvixie-cron同様、Cron deamonとして動くようだ

    cronie-1.4.4-2.4.amzn1 – Cron daemon for executing programs at set times

    yum infoの情報は以下の通り

    $ yum info cronie
    読み込んだプラグイン:priorities, update-motd, upgrade-helper
    14 packages excluded due to repository priority protections
    インストール済みパッケージ
    名前 : cronie
    アーキテクチャー : x86_64
    バージョン : 1.4.4
    リリース : 15.8.amzn1
    容量 : 174 k
    リポジトリー : installed
    要約 : Cron daemon for executing programs at set times
    URL : https://fedorahosted.org/cronie
    ライセンス : MIT and BSD and ISC and GPLv2
    説明 : Cronie contains the standard UNIX daemon crond that runs specified programs at
    : scheduled times and related tools. It is a fork of the original vixie-cron and
    : has security and configuration enhancements like the ability to use pam and
    : SELinux.

    yum info にあるようにvixie-cronからforkされているようなので、基本的にはvixie-cronをcronieに置き換えるだけで済みそう。

  • gitで間違えたブランチに書き込んだ際の対処

    gitで間違えたブランチに書き込んだ際の対処


    gitで間違えたブランチに書き込んだ

    一度退避させた後、ブランチを切り替えて、退避した変更を引き継ぐというやり方。しょっちゅう使っているコマンドの一つ

    今回はmasterブランチに書き込んだとする

    変更点を退避する

    git stashコマンドを使うと、変更点のみ退避することが可能

    $ git stash
    Saved working directory and index state WIP on master: 1169a810 Merge branch 'route53_20180724_120035' into 'master'
    $ 


    この時点でgit statusを実行すると変更点がなくなる。
    書き込んだmasterブランチはクリアーになる

    $ git status
    On branch master
    Your branch is up-to-date with 'origin/master'.
    
    nothing to commit, working tree clean
    $

    新ブランチを作成

    本来作業したかったブランチを作成する
    今回はCloudWatchAlarmというブランチとする
    ここではcheckout -bオプションで作成と同時にgit branchを行う

    $ git checkout -b CloudWatchAlarm
    Switched to a new branch 'CloudWatchAlarm'
    $ 

    当然この時点ではgit statusを実施しても変更はない

    $ git status
    On branch CloudWatchAlarm
    nothing to commit, working tree clean
    $

    ブランチは存在している

    $ git branch
    * CloudWatchAlarm
      master
    $ 

    新ブランチに変更点を取り入れる

    git stash popコマンドで新ブランチに変更点を取り入れる

    $ git stash pop
    On branch CloudWatchAlarm
    Changes not staged for commit:
      (use "git add <file>..." to update what will be committed)
      (use "git checkout -- <file>..." to discard changes in working directory)
    
        modified:   CloudWatchAlarm.sh
    
    no changes added to commit (use "git add" and/or "git commit -a")
    Dropped refs/stash@{0} (d081148067aad39eb60500c5fbb2a32a4c6c2566)
    $ 
    

    まとめ

    # 一時退避
    git stash
    
    # チェックアウト 
    git checkout xxx
    
    # 直前のgit stashを取り出す
    git stash pop


  • パスワードやAPI keyをコンソールから入力を、より安全にする

    パスワードやAPI keyをコンソールから入力を、より安全にする

    パスワードやAPI keyを入力する度、神経を尖らせている

    今までは

    HISTCONTROL=ignorespace

    を定義し、

     export __pass=xxxxxxxx

    のように、頭にスペースを付けることで、hitoryコマンドでパスワードが表示されないよう工夫をしていた

    Qiitaを見ててreadコマンドをうまく使うやり方を知った。

    Linux 作業手順書からべた書きパスワードをなくすシンプルなアイディア
    https://qiita.com/ktooi/items/ba156bb1848c31f04949

    $ read -sp "Please input your password: " __pass; echo
    ※ パスワード は XXX を参照して入力してください。
    $ curl -u "user:${__pass}" http://example.com

    シンプル!

    前途した HISTCONTROL を使う方法はキーなどを環境変数に設定するのに使い、
    readはパスワードに使うのが綺麗な使い分けかも。