タグ: aws

  • ElasticIP を使わず EC2 instance へsshする

    コンテナが広く使われるようになり、
    EC2 instanceは徐々に使わなくなってきたが、それでもEC2 instance を使っているところはまだまだ多い。

    EC2 instance に接続するには ElasticIP を使ってssh を使うのが一般的だが、
    ElasticIP は便利なために、長年運用している間に気がつけばだんだん増えていってしまいがちである。

    踏み台サーバのような ssh しか使わないサーバであれば、極力 ElasticIP を使わずいけるようにしたい。

    接続先のAWS EC2 側の設定と、接続元のMac に設定をまとめた。

    接続先のAWS EC2 側の設定

    Linux 側に SSM agent をインストールする

    sudo yum install -y https://s3.ap-northeast-1.amazonaws.com/amazon-ssm-ap-northeast-1/latest/linux_amd64/amazon-ssm-agent.rpm


    ap-northeast-1 の場合は上記の通りだが、
    他のリーションを使うことになれば上記よしなに変更する

    IAM の設定

    EC2 インスタンスに Attach している IAM role に
    SSM のロールを Attach する。

    AmazonSSMManagedInstanceCore

    という AWS管理のポリシーがあるので、これを Attach

    Mac の設定

    直に aws コマンドをインストールしてもよいが、ローカル環境が汚れるのが嫌なので(これは完全に趣向性)
    自分はaws コマンドを叩くと、aws cli のコンテナが動くようにしている。
    公式のaws cli のコンテナは何のプラグインも入ってないプレーンな状態なので、
    session-manager-plugin をインストールした。

    vi Dockerfile

    FROM amazon/aws-cli
    
    RUN curl "https://s3.amazonaws.com/session-manager-downloads/plugin/latest/linux_64bit/session-manager-plugin.rpm" -o "session-manager-plugin.rpm" && \
        yum install -y ./session-manager-plugin.rpm


    docker image build -t ssm/aws-cli:latest .

    .ssh/config に以下の通り設定を入れる

    host bastion
        User ec2-user
        ProxyCommand sh -c "docker run --rm -i -v ~/.aws:/root/.aws -v $(pwd):/aws --env AWS_PAGER="" ssm/aws-cli ssm --profile staging start-session --target i-08afxxxxxxxxxx --document-name AWS-StartSSHSession --parameters 'portNumber=%p'"
        IdentityFile ~/.ssh/ec2-user


    他のサーバに対して同様の設定をする際は
    インスタンスID i-08afxxxxxxxxxx
    や User, IdentityFileを変更すれば良い

    また、今回は接続先が BT 環境のため --profile staging としたが、他の環境に接続する際はここを適宜変更する。

    動作確認

    今まで ElasticIP を使って接続していたことと同様に接続できることを確認できた。

    % ssh bastion                  
    Last login: Mon May  9 10:31:34 2022 from localhost
    
           __|  __|_  )
           _|  (     /   Amazon Linux 2 AMI
          ___|\___|___|
    
    https://aws.amazon.com/amazon-linux-2/
    [ec2-user@bastion ~]$
    
    
  • About the concept of S3 directories

    Introduction

    Most of the tasks in aws can be operated with aws commands. The only command I couldn’t find in the official documentation was “create folder,” which should be on the screen.

    The concept of a folder in S3

    In fact, the concept of folders does not exist in S3. https://docs.aws.amazon.com/ja_jp/AmazonS3/latest/dev/UsingMetadata.html

    The data model of Amazon S3 is a flat structure. Buckets are created and objects are stored in those buckets. There is no hierarchy of sub-buckets or sub-folders. However, a logical hierarchy can be implied by using key name prefixes and delimiters, such as those used in the Amazon S3 console.

    So, for one bucket, there are no folders in it, and it is an image of a large number of files.

    So what do we do?

    I don’t have a directory, but I’ll just dump it in directly!

    aws s3 cp sample.txt s3://test/sample-folder/


    This will create a sample-folder in the test bucket. Copy the sample.txt file into it. Reference: Breaking the illusion of “folder” in Amazon S3 and revealing its reality https://dev.classmethod.jp/cloud/aws/amazon-s3-folders/

    If multiple environments are registered in the .aws directory, it is possible to specify the profile to be loaded with -profile role-a-profile.

    If you want to copy the whole directory, use

    --recursive
    option to copy the entire directory recursively.

  • boto3 でファイルをアップロードする

    python 経由で s3 にファイルをアップロードしたくなる場合がある。

    本記事はその際のメモ。

    import boto3
    
    # 書き込み先バケット
    BUCKET = 'output-bucket'
    INPUT= 'hoge.csv'
    OUTPUT = 'hoge.csv'
    # OUTPUT = 'DIR/DIR/hoge.csv'
    
    
    s3 = boto3.resource('s3')
    s3.Bucket(BUCKET).upload_file(Filename=INPUT, Key=OUTPUT)


    ポイントとして、書き込み先の s3 のディレクトリに対し書き込むとき、存在しないディレクトリを対象にすると、存在しないディレクトリは一緒に作られる。これは、そもそも s3 にディレクトリという考えがないためである。

    それについては以下の記事を参照

  • EC2 で動いている Windows Server をアップグレードについて

    インプレースアップグレードと移行 (並行アップグレード) の 2 通りの方法が選択肢になる。

    それぞれの特徴についてまとめる

    インプレースアップグレード

    セッションレスアプリケーション用に設計されている。

    ローリングデプロイメントスケジュールを実装することにより、ステートフルアプリケーションにインプレースアップグレード方式を引き続き使用することができる。

    Windows のサーバに十分なストレージがあることを確認する必要がある。

    並行アップグレード

    アップグレードのエラーや問題がより少ない反面、インプレースアップグレードより時間がかかる。

    公式ドキュメント

    https://docs.aws.amazon.com/ja_jp/AWSEC2/latest/WindowsGuide/serverupgrade.html

  • fargate platform 1.4 で service を起動できない

    fargate platform 1.4 で service を起動できない

    今まで fargate で service を動かせていたが、platform 1.4 では動かせないことがあった。その対処法を紹介。

    pseudoTerminal option があるが、falase だと起動した後に停止してしまう。解決策としては、

    pseudoTerminal を false から true にすること。

    そもそも pseudoTerminal とは擬似ターミナル。

    Docker Remote API の コンテナを作成する際、セッションの TTy にマッピングして docker run にマッピングするオプション。

    1.3 まではこの設定が false でも動かすことができたが、1.4 ではこれを true にしないと動かすことができないようだ。

  • 手動で作った lambda を code として管理する

    手動で作った lambda を code として管理する

    tl;dr;

    既存の lambda をダウンロードし、コンソールを使わず sam を用いて管理する方法をまとめた。deploy 方法から注意事項までを記載。

    既存 lambda をダウンロード

     lambda をダウンロードすると大きく2つに分けてダウンロードすることができる。

    sam のドキュメントについてはこちら
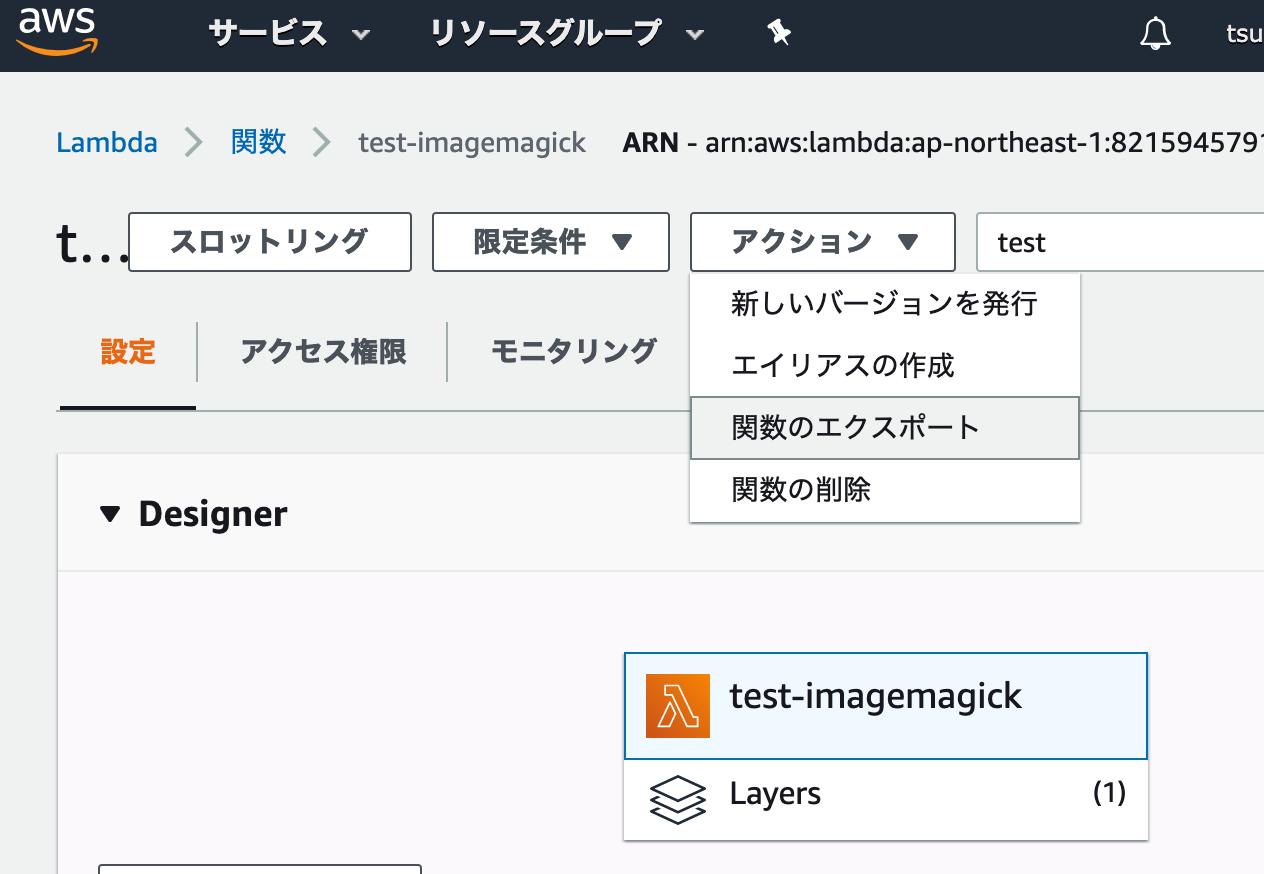
    関数のエクスポートを押下すると、


    • AWS SAM ファイルのダウンロード
    • デプロイパッケージのダウンロード

    が選択できる。

    端的に言うと

    • lambda の設定ファイル
    • プログラムのコード

    だ。両方ダウンロードする。

    sam のセットアップ

    公式ドキュメントの手順を準拠すると、 sam のインストールは以下の通りとなる。

    brew tap aws/tap
    brew install aws-sam-cli

    deploy ディレクトリの初期化

    今回は python3.8 を利用するので以下のように設定した。
    ダウンロードした zipファイル は unzipコマンドなどで解凍しておく。

    sam init
    
    
    	SAM CLI now collects telemetry to better understand customer needs.
    
    	You can OPT OUT and disable telemetry collection by setting the
    	environment variable SAM_CLI_TELEMETRY=0 in your shell.
    	Thanks for your help!
    
    	Learn More: https://docs.aws.amazon.com/serverless-application-model/latest/developerguide/serverless-sam-telemetry.html
    
    Which template source would you like to use?
    	1 - AWS Quick Start Templates
    	2 - Custom Template Location
    Choice: 1
    
    Which runtime would you like to use?
    	1 - nodejs12.x
    	2 - python3.8
    	3 - ruby2.5
    	4 - go1.x
    	5 - java11
    	6 - dotnetcore2.1
    	7 - nodejs10.x
    	8 - nodejs8.10
    	9 - python3.7
    	10 - python3.6
    	11 - python2.7
    	12 - java8
    	13 - dotnetcore2.0
    	14 - dotnetcore1.0
    Runtime: 2
    
    Project name [sam-app]: 
    
    Cloning app templates from https://github.com/awslabs/aws-sam-cli-app-templates.git
    
    AWS quick start application templates:
    	1 - Hello World Example
    	2 - EventBridge Hello World
    	3 - EventBridge App from scratch (100+ Event Schemas)
    Template selection: 1
    
    -----------------------
    Generating application:
    -----------------------
    Name: sam-app
    Runtime: python3.8
    Dependency Manager: pip
    Application Template: hello-world
    Output Directory: .
    
    Next steps can be found in the README file at ./sam-app/README.md
        
    coco@darkenagy sam % 

    ダウンロードした yamlファイル を、 template.yml と言うファイル名に変更する。

    mv test-imagemagick.yaml template.yml 

    requirements.txt も必要になるので、作成する。使わない場合でも空のファイルを用意する必要があるので、 touch するなり作成する。

    touch requirements.txt

    以下のように表示されれば成功。

    sam build
    Building resource 'testimagemagick'
    Running PythonPipBuilder:ResolveDependencies
    Running PythonPipBuilder:CopySource
    
    Build Succeeded
    
    Built Artifacts  : .aws-sam/build
    Built Template   : .aws-sam/build/template.yaml
    
    Commands you can use next
    =========================
    [*] Invoke Function: sam local invoke
    [*] Deploy: sam deploy --guided
        

    ちなみに、sam コマンドでも、.aws 配下の profile を読み込むことも可能。

    `sam build –profile cloudformation` 

    エラーが発生した場合は debugモード で確認することができる。

    sam build --debug

    あとは invoke するなり、deploy するなりすればよい。

    deploy

    `sam deploy –guided`コマンドを利用することで deploy が可能。

    % sam deploy --guided
    
    Configuring SAM deploy
    ======================
    
    	Looking for samconfig.toml :  Not found
    
    	Setting default arguments for 'sam deploy'
    	=========================================
    	Stack Name [sam-app]: 
    	AWS Region [us-east-1]: ap-northeast-1
    	#Shows you resources changes to be deployed and require a 'Y' to initiate deploy
    	Confirm changes before deploy [y/N]: y
    	#SAM needs permission to be able to create roles to connect to the resources in your template
    	Allow SAM CLI IAM role creation [Y/n]: y
    	Save arguments to samconfig.toml [Y/n]: y
    
    	Looking for resources needed for deployment: Found!
    
    		Managed S3 bucket: aws-sam-cli-managed-default-samclisourcebucket-1dc492sz2bqu7
    		A different default S3 bucket can be set in samconfig.toml
    
    	Saved arguments to config file
    	Running 'sam deploy' for future deployments will use the parameters saved above.
    	The above parameters can be changed by modifying samconfig.toml
    	Learn more about samconfig.toml syntax at 
    	https://docs.aws.amazon.com/serverless-application-model/latest/developerguide/serverless-sam-cli-config.html
    
    	Deploying with following values
    	===============================
    	Stack name                 : sam-app
    	Region                     : ap-northeast-1
    	Confirm changeset          : True
    	Deployment s3 bucket       : aws-sam-cli-managed-default-samclisourcebucket-1dc492sz2bqu7
    	Capabilities               : ["CAPABILITY_IAM"]
    	Parameter overrides        : {}
    
    Initiating deployment
    =====================
    Uploading to sam-app/9a97ece5eb5fac3dd9dff84a97110722  9611 / 9611.0  (100.00%)
    Uploading to sam-app/cac8e2252620a466ff8e4becb2d4a8ed.template  638 / 638.0  (100.00%)
    
    Waiting for changeset to be created..
    
    CloudFormation stack changeset
    ---------------------------------------------------------------------------------------------------------------------------------------------------------------------------------------------------------
    Operation                                                           LogicalResourceId                                                   ResourceType                                                      
    ---------------------------------------------------------------------------------------------------------------------------------------------------------------------------------------------------------
    + Add                                                               testimagemagick                                                     AWS::Lambda::Function                                             
    ---------------------------------------------------------------------------------------------------------------------------------------------------------------------------------------------------------
    
    Changeset created successfully. arn:aws:cloudformation:ap-northeast-1:821594579130:changeSet/samcli-deploy1578156109/01d374f5-800c-438e-b4cb-4f25d8d0bc4d
    
    
    Previewing CloudFormation changeset before deployment
    ======================================================
    Deploy this changeset? [y/N]:

    問題なければyを押す。

    2020-01-05 01:42:01 - Waiting for stack create/update to complete
    
    CloudFormation events from changeset
    ---------------------------------------------------------------------------------------------------------------------------------------------------------------------------------------------------------
    ResourceStatus                                     ResourceType                                       LogicalResourceId                                  ResourceStatusReason                             
    ---------------------------------------------------------------------------------------------------------------------------------------------------------------------------------------------------------
    CREATE_IN_PROGRESS                                 AWS::Lambda::Function                              testimagemagick                                    -                                                
    CREATE_IN_PROGRESS                                 AWS::Lambda::Function                              testimagemagick                                    Resource creation Initiated                      
    CREATE_COMPLETE                                    AWS::Lambda::Function                              testimagemagick                                    -                                                
    CREATE_COMPLETE                                    AWS::CloudFormation::Stack                         sam-app                                            -                                                
    ---------------------------------------------------------------------------------------------------------------------------------------------------------------------------------------------------------
    
    Successfully created/updated stack - sam-app in ap-northeast-1
    

    確認

    成功すれば以下の通り作成される。

    function name が、意図した名前と違う場合、明示的に指定することができる。

    AWSTemplateFormatVersion: '2010-09-09'
    Transform: 'AWS::Serverless-2016-10-31'
    Description: An AWS Serverless Specification template describing your function.
    Resources:
      testimagemagick:
        Type: 'AWS::Serverless::Function'
        Properties:
          FunctionName: test-imagemagick-123
          Handler: lambda_function.lambda_handler
          Runtime: python3.8
          CodeUri: .
          Description: ''
          MemorySize: 128
          Timeout: 3
          Role: 'arn:aws:iam::123:role/lambdaExecution'
          Layers:
            - 'arn:aws:lambda:ap-northeast-1:123:layer:image-magick:2'

    template.yml で`FunctionName`を指定する。

    再度`sam build`、 `sam deploy` を行うと、新しい lambda function に置き換わる。

    注意点

    手動で作り上げた lambda を sam を用いて上書いて管理することはできないのか。
    結論、そのままはできない。

    現在自分が動かしているものについては、手動で作った lambda は削除し、その後 sam を用いたdepoloy に切替えるなどして対応している。


    https://dev.classmethod.jp/cloud/aws/cloudformation-import-existing-resources/


    しかし、CloudForomation で手動で作成したリソースをインポートできるようになったので、これを使えばできるかも。(未確認)

    試したことある人いたら twitter でもご一報ください。