IDEA Note

  • Insufficient space in download directory /var/cache/yum/x86_64/latest/amzn-main

    Insufficient space in download directory /var/cache/yum/x86_64/latest/amzn-main

    はじめに

    docker をbuild中にErrorがでてbuildできなくなった。

     One of the configured repositories failed (Unknown),
     and yum doesn't have enough cached data to continue. At this point the only
     safe thing yum can do is fail. There are a few ways to work "fix" this:
    
         1. Contact the upstream for the repository and get them to fix the problem.
    
         2. Reconfigure the baseurl/etc. for the repository, to point to a working
            upstream. This is most often useful if you are using a newer
            distribution release than is supported by the repository (and the
            packages for the previous distribution release still work).
    
         3. Disable the repository, so yum won't use it by default. Yum will then
            just ignore the repository until you permanently enable it again or use
            --enablerepo for temporary usage:
    
                yum-config-manager --disable <repoid>
    
         4. Configure the failing repository to be skipped, if it is unavailable.
            Note that yum will try to contact the repo. when it runs most commands,
            so will have to try and fail each time (and thus. yum will be be much
            slower). If it is a very temporary problem though, this is often a nice
            compromise:
    
                yum-config-manager --save --setopt=<repoid>.skip_if_unavailable=true
    
    Insufficient space in download directory /var/cache/yum/x86_64/latest/amzn-main
        * free   0 
        * needed 100 k

    原因

    dockerのdiskがfullになっている

    対処

    使っていないdocker container、docker imageを削除する

    % docker rm `docker ps -aq`  
    38068772176a
    3888aa5447b1
    66fe52df5528
    82584720485f
    5bd5855641fd
    379ca80b607c
    e06a7e7e1e60
    5685e43f3a4a
    e3b182bbb54d
    
    % docker images | awk '{print $3}' | xargs docker rmi    
    
    Deleted: sha256:aea654465ef677aeb2b9e25eb8b9fc4a8b1aa23908c229249898cf2e2b9d4ed9
    Deleted: sha256:cf346c3b10cd250b10af438fbf1554781a38c243dd873b66dc2b07f82a8375ca
    Deleted: sha256:16ecc35ae52fd0fbc6428510ac554549227baf58e053937d5b7f6732595d057f
    Deleted: sha256:9e6d8d236b08a8f4eabdbd661d8caa80e87db8f663894334f3b19a79bdc15a0a
    Deleted: sha256:c834d9fa415cddfd8c6d3ebd726816007529348e7abd6be47cbc021955b3ea5c
    Deleted: sha256:7d2ad60980725a5cb256bafc8b0df8a0b4c41b6e754063164c793888c2239ff0
    Deleted: sha256:518874706ae596a3f69c7f6e93c9095b7284e5c20c6c1c80c8ab8b924a1049e9
    Deleted: sha256:cd217551e011d423ad768be44bab435e8bb6f7ff71276c1288ff2477541bf353


  • SQLiteで小数点が入る割り算を行う

    SQLiteで小数点が入る割り算を行う

    はじめに

    redashでQuery Resultを利用するとSQLiteを利用することができる。

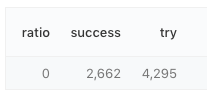
    ただし、SQLite内で割合を計算をするような処理をすると、0になってしまうので、一工夫必要になる

    SELECT success  / try  * 100 AS ratio,
           success ,
           try

    解決策

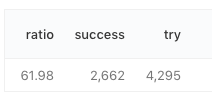
    castと、roundを利用し、小数点以下の計算に対応させる。

    SELECT round(cast(success as REAL) / cast(try as REAL),5) * 100 AS ratio,
           success as success ,
           try as try


  • go言語で時間を制御する

    go言語で時間を制御する

    はじめに

    どの言語でも時間を表示したり、プログラムに利用したいことが多々ある。

    go言語でよくつかうライブラリ time について整理する。

    公式ドキュメントはこちら

    https://godoc.org/time

    時間のフォーマットは世界中にいろいろある。

    const (
        ANSIC       = "Mon Jan _2 15:04:05 2006"
        UnixDate    = "Mon Jan _2 15:04:05 MST 2006"
        RubyDate    = "Mon Jan 02 15:04:05 -0700 2006"
        RFC822      = "02 Jan 06 15:04 MST"
        RFC822Z     = "02 Jan 06 15:04 -0700" // RFC822 with numeric zone
        RFC850      = "Monday, 02-Jan-06 15:04:05 MST"
        RFC1123     = "Mon, 02 Jan 2006 15:04:05 MST"
        RFC1123Z    = "Mon, 02 Jan 2006 15:04:05 -0700" // RFC1123 with numeric zone
        RFC3339     = "2006-01-02T15:04:05Z07:00"
        RFC3339Nano = "2006-01-02T15:04:05.999999999Z07:00"
        Kitchen     = "3:04PM"
        // Handy time stamps.
        Stamp      = "Jan _2 15:04:05"
        StampMilli = "Jan _2 15:04:05.000"
        StampMicro = "Jan _2 15:04:05.000000"
        StampNano  = "Jan _2 15:04:05.000000000"
    )

    今回は我々日本人に馴染みのあるRCF3339を利用することとする

    サンプルプログラム

    package main
    
    import (
    	"fmt"
    	"time"
    )
    
    func main() {
    	//現在時間を取得する
    	t := time.Now()
    	fmt.Println(t)
    
    	// RCF3339 formatに変換する
    	fmt.Println(t.Format(time.RFC3339))
    
    	// 年月日を取得する
    	fmt.Println(t.Year(), t.Month(), t.Day())
    
    	// 月を数字(April -> 4 に変換する)
    	fmt.Println(t.Year(), int(t.Month()), t.Day())
    
    	// 時分秒を表示
    	fmt.Println(t.Hour(), t.Minute(), t.Second())
    }

    出力結果

    2019-04-06 11:13:36.125176 +0900 JST m=+0.000473714
    2019-04-06T11:13:36+09:00
    2019 April 6
    2019 4 6
    11 13 36
    

    “` int(t.Month()) “` とすることで数字(4月など)に変換できるのは面白い。


  •  go言語で株価を取得する

     go言語で株価を取得する

    はじめに

    株価情報を取得したいことがある。

    go言語ではパッケージを利用することにより株価の取得が非常に簡単にできている。

    利用するライブラリ

    https://github.com/markcheno/go-talib

    サンプルコードや導入手順もこちらに記載されてある。

    go get github.com/markcheno/go-talib
    go get github.com/markcheno/go-quote

    実施するコマンド

    Googleの株価を取得する。

    オリジナルはこちら

    https://finance.yahoo.com/quote/GOOG?p=GOOG&.tsrc=fin-srch

    package main
    
    import (
    	"fmt"
    
    	"github.com/markcheno/go-quote"
    	"github.com/markcheno/go-talib"
    )
    
    func main() {
    	spy, _ := quote.NewQuoteFromYahoo("GOOG", "2019-04-01", "2019-04-04", quote.Daily, true)
    	fmt.Print(spy.CSV())
    	rsi2 := talib.Rsi(spy.Close, 2)
    	fmt.Println(rsi2)
    }

    実行結果

    $ go run main.go
    datetime,open,high,low,close,volume
    2019-04-01 00:00,1184.10,1196.66,1182.00,1194.43,1252500.00
    2019-04-02 00:00,1195.32,1201.35,1185.71,1200.49,827900.00
    2019-04-03 00:00,1207.48,1216.30,1200.50,1205.92,1017800.00
    [0 0 100]


  • go言語でtestingを使ったunittestの方法

    go言語でtestingを使ったunittestの方法

    はじめに

    あらゆるプログラミング言語でunitテストという作業は必要だが、今回はそのgo言語版について説明する。

    今回はgoのデフォルトの “` testing “` を使い、ライブラリのテストを行うものとする。

    ディレクトリ構成

    $ tree
    .
    ├── library
    │   ├── Ave.go # ライブラリ
    │   └── Ave_test.go # ライブラリのテストプログラム
    └── main.go # 呼び出し元

    テスト対象

    library/Ave.go は以下の通り

    package library
    
    func Average(s []int) int {
    	total := 0
    	for _, i := range s {
    		total += i
    	}
    	return int(total / len(s))
    }

    受け取ったスライスを元に、平均を計算し、

    平均値を返す

    テストプログラム

    テストプログラムは

    “` import “testing” “`

    を行い、functionは 

    “` func TestAverage(t *testing.T) “`

    という名前で作成する必要がある。

    package library
    
    import "testing"
    
    func TestAverage(t *testing.T) {
    	v := Average([]int{1, 2, 3, 4, 5})
    	if v != 3 {
    		t.Error("Expected 3, got", v)
    	}
    }

    テストプログラムを実施する

    テスト実施コマンドはこちら

    “` go test ./… “`

    現在のディレクトリで全てのテストプログラムを実施するという意味。


    テスト結果(成功時のパターン)

    $ go test ./...
    ?       github.com/GitSumito/go-sample  [no test files] # testがありません
    ok      github.com/GitSumito/go-sample/library  0.009s

    libraryのテストが完了した

    詳細を確認する際は “` -v “` オプションを実施する

    $ go test ./... -v
    ?       github.com/GitSumito/go-sample  [no test files]
    === RUN   TestAverage
    --- PASS: TestAverage (0.00s)
    PASS
    ok      github.com/GitSumito/go-sample/library  0.008s


    テスト結果(失敗時のパターン)

    テストコードをあえて失敗するよう修正する

    package library
    
    import "testing"
    
    func TestAverage(t *testing.T) {
    	v := Average([]int{1, 2, 3, 4, 5, 6, 7, 8, 9})
    	if v != 3 {
    		t.Error("Expected 3, got", v)
    	}
    }

    再度テストを実行

    $ go test ./... -v
    ?       github.com/GitSumito/go-sample  [no test files]
    === RUN   TestAverage
    --- FAIL: TestAverage (0.00s)
            Ave_test.go:8: Expected 3, got 5
    FAIL
    FAIL    github.com/GitSumito/go-sample/library  0.008s

    テストをskipさせる

    Skipを使うことによりスキップさせることが可能

    package library
    
    import "testing"
    
    var Debug bool = true
    
    func TestAverage(t *testing.T) {
    
    	if Debug {
    		t.Skip("Skip Reason")
    	}
    
    	v := Average([]int{1, 2, 3, 4, 5, 6, 7, 8, 9})
    	if v != 3 {
    		t.Error("Expected 3, got", v)
    	}
    }

    結果

    $ go test ./... -v
    ?       github.com/GitSumito/go-sample  [no test files]
    === RUN   TestAverage
    --- SKIP: TestAverage (0.00s)
            Ave_test.go:10: Skip Reason
    PASS
    ok      github.com/GitSumito/go-sample/library  0.009s

     参考情報

    本記事は、udemyの講座で得た情報をメモとしてまとめました。非常に濃厚な講義ですので、以下の講座を強くお勧めします。

    https://www.udemy.com/go-fintech/


  • redash パラメータを動的に変えてクエリを実行する

    redash パラメータを動的に変えてクエリを実行する

    Notice!

    以下の記事で redash  のみで行う方法をまとめております。
    こちらの記事をご覧ください。


    https://tsukada.sumito.jp/2020/02/28/redash-api-query-parameter/

    はじめに(本記事はサードパーティを利用した方法です)

    redashはとても便利だが、パラメータを動的に変えてクエリを投げる様な事はオフィシャルにはできない

    しかし、それもサードパーティを利用し、少し手を加える事で実現可能になる。

    検証環境の構築

    サンプルをダウンロード

    サンプルのredashと、適当なデータが入ったmysqlをダウンロード

    git clone https://github.com/GitSumito/redash-blue

    セットアップ

    docker-compose run --rm server create_db docker-compose up

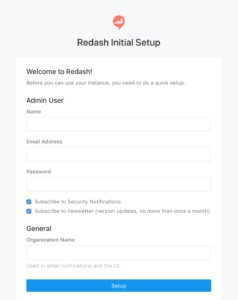
    http://localhost/setup

    へ接続するとセットアップ画面が表示されるので入力する

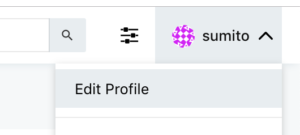
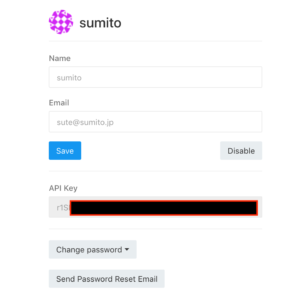
    ログインすると、右上のメニューから Edit Profile を選択する

    API keyが表示されるのでひかえる

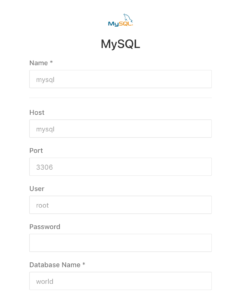
    データソースにmysqlを追加する

    設定は以下の通り

     この時、保存した際のURLを確認する

    /data_sources/1 とある。

    これがデータソース番号となる。今回登録したデータソースは1番ということがこれでわかる。

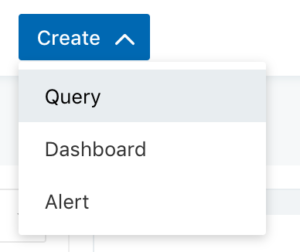
    クエリを書く

    select * from city where CountryCode = "{{code}}"

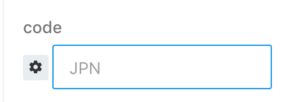
    このクエリを書くと、下にテキストボックスが表示される

    これでExecuteボタンを押すと、where CountryCode = “JPN” が実施される

    クエリを保存すると、以下の様なURLになっている

    後ろにパラメータがついているがそれは無視すると、クエリ番号1番となっていることがわかる。


    /redash_client をインストールする

    https://github.com/mozilla/redash_client

    mozillaでredash clientというものが存在している。

    これを ariarijp さんが改修してくれていた。神!

    (今現在masterに取りこめられていないが、非常に便利な機能だ)

    差分が公開されているので、これを元にオリジナルのmozillaを一部改修する

    https://github.com/mozilla/redash_client/pull/70/files#diff-80f7450d3a8b47a2d0a622873d1a67fe

    これにより、動的クエリを受け付けることができるようになる


    from pprint import pprint
    
    import os
    import pystache
    
    from redash_client.client import RedashClient
    
    api_key = os.environ["REDASH_API_KEY"]
    
    client = RedashClient(api_key)
    client.BASE_URL = 'http://127.0.0.1/'
    client.API_BASE_URL = client.BASE_URL + 'api/'
    
    query = client.get_query(1)
    sql = pystache.render(query['query'], {
      'code': 'JPN',
    })
    
    result = client.get_query_results(sql, query['data_source_id'])
    
    pprint(result, width=160)

    その後、環境変数に

    REDASH_API_KEY

    をセットする

    export REDASH_API_KEY=*********************

    実行結果

    $ python3 mozilla.py 
    [{'CountryCode': 'JPN', 'District': 'Tokyo-to', 'ID': 1532, 'Name': 'Tokyo', 'Population': 7980230},
     {'CountryCode': 'JPN', 'District': 'Kanagawa', 'ID': 1533, 'Name': 'Jokohama [Yokohama]', 'Population': 3339594},
     {'CountryCode': 'JPN', 'District': 'Osaka', 'ID': 1534, 'Name': 'Osaka', 'Population': 2595674},
     {'CountryCode': 'JPN', 'District': 'Aichi', 'ID': 1535, 'Name': 'Nagoya', 'Population': 2154376},
     {'CountryCode': 'JPN', 'District': 'Hokkaido', 'ID': 1536, 'Name': 'Sapporo', 'Population': 1790886},
     {'CountryCode': 'JPN', 'District': 'Kyoto', 'ID': 1537, 'Name': 'Kioto', 'Population': 1461974},
     {'CountryCode': 'JPN', 'District': 'Hyogo', 'ID': 1538, 'Name': 'Kobe', 'Population': 1425139},

    scriptのcodeを変えて実行

    $ python3 mozilla.py 
    [{'CountryCode': 'USA', 'District': 'New York', 'ID': 3793, 'Name': 'New York', 'Population': 8008278},
     {'CountryCode': 'USA', 'District': 'California', 'ID': 3794, 'Name': 'Los Angeles', 'Population': 3694820},
     {'CountryCode': 'USA', 'District': 'Illinois', 'ID': 3795, 'Name': 'Chicago', 'Population': 2896016},
     {'CountryCode': 'USA', 'District': 'Texas', 'ID': 3796, 'Name': 'Houston', 'Population': 1953631},
     {'CountryCode': 'USA', 'District': 'Pennsylvania', 'ID': 3797, 'Name': 'Philadelphia', 'Population': 1517550},
     {'CountryCode': 'USA', 'District': 'Arizona', 'ID': 3798, 'Name': 'Phoenix', 'Population': 1321045},

    取得結果が変わった。

    色々活用できる場がありそうだ。


  • BigQueryのpartitioned-tables(分割テーブル)について

    BigQueryのpartitioned-tables(分割テーブル)について

    はじめに

    BigQueryは従量課金のモデルのため、スキャン量に応じて課金される。

    いかにスキャン対象を減らすかが非常に重要になる。

    通常のwhereで絞ったとしても、スキャンはされてしまうため課金を回避することができない。

    そこで、partitioned-tables(分割テーブル)である。

    partitioned-tables(分割テーブル)について

    現時点で大きく2つ存在している

    • 取り込み時間分割テーブル:
      データを取り込んだ(読み込んだ)日付またはデータが着信した日付に基づいて分割されたテーブル。
    • 分割テーブルTIMESTAMP 列または DATE 列を基準にして分割されたテーブル

    詳細はこちら

    https://cloud.google.com/bigquery/docs/creating-partitioned-tables

    通常のwhereのように使い、課金額を減らすのが目的であれ”取り込み時間分割テーブル”ではなく”分割テーブル”のが便利そうだ

    やってみた

    テーブル定義

    まずはテーブル定義

    [
      {
        "mode": "NULLABLE", 
        "name": "register_day", 
        "type": "STRING"
      }, 
      {
        "mode": "NULLABLE", 
        "name": "rtime", 
        "type": "STRING"
      }, 
      {
        "mode": "NULLABLE", 
        "name": "lesson_date", 
        "type": "TIMESTAMP"
      }
    ]

    テーブルを作成する

    bq mk --table --expiration 3600 --description "This is my table" --time_partitioning_field=lesson_date --time_partitioning_type=DAY --label organization:development logs.cccc bbbb 

    lesson_dateが分割テーブルのパーティションとなる

    読み込み

    データはこんな感じ

    {"register_day":"3320915", "rtime":"tsukada", "lesson_date": "2019-04-30 14:02:04"}
    {"register_day":"3320915", "rtime":"tsukada", "lesson_date": "2019-05-30 14:02:04"}
    {"register_day":"3320915", "rtime":"tsukada", "lesson_date": "2019-06-30 14:02:04"}
    {"register_day":"3320915", "rtime":"tsukada", "lesson_date": "2019-07-30 14:02:04"}

    読み込ませる

    bq load --source_format=NEWLINE_DELIMITED_JSON logs.cccc cccc.json 

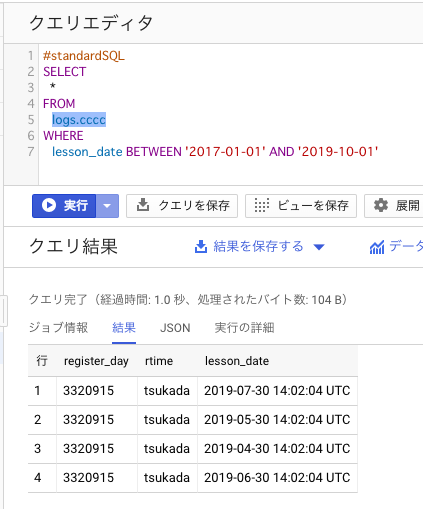
    使ってみる

    #standardSQL
    SELECT
      *
    FROM
      logs.cccc
    WHERE  
      lesson_date BETWEEN '2017-01-01' AND '2019-10-01'

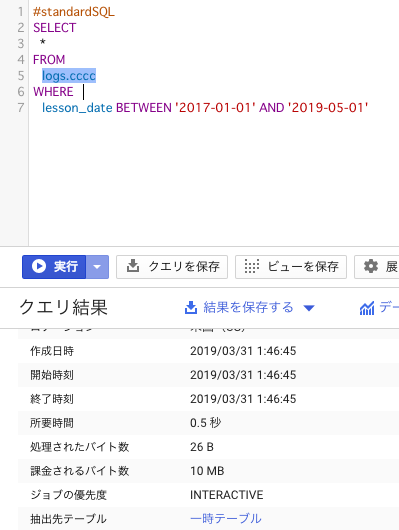
    少数のデータなので記事としては微妙だが、最小単位の10Mが課金対象となる。


  • gcloud(gcpのコマンド)をzshで使えるようにする

    gcloud(gcpのコマンド)をzshで使えるようにする

    はじめに

    gcloudコマンドしようとすると、デフォルトではbashへinstallすることが前提となってしまっている。

    zshでgcloudコマンドを設定する。

    前提

    gcloudコマンドがinstallされていること。

    まだの場合は公式手順を参考にinstallする。

    https://cloud.google.com/sdk/downloads?hl=ja

    gcloudコマンドのインストール場所を探す

    デフォルトでは “` ~/google-cloud-sdk/ “` にインストールされる

    もし存在しない場合はfindなどで調べる

    .zshrcの設定を変更

    google-cloud-sdk配下に

    “` path.zsh.inc “` というファイルがある。これを.zshrcへ追加する

    source /Users/sumito.tsukada/google-cloud-sdk/path.zsh.inc

    このような感じ。

    その後は再読み込みを実施する

    “` source ~/.zshrc “`

    以上。


  • ERROR 1064 (42000) at line 101: You have an error in your SQL syntax; check the manual that corresponds to your MySQL server version for the right syntax to use near ” at line 1

    ERROR 1064 (42000) at line 101: You have an error in your SQL syntax; check the manual that corresponds to your MySQL server version for the right syntax to use near ” at line 1

    はじめに

    mysqldumpで取得した結果を、そのままmysqlへ流しこもうとしたらエラーになった。

    実施したコマンド

    変数には適宜設定値が入る。

    やりたいことはmysqldumpでデータを取得し、標準出力で別のサーバへ流し込む。

    mysqldump -u$dbbackupuser $dbbackupname $table -h$dbbackuporiginal -p$dbbackuppass | mysql -u$dbrestoreuser -h$dbrestoreserver -p$dbrestorepass $dbrestorename 

    発生したエラー

    ERROR 1064 (42000) at line 101: You have an error in your SQL syntax; check the manual that corresponds to your MySQL server version for the right syntax to use near '' at line 1

    原因

    mysqldumpコマンドはデフォルトでmysqlの独自構文が入ってしまうことがあり、微妙なmysqlのversionの差異がこの独自構文を受け付けないことがある。

    対処

    ANSIフォーマットで出力させるオプション “` –compatible=ansi “` を追加する

     after

    mysqldump --compatible=ansi -u$dbbackupuser $dbbackupname $table -h$dbbackuporiginal -p$dbbackuppass | mysql -u$dbrestoreuser -h$dbrestoreserver -p$dbrestorepass $dbrestorename 


  • gitのリポジトリの引越しをする

    gitのリポジトリの引越しをする

    はじめに

    リポジトリが肥大化したり、プロジェクトが大きくなり、サービス名が変わったり、プロジェクトを進めていくといろいろなことがある。

    リポジトリの移行方法をまとめる。

    移行元(gitlab) -> 移行先(gitlabの別プロジェクト

    before projectからgit cloneする

    % git clone --mirror git@git.hoge.com:before/beforeproject.git
    Cloning into bare repository 'beforeproject.git'...


    移行先のプロジェクトへgit pushを行う

    % git push --mirror git@git.sumito.com:after/afterproject.git
    Counting objects: 1381, done.
    Delta compression using up to 4 threads.
    Compressing objects: 100% (520/520), done.
    Writing objects: 100% (1381/1381), 266.47 KiB | 88.82 MiB/s, done.
    Total 1381 (delta 629), reused 1381 (delta 629)
    remote: Resolving deltas: 100% (629/629), done.% 

    最後に

    今回はgitlabのプロジェクトからgitlabですが、gitlabからgithubのような場合も同様の手順でいけます。