カテゴリー: GCP

BigQuery含むGCPに関する情報を提供する

  • GCPで利用する鍵を変更する

    GCPで利用する鍵を変更する

    tl;dr;

    GCP で key を有効化する手順についてよく忘れるのでメモ。

    Activate

    service account によって払い出した key を読み込む

    gcloud auth activate-service-account --key-file xxxx.json 
    Activated service account credentials for: [xxxx@xxxx.iam.gserviceaccount.com]
    

    確認

    Cloud Storage に対する確認を行いたい場合、以下の様にアクセスする。

    gsutil ls gs://hogehoge-bucket/                


  • GCP(CloudStorage) で署名付き URL を作成する

    GCP(CloudStorage) で署名付き URL を作成する

    tl;dr;

    GCP(CloudStorage) で署名付き URL を作成する方法を紹介します。

    方法

    requirements.txt にoauth2client を記載します。

    oauth2client

    install します。

    pip3 install -r requirements.txt  

    python でスクリプトを書きます。今回は 120秒間だけ見せることにしました。

    import time
    import urllib 
    from datetime import datetime, timedelta 
    import os
    import base64 
    from oauth2client.service_account import ServiceAccountCredentials
     
    API_ACCESS_ENDPOINT = 'https://storage.googleapis.com'
     
    def sign_url(bucket, bucket_object, method, expires_after_seconds=120):
        gcs_filename = '/%s/%s' % (bucket, bucket_object)
        content_md5, content_type = None, None
     
        credentials = ServiceAccountCredentials.from_json_keyfile_name('xxxxxxxx.json')
        google_access_id = credentials.service_account_email
     
        expiration = datetime.now() + timedelta(seconds=expires_after_seconds)
        expiration = int(time.mktime(expiration.timetuple()))
     
        signature_string = '\n'.join([
            method,
            content_md5 or '',
            content_type or '',
            str(expiration),
            gcs_filename])
        _, signature_bytes = credentials.sign_blob(signature_string)
        signature = base64.b64encode(signature_bytes)
     
        query_params = {'GoogleAccessId': google_access_id,
                        'Expires': str(expiration),
                        'Signature': signature}
     
        return '{endpoint}{resource}?{querystring}'.format(
            endpoint=API_ACCESS_ENDPOINT,
            resource=gcs_filename,
            querystring=urllib.parse.urlencode(query_params))
     
     
    if __name__ == '__main__':
        url = sign_url('project-name', 'test/coco.png', 'GET')
        print(url)

    黄色で塗った部分が、主に変更する場所になります。

    結果

    python3 main.py                               
    https://storage.googleapis.com/project/test/coco.png?GoogleAccessId=signed-url%40project&Expires=1581540902&Signature=xxxx


    • 左側が有効期限内にアクセスした時に見える結果です
    • 右側が有効期限が過ぎた際に見える結果です

    参考情報

    https://cloudpack.media/45121


  • ERROR: (gcloud.auth.application-default.print-access-token) The Application Default Credentials are not available.

    ERROR: (gcloud.auth.application-default.print-access-token) The Application Default Credentials are not available.

    はじめに

    gcloud コマンドで key を取得しようとした際、The Application Default Credentials are not available.と出た時の対処法についてまとめます。

    原因と対処

    default のkeyが読み込めていないことが濃厚です。
    対処法としては、環境変数でgcp の key の場所を定義するだけでパスすることができます。

    詳細

    % curl -X POST \
    -H "Authorization: Bearer "$(gcloud auth application-default print-access-token) \
    -H "Content-Type: application/json; charset=utf-8" \
    -d @request.json \
    https://translation.googleapis.com/language/translate/v2
    ERROR: (gcloud.auth.application-default.print-access-token) The Application Default Credentials are not available. They are available if running in Google Compute Engine. Otherwise, the environment variable GOOGLE_APPLICATION_CREDENTIALS must be defined pointing to a file defining the credentials. See https://developers.google.com/accounts/docs/application-default-credentials for more information.
    {
      "error": {
        "code": 403,
        "message": "The request is missing a valid API key.",
        "errors": [
          {
            "message": "The request is missing a valid API key.",
            "domain": "global",
            "reason": "forbidden"
          }
        ],
        "status": "PERMISSION_DENIED"
      }
    }

    `gcloud auth application-default print-access-token`  がうまく動いていないようですね。

    gcloud auth application-default print-access-token

    ERROR: (gcloud.auth.application-default.print-access-token) The Application Default Credentials are not available. They are available if running in Google Compute Engine. Otherwise, the environment variable GOOGLE_APPLICATION_CREDENTIALS must be defined pointing to a file defining the credentials. See https://developers.google.com/accounts/docs/application-default-credentials for more information.

    環境変数 `GOOGLE_APPLICATION_CREDENTIALS` に gcp の key を登録します。

    export GOOGLE_APPLICATION_CREDENTIALS=~/.ssh/gcp.json

     再度 `gcloud auth application-default print-access-token` を叩くとtoken を取得することができます。


  • Cloud functionsを使ってCloud Storageに画像がuploadされるとサムネイルを作成する

    Cloud functionsを使ってCloud Storageに画像がuploadされるとサムネイルを作成する

    tl;dr;

    Cloud Storageにuploadされると、イベントフックでCloud functionsが実行されサムネイル作成処理が走る処理を作った。

    事前準備

    gcloudコマンドのインストール。既に設定済ならスキップを。

    https://cloud.google.com/storage/docs/gsutil_install?hl=ja

    バケットの作成。今回は変換対象、変換後の格納先を作成。

    export YOUR_INPUT_BUCKET_NAME=tsukada-input
    gsutil mb gs://$YOUR_INPUT_BUCKET_NAME
    
    export YOUR_OUTPUT_BUCKET_NAME=tsukada-output
    gsutil mb gs://$YOUR_OUTPUT_BUCKET_NAME

    deploy

    sample productをダウンロード。deploy。

    mkdir project
    cd project
    git clone https://github.com/GitSumito/cloudfunctions-imagemagick-on-gcp
    cd cloudfunctions-imagemagick-on-gcp
    
    # deploy
    gcloud functions deploy ImageConvert --runtime go111 --trigger-bucket $YOUR_INPUT_BUCKET_NAME --set-env-vars THUMBNAILED=$YOUR_OUTPUT_BUCKET_NAME

    `gcloud functions deploy`の後ろは、実行する関数名を入力する。

    また、引数として `(ctx context.Context, e GCSEvent)` を受け付ける必要があるので注意。

    Cloud Functionsのコマンドでは予め`–trigger-bucket`というオプションが用意されていて、任意のバケットを指定すれば簡単にイベント処理を紐付けることができる。便利。

    deployコマンドを実行すると

    ` Deploying function (may take a while – up to 2 minutes)…⠼     `

     と表示され、しばらく待つ。

    result

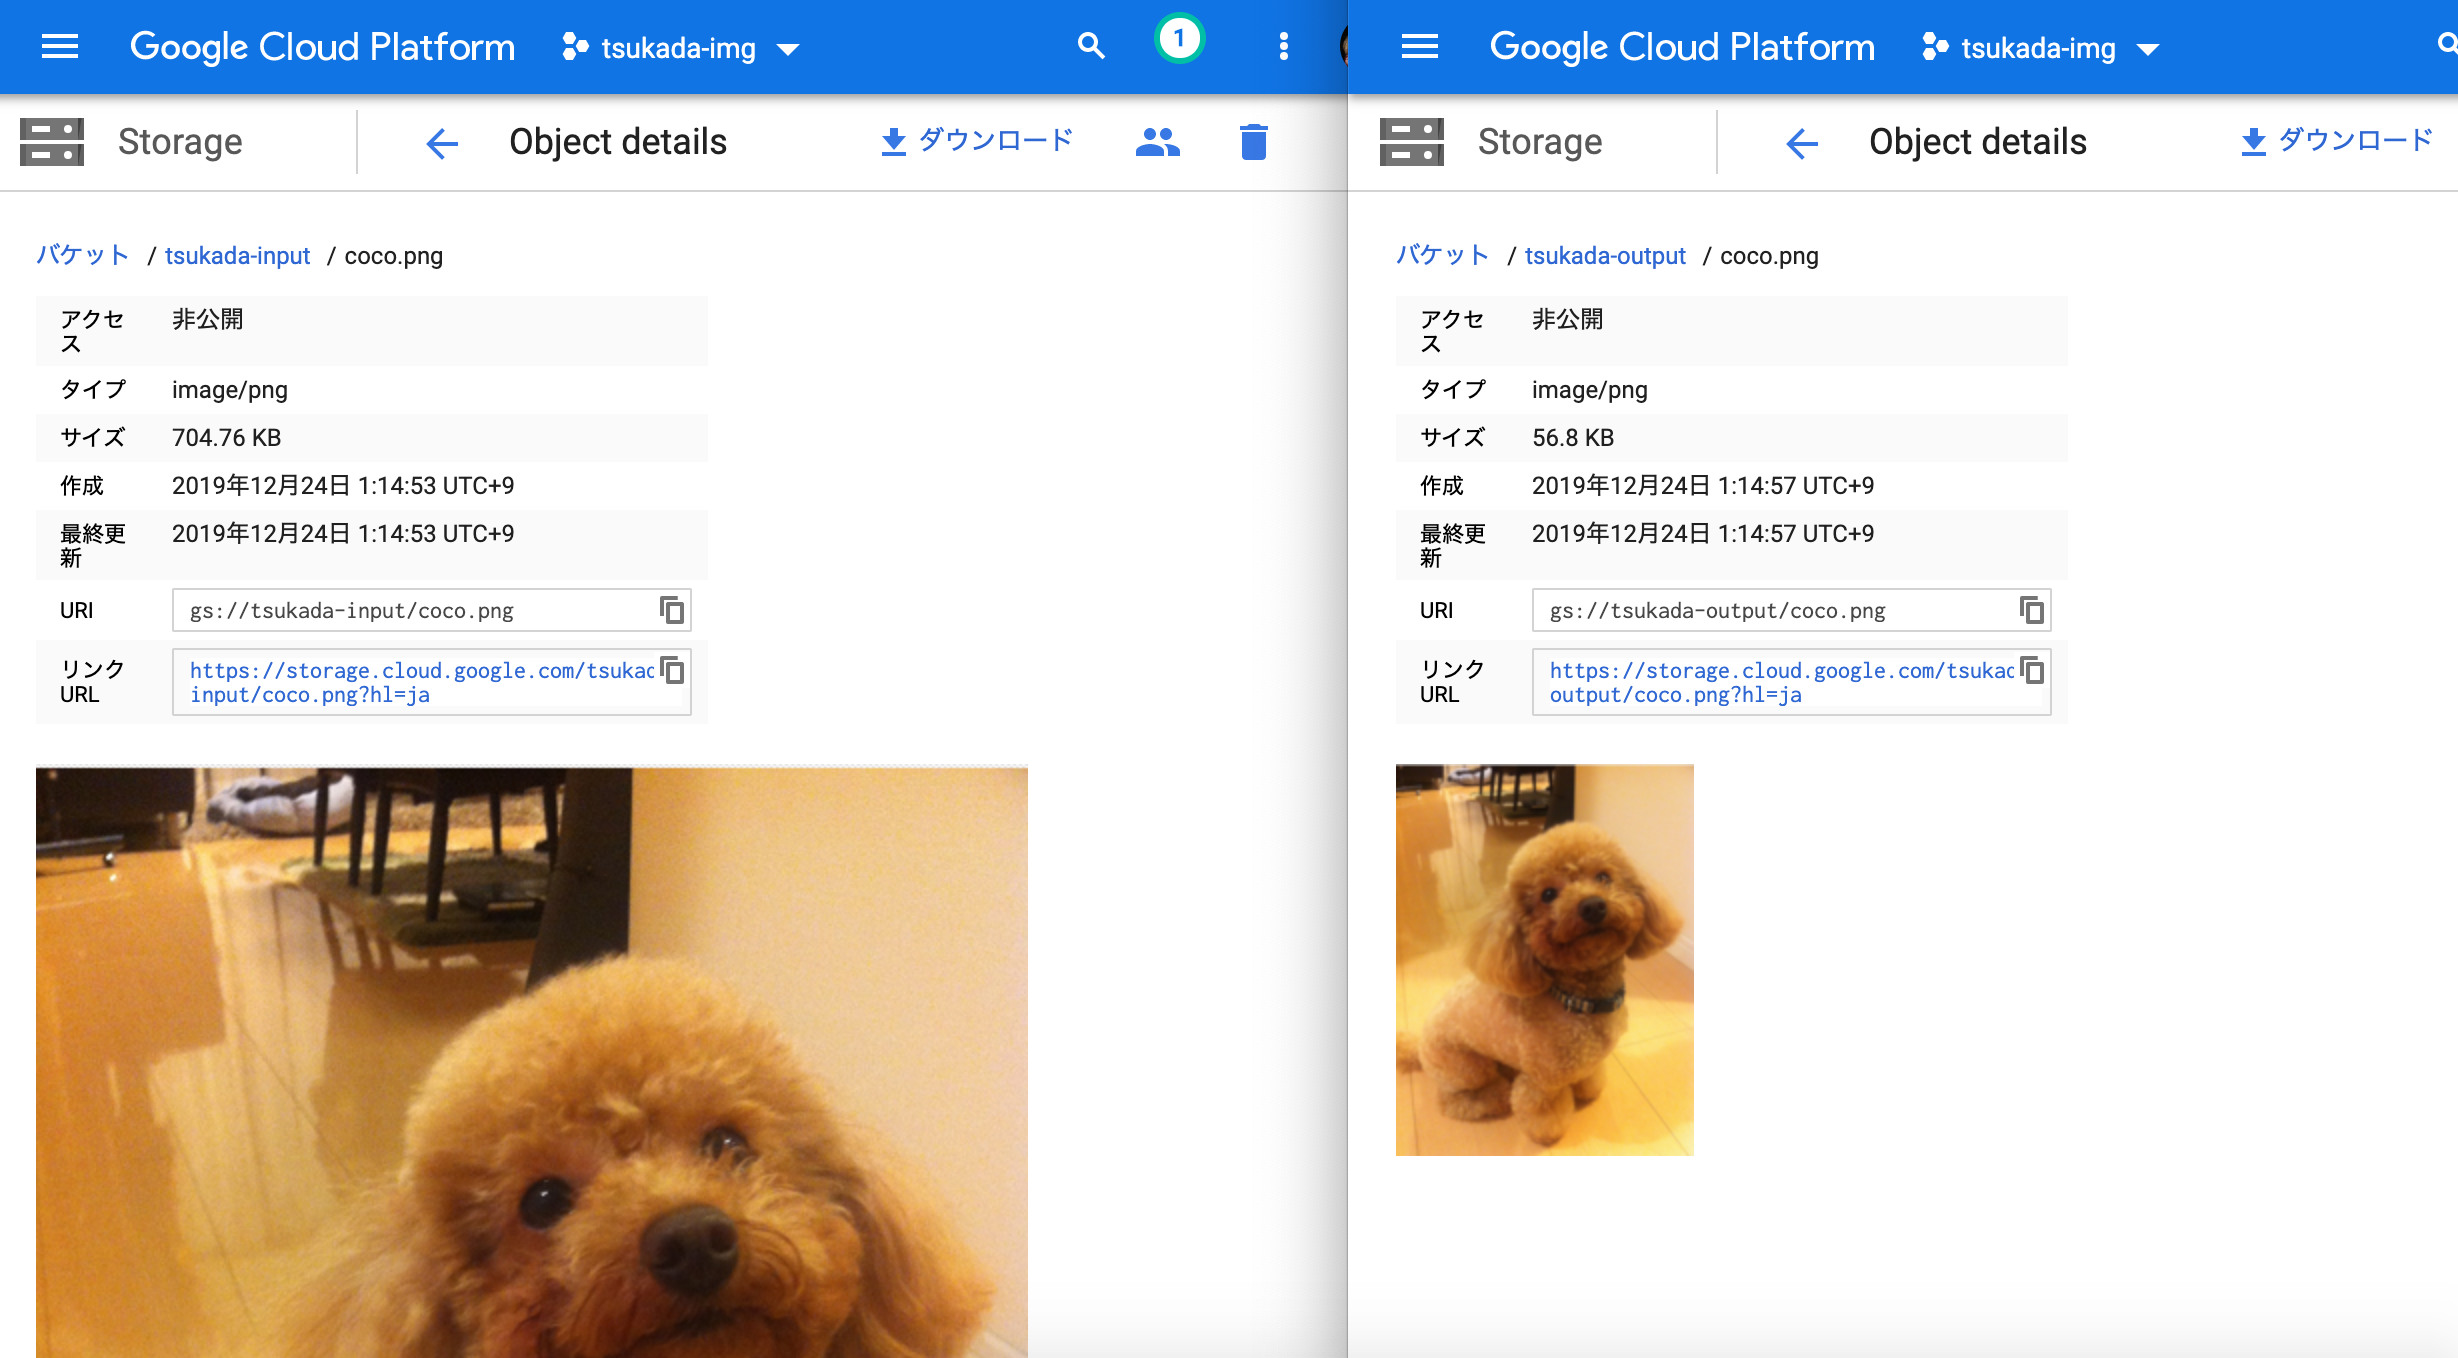
    左がアップロードしたオリジナルの画像。

    右側がEventを検知して、Cloud Functionsが実行され、サムネイル作成された画像。

    使ってみると非常に簡単にイベント駆動処理を作ることができた。使い方次第では活躍しそう。


  • firebase deploy時のeslintを無効にする

    firebase deploy時のeslintを無効にする

    はじめに

    firebase functionを使えるようにした際、知らず知らずにESLintを有効にしてしまっていた。今回は対処した際の方法を紹介。

    問題

    firebase deploy
    
    === Deploying to 'auth-xxx'...
    
    i  deploying database, functions, hosting
    Running command: npm --prefix "$RESOURCE_DIR" run lint
    
    > functions@ lint /Users/coco/Documents/firebase-auth/functions
    > eslint .
    
    
    /Users/coco/Documents/firebase-auth/functions/index.js
      31:7   error    Expected return with your callback function                     callback-return
      38:24  warning  Use path.join() or path.resolve() instead of + to create paths  no-path-concat
    
    ✖ 2 problems (1 error, 1 warning)
    
    npm ERR! code ELIFECYCLE
    npm ERR! errno 1
    npm ERR! functions@ lint: `eslint .`
    npm ERR! Exit status 1
    npm ERR! 
    npm ERR! Failed at the functions@ lint script.
    npm ERR! This is probably not a problem with npm. There is likely additional logging output above.
    
    npm ERR! A complete log of this run can be found in:
    npm ERR!     /Users/coco/.npm/_logs/2019-12-10T15_36_22_429Z-debug.log
    
    Error: functions predeploy error: Command terminated with non-zero exit code1
    darkenagy:firebase-auth coco$ cat /Users/coco/.npm/_logs/2019-12-10T15_36_22_429Z-de

    ESLintで引っかかっているようだ。

    ふりかえり

    そもそも、本当にESLintを有効にしたんだっけ。。
    どのようにfirebase functionを有効にしたか振り返る。

    firebase init functions
    
         ######## #### ########  ######## ########     ###     ######  ########
         ##        ##  ##     ## ##       ##     ##  ##   ##  ##       ##
         ######    ##  ########  ######   ########  #########  ######  ######
         ##        ##  ##    ##  ##       ##     ## ##     ##       ## ##
         ##       #### ##     ## ######## ########  ##     ##  ######  ########
    
    You're about to initialize a Firebase project in this directory:
    
      /Users/coco/Documents/firebase-auth
    
    Before we get started, keep in mind:
    
      * You are initializing in an existing Firebase project directory
    
    
    === Project Setup
    
    First, let's associate this project directory with a Firebase project.
    You can create multiple project aliases by running firebase use --add, 
    but for now we'll just set up a default project.
    
    i  .firebaserc already has a default project, using auth-xxx.
    
    === Functions Setup
    
    A functions directory will be created in your project with a Node.js
    package pre-configured. Functions can be deployed with firebase deploy.
    
    ? What language would you like to use to write Cloud Functions? JavaScript
    ? Do you want to use ESLint to catch probable bugs and enforce style? Yes
    ✔  Wrote functions/package.json
    ✔  Wrote functions/.eslintrc.json
    ✔  Wrote functions/index.js
    ✔  Wrote functions/.gitignore
    ? Do you want to install dependencies with npm now? Yes
    
    > protobufjs@6.8.8 postinstall /Users/coco/Documents/firebase-auth/functions/node_modules/protobufjs
    > node scripts/postinstall
    
    npm notice created a lockfile as package-lock.json. You should commit this file.
    added 344 packages from 245 contributors and audited 869 packages in 11.579s
    found 0 vulnerabilities
    
    
    i  Writing configuration info to firebase.json...
    i  Writing project information to .firebaserc...
    
    ✔  Firebase initialization complete!
    
    
       ╭───────────────────────────────────────────╮
       │                                           │
       │      Update available 7.8.1 → 7.9.0       │
       │   Run npm i -g firebase-tools to update   │
       │                                           │
       ╰───────────────────────────────────────────╯
    

    しっかりESLintを有効にしてた。

    現在の設定を確認

    firebase.jsonを確認する

    cat firebase.json 
    {
      "database": {
        "rules": "database.rules.json"
      },
      "hosting": {
        "public": "public",
        "rewrites": [
          {
            "source": "**",
            "function": "firebaseAuth"
          }
        ],
        "ignore": [
          "firebase.json",
          "**/.*",
          "**/node_modules/**"
        ]
      },
      "functions": {
        "predeploy": [
          "npm --prefix \"$RESOURCE_DIR\" run lint"
        ]
      }
    }

    黄色の箇所を削除し、再度“` firebase deploy“`を行うと、ESlintが行われずdeployされる。

    参考情報

  • Firebase AuthenticationにFacebook Accountでログインする

    Firebase AuthenticationにFacebook Accountでログインする

    はじめに

    Firebase AuthenticationにFacebook Accountでログインを有効にさせる方法をまとめます。

    設定

    Facebook for Developers(以下Facebook)にログインして、アカウントのセットアップをします

    https://developers.facebook.com/?locale=ja_JP


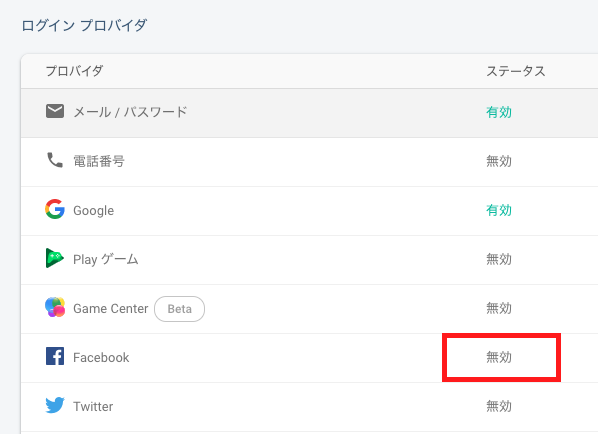
    Firebaseのログインプロバイダの画面で「Facebookログイン」を有効にします。

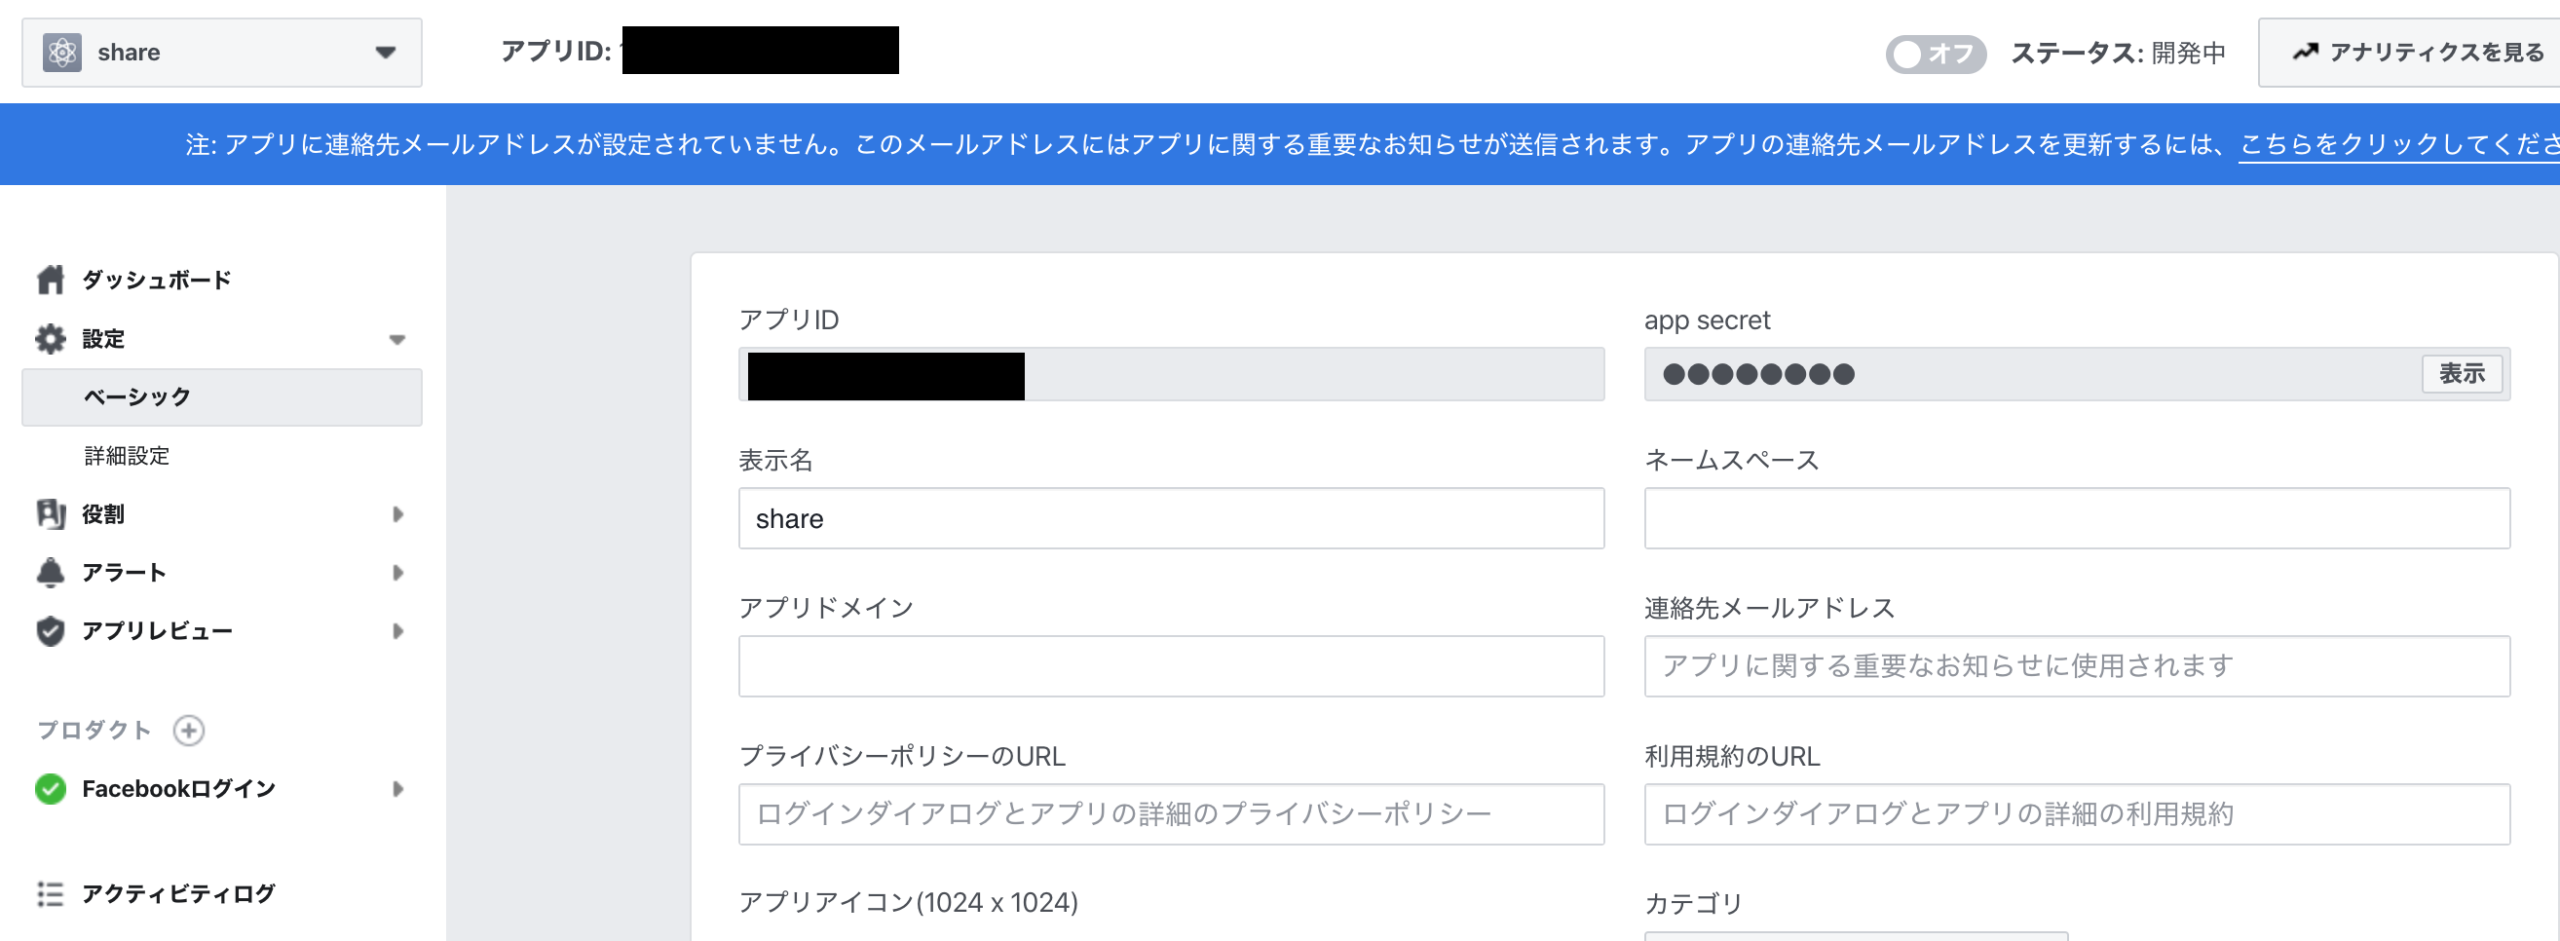
    Facebook側のページに戻り、左側の設定のからベーシックを押し、アプリID/app secretを確認します。

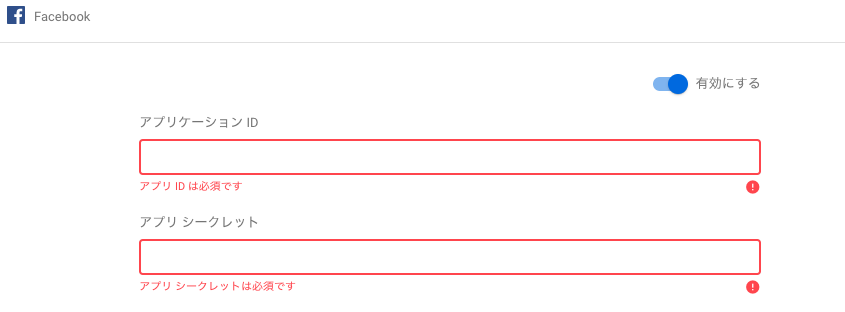
    Firebase側に戻り、それぞれ埋めます。

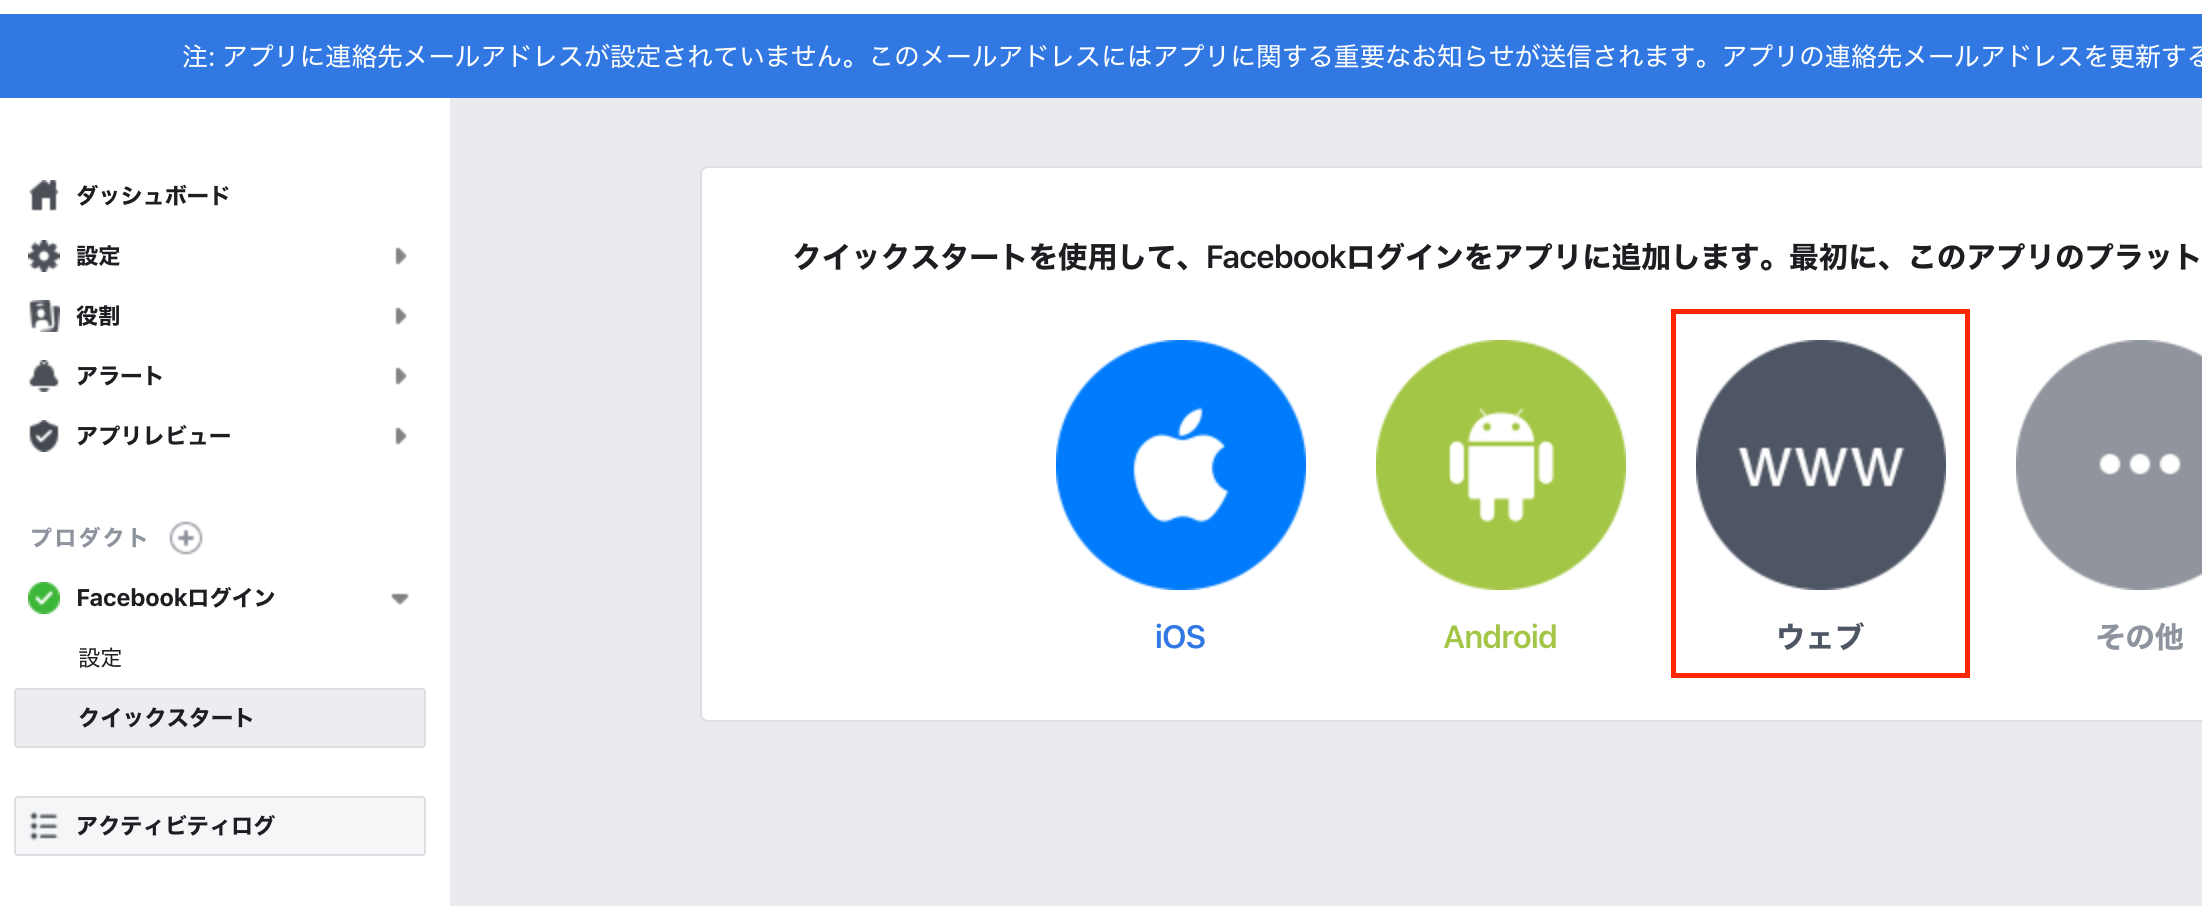
    Facebookでクイックスタートからウェブを選択します。

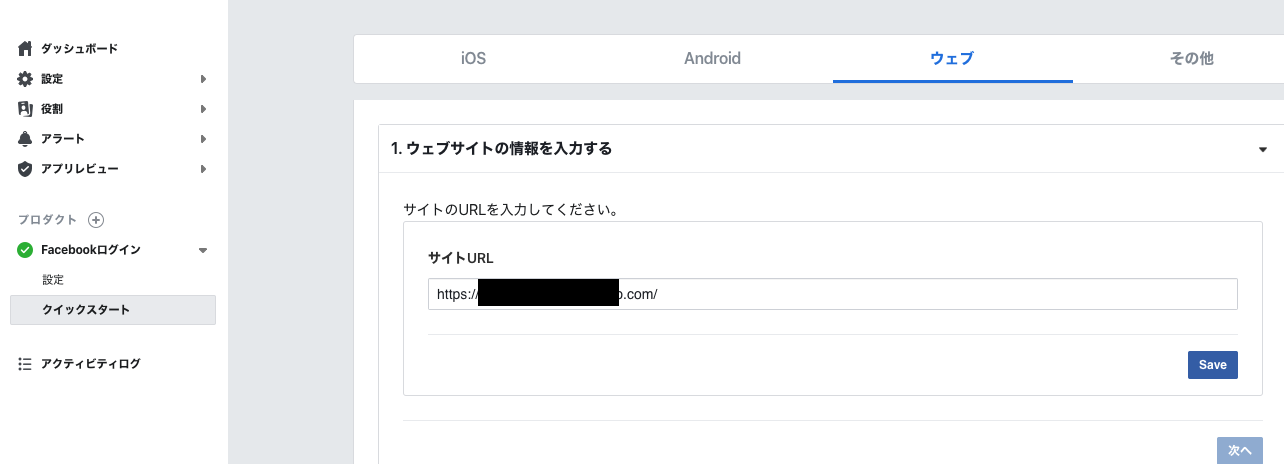
    WebアプリケーションのURLを入力。

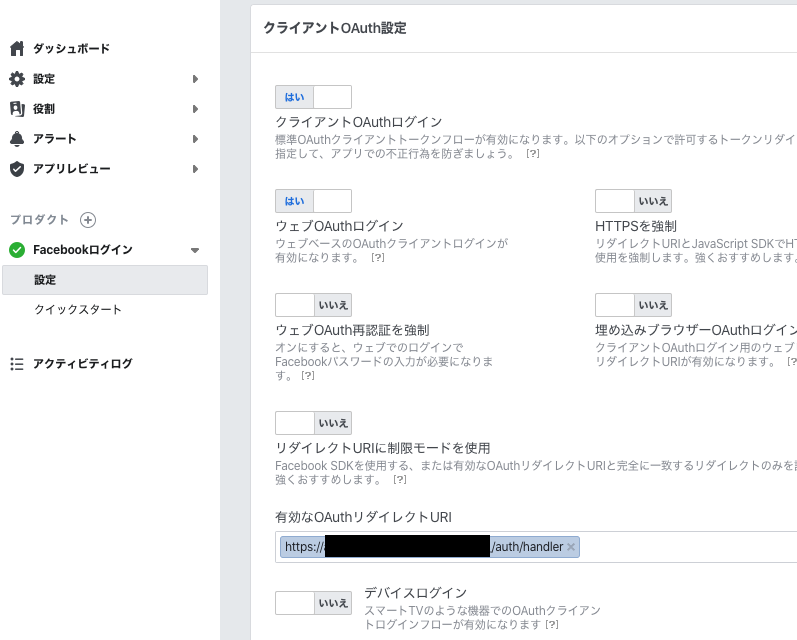
    Firebaseの画面に表示されているOAuth リダイレクト URI を Facebook アプリの設定に追加します。

    以上で設定は完了です。

    Signin

    自作のアプリケーションからSigninします

    Facebookログインを試みると、

    よく見るFacebookの承認画面が表示され、ログインを押すと、無事アプリケーションにログインできるようになりました。

    注意すべきところ

    接続元の環境がhttp

    ローカルで開発しているので、http://localhost/ で確認していたのですが、httpでFacebookログインを試みると

    Facebook側で以下のようなアラートが出て、invalid_request

    無視して進めたところ認証エラーが。

    Error getting verification code from facebook.com response: error=invalid_request&error_code=191&error_description

    というエラーが表示されるようになりました。

    その対策としてFirebase Hostingへdeployして、httpsで接続できるようにした上でFacebookとの接続をするようにしました。

    メールアドレスの重複

    既に他のソーシャルアカウントでログインした後に、Facebookアカウントでログインを試みるとエラーが。。

    An account already exists with the same email address but different sign-in credentialsSign in using a provider associated with this email address

    どうやらFirebaseのデフォルトの動きとしてソーシャルアカウントに登録したメールアドレスが、他のソーシャルアカウントで使っている場合、「既に登録してある」と見なされアカウント作成できないようです。

    もちろんFirebaseで承認したアカウントを削除することで、Facebookアカウントでログインできるようになりました。


    しかし、やはりユーザーによっては複数ソーシャルアカウントが同一メールアドレスで登録している人も少なくありません。

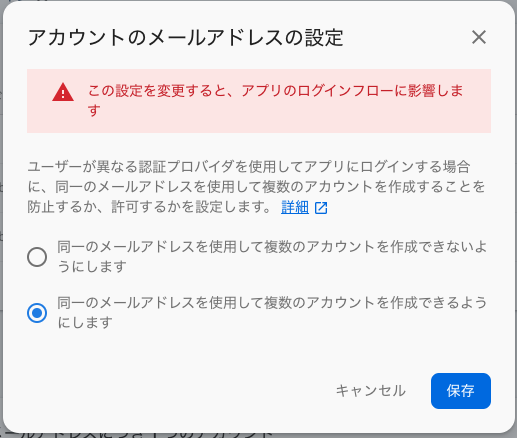
    設定変更画面から複数メールアドレスの登録を許可させることができます。

    デフォルトでは上段が選択されていますが、下の「複数のアカウントを作成できるようにする」を選択します。

    Google認証に加え、Facebookアカウントでもログインできるようになりました。
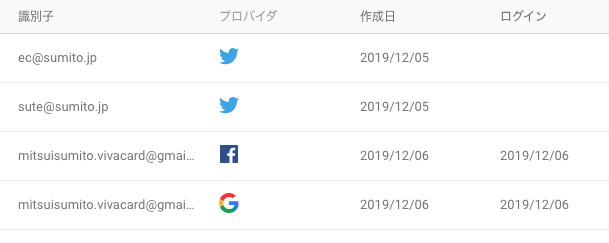
    登録アカウントは以下の通り。

    Firebaseはシンプルな認証機能を提供してくれるので、これからアプリケーションを作っていくという場合は最適な選択肢になるのではないでしょうか。


  • firebase authenticationでユーザーのimport/exportについて調べた

    firebase authenticationでユーザーのimport/exportについて調べた

    はじめに

    Firebase Authentication は、firebase での認証処理を行うための機能です。
    ID/PWによるパスワード認証、電話番号認証、Google、Facebook、Twitterなどソーシャルアカウントを使用した認証を行うことができます。

    本記事はfirebase authenticationでユーザーのimport/exportについて調べました。

    firebase authenticationの責務について

    責務としては認証までです。
    認可については本機能のスコープ外になります。

    詳細は以下参考

    https://apps-gcp.com/firebase-authentication/


    コンソール画面での見え方について

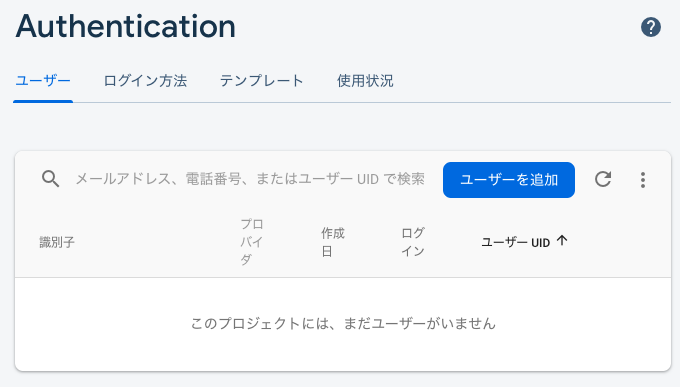
    コンソール画面にcsv/json形式でimportする機能があっても良さそうですが、残念ながらそのボタンは見当たりません。

    青い「ユーザーを追加」ボタンを押しても、メールアドレスとパスワードを入力する画面が表示されるのみです。

    対応

    firebase cliを使うことで、具体的には “` firebase auth:import “` コマンドを使うことでimportが可能ということが分かりました。

    https://firebase.google.com/docs/cli/auth-import#syntax

    firebase cliのinstall方法はこちら

    https://firebase.google.com/docs/cli?hl=ja

    jsonファイルを作成する

    試しにtwitter認証アカウントを2つ、Google認証というアカウントを1つ。合計3ユーザーを作成することにします。

    {
      "users": [
        {
          "localId": "1",
          "email": "ec@sumito.jp",
          "emailVerified": null,
          "passwordHash": null,
          "salt": null,
          "displayName": "test1",
          "photoUrl": null,
          "providerUserInfo": [
            {
              "providerId": "twitter.com",
              "rawId": "xxxxxxxxxxxx",
              "email":  null,
              "displayName": "test1",
              "photoUrl": null
            }
          ]
        },
        {
          "localId": "2",
          "email": "sute@sumito.jp",
          "emailVerified": null,
          "passwordHash": null,
          "salt": null,
          "displayName": "test2",
          "photoUrl": null,
          "providerUserInfo": [
            {
              "providerId": "twitter.com",
              "rawId": "xxxxxxxxxxxx",
              "email":  null,
              "displayName": "test2",
              "photoUrl": null
            }
          ]
        },
        {
          "localId": "3",
          "email": "mitsuisumito.viva@gmail.com",
          "emailVerified": true,
          "displayName": "sumito tsukada",
          "photoUrl": "https://lh3.googleusercontent.com/a-/xxx,
          "providerUserInfo": [
            {
              "providerId": "google.com",
              "rawId": "1234",
              "email": "mitsuisumito.viva@gmail.com",
              "displayName": "sumito tsukada",
              "photoUrl": "https://lh3.googleusercontent.com/a-/xxx"
            }
          ]
        }
      ]
    }

     今回はuser.jsonという名前で保存し、読み込ませます。

    $ firebase auth:import ./user.json --hash-algo=HMAC_SHA256  --hash-key=hogehoge
    Processing ./user.json (1451 bytes)
    Starting importing 3 account(s).
    ✔  Imported successfully.
    

    今回はハッシュアルゴリズムをHMAC_SHA256にしましたが、適宜変更してください。

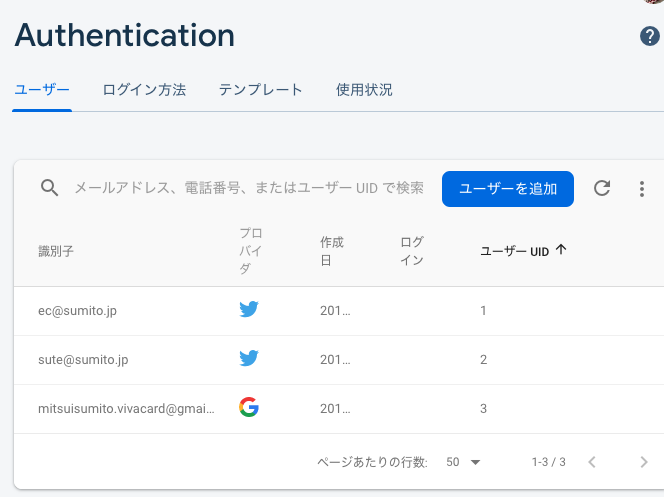
    firebase authentication上でimport確認

    無事importされたようです。

    ちなみに、デフォルトでFirebase authenticationを使いアカウント作成すると、ユーザーUIDはランダム数字になりますが、import形式では任意のIDを指定することができるようです。

    動作確認

    自作のアプリケーションのログイン画面からログインを試みます。

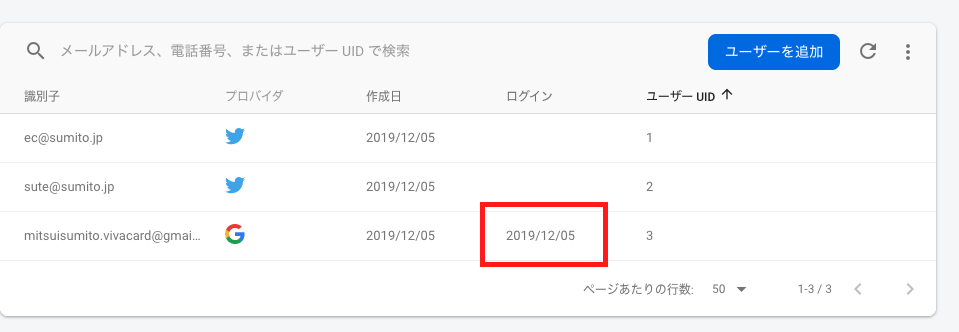
    無事ログインできたようです。

    無事ログイン日時も記載されました

    export

    firebase authenticationに登録されたユーザーは“` firebase auth:export “` コマンドでexportすることができます

    $ firebase auth:export hogehoge --format=json
    Exporting accounts to hogehoge
    ✔  Exported 3 account(s) successfully.

    所感

    firebase authenticationを使えば既存システムからの移行も現実的に見えるかもしれません。
    とはいえ、まだまだ調査すべきところは山のようにあるので、一つ一つ調べていこうと思います。


  • Cloud Natural Language API を試した

    Cloud Natural Language API を試した

    はじめに

    Googleがトレーニング済みモデルとして提供している自然言語処理(Natural Language Processing)を使うことで、文字を元に感情分析、エンティティ分析、エンティティ感情分析、コンテンツ分類、構文分析などの自然言語理解の機能がAPI経由で利用できるとのこと。

    Cloud Natural Language APIで、どのような結果を得る事ができるか試してみた。

    どのような事ができるのか

    公式ドキュメントでは以下の通り記載されている

    https://cloud.google.com/sdk/gcloud/reference/ml/language/

    analyze-entitiesUse Google Cloud Natural Language API to identify entities in text.

    analyze-entity-sentimentUse Google Cloud Natural Language API to identify entity-level sentiment.

    analyze-sentimentUse Google Cloud Natural Language API to identify sentiments in a text.

    analyze-syntaxUse Google Cloud Natural Language API to identify linguistic information.

    classify-textClassifies input document into categories.

    上から

    • エンティティ分析
    • エンティティ感情分析
    • 感情分析
    • 構文解析
    • コンテンツ分類

    だ。ひとつひとつ試していったので、実行コマンドと結果とともに解説していく。

    解析対象

    著作権フリーのドキュメントを解析対象とした。

    learningenglish.voanews.comというサイトは著作権フリーでテキスト、MP3を公開しているとのことだったので、今回はそれをコンテンツを利用することにした。

    その中でも「我々のコンテンツは著作権フリーですよ」と記載されているページを解析することにした。

    https://learningenglish.voanews.com/p/6861.html

    https://learningenglish.voanews.com/p/6861.html

    Requesting usage of VOA Learning English content

    Learning English texts, MP3s and videos are in the public domain. You are allowed to reprint them for educational and commercial purposes, with credit to learningenglish.voanews.com. VOA photos are also in the public domain. However, photos and video images from news agencies such as AP and Reuters are copyrighted, so you are not allowed to republish them.

    If you are requesting one-time use of VOA Learning English content, please fill out the information in this form and we will respond to you as soon as possible. For repeat use, please see the Content Usage FAQs on the page.

    High-resolution audio and video files can be downloaded for free through USAGM Direct an online service providing original multimedia content from Voice of America for publication across all platforms: online, mobile, print and broadcast. Access to USAGM Direct requires user registration. If you have any questions about our policies, or to let us know that you plan to use our materials, write to learningenglish@voanews.com.

    各種コマンドを実施した後、リダイレクトとしてテキストに出力させ、結果が膨大なので、上位100桁のみ表示させる。

    なお、Natural Language APIの基本について書かれているドキュメントはこちら。

    https://cloud.google.com/natural-language/docs/basics?hl=ja

    エンティティ分析

    テキストデータからエンティティ(人、組織、場所、イベント、商品、メディアなど)を特定できるようだ。

    実施コマンド

    gcloud ml language analyze-entities --content-file=/tmp/voa.original > /tmp/voa.analyze-entities

    結果

    # head -n100 /tmp/voa.analyze-entities
    {
      "entities": [
        {
          "mentions": [
            {
              "text": {
                "beginOffset": 90,
                "content": "content"
              },
              "type": "COMMON"
            },
            {
              "text": {
                "beginOffset": 518,
                "content": "content"
              },
              "type": "COMMON"
            }
          ],
          "metadata": {},
          "name": "content",
          "salience": 0.1703016,
          "type": "OTHER"
        },
        {
          "mentions": [
            {
              "text": {
                "beginOffset": 60,
                "content": "usage"
              },
              "type": "COMMON"
            }
          ],
          "metadata": {},
          "name": "usage",
          "salience": 0.077866085,
          "type": "OTHER"
        },
        {
          "mentions": [
            {
              "text": {
                "beginOffset": 132,
                "content": "videos"
              },
              "type": "COMMON"
            }
          ],
          "metadata": {},
          "name": "videos",
          "salience": 0.07223342,
          "type": "WORK_OF_ART"
        },
        {
          "mentions": [
            {
              "text": {
                "beginOffset": 0,
                "content": "https://learningenglish.voanews.com/p/6861.html"
              },
              "type": "PROPER"
            },
            {
              "text": {
                "beginOffset": 253,
                "content": "learningenglish.voanews.com"
              },
              "type": "PROPER"
            },
            {
              "text": {
                "beginOffset": 282,
                "content": "VOA"
              },
              "type": "PROPER"
            },
            {
              "text": {
                "beginOffset": 831,
                "content": "Voice of America"
              },
              "type": "PROPER"
            },
            {
              "text": {
                "beginOffset": 1083,
                "content": "learningenglish@voanews.com"
              },
              "type": "PROPER"
            }
          ],
          "metadata": {
            "mid": "/m/0q0r9",
            "wikipedia_url": "https://en.wikipedia.org/wiki/Voice_of_America"
          },
          "name": "https://learningenglish.voanews.com/p/6861.html",
          "salience": 0.07165857,
          "type": "OTHER"
        },

    結果の見方は以下の通り。

    name解析対象の文字列


    beginOffset: 指定したテキスト内の文の開始位置を表す(0 から始まる)文字オフセットを示します。このオフセットは、リクエストで渡した encodingType を使用して計算される。


    salienceドキュメントのテキスト全体に対するこのエンティティの重要性または関連性を示します。情報の取得や要約の際にエンティティを優先するのに役立ちます。スコアが 0.0 に近いほど重要性が低くなり、1.0 に近いほど重要性が高くなる。


    typeドキュメントの種類(HTML または PLAIN_TEXT)などが書かれる。


    metadatawikipediaにリンクがあればwikipedia_urlに書かれる。midはGoogle Knowledge GraphのMID(Machine-generated Identifier)が格納される

    エンティティ感情分析

    エンティティ分析と感情分析の両方を組み合わせたものであり、テキスト内でエンティティについて表現された感情(ポジティブかネガティブか)の特定ができるようだ

    実施コマンド

    gcloud ml language analyze-entity-sentiment --content-file=/tmp/voa.original > /tmp/voa.analyze-entity-sentiment
    

    結果

    # head -n100 /tmp/voa.analyze-entity-sentiment
    {
      "entities": [
        {
          "mentions": [
            {
              "sentiment": {
                "magnitude": 0.2,
                "score": 0.2
              },
              "text": {
                "beginOffset": 90,
                "content": "content"
              },
              "type": "COMMON"
            },
            {
              "sentiment": {
                "magnitude": 0.1,
                "score": 0.1
              },
              "text": {
                "beginOffset": 518,
                "content": "content"
              },
              "type": "COMMON"
            }
          ],
          "metadata": {},
          "name": "content",
          "salience": 0.1703016,
          "sentiment": {
            "magnitude": 0.3,
            "score": 0.1
          },
          "type": "OTHER"
        },
        {
          "mentions": [
            {
              "sentiment": {
                "magnitude": 0.5,
                "score": 0.5
              },
              "text": {
                "beginOffset": 60,
                "content": "usage"
              },
              "type": "COMMON"
            }
          ],
          "metadata": {},
          "name": "usage",
          "salience": 0.077866085,
          "sentiment": {
            "magnitude": 0.5,
            "score": 0.5
          },
          "type": "OTHER"
        },
        {
          "mentions": [
            {
              "sentiment": {
                "magnitude": 0.4,
                "score": 0.4
              },
              "text": {
                "beginOffset": 132,
                "content": "videos"
              },
              "type": "COMMON"
            }
          ],
          "metadata": {},
          "name": "videos",
          "salience": 0.07223342,
          "sentiment": {
            "magnitude": 0.4,
            "score": 0.4
          },
          "type": "WORK_OF_ART"
        },
        {
          "mentions": [
            {
              "sentiment": {
                "magnitude": 0.0,
                "score": 0.0
              },
              "text": {
                "beginOffset": 0,
                "content": "https://learningenglish.voanews.com/p/6861.html"
              },
              "type": "PROPER"
            },
            {
              "sentiment": {
                "magnitude": 0.1,
                "score": 0.1
              },


    magnitude: 指定したテキストの全体的な感情の強度(ポジティブとネガティブの両方)が 0.0+inf の値で示されるscore と違って magnitude は正規化されていないため、テキスト内で感情(ポジティブとネガティブの両方)が表現されるたびにテキストの magnitude の値が増加

    と、公式にはあるが、ドキュメントは正直よくわからないが、以下の表は非常にわかりやすかった。

    感情 サンプル値
    明らかにポジティブ* "score": 0.8、"magnitude": 3.0
    明らかにネガティブ* "score": -0.6、"magnitude": 4.0
    ニュートラル "score": 0.1、"magnitude": 0.0
    混合 "score": 0.0、"magnitude": 4.0


    感情分析

    指定されたテキストを調べて、そのテキストの背景にある感情的な考え方を分析することができる。

    実施コマンド

    gcloud ml language analyze-sentiment --content-file=/tmp/voa.original > /tmp/voa.analyze-sentiment

    結果

    # head -n100 /tmp/voa.analyze-sentiment
    {
      "documentSentiment": {
        "magnitude": 4.6,
        "score": 0.2
      },
      "language": "en",
      "sentences": [
        {
          "sentiment": {
            "magnitude": 0.0,
            "score": 0.0
          },
          "text": {
            "beginOffset": 0,
            "content": "https://learningenglish.voanews.com/p/6861.html"
          }
        },
        {
          "sentiment": {
            "magnitude": 0.8,
            "score": 0.8
          },
          "text": {
            "beginOffset": 49,
            "content": "Requesting usage of VOA Learning English content"
          }
        },
        {
          "sentiment": {
            "magnitude": 0.8,
            "score": 0.8
          },
          "text": {
            "beginOffset": 99,
            "content": "Learning English texts, MP3s and videos are in the public domain."
          }
        },
        {
          "sentiment": {
            "magnitude": 0.0,
            "score": 0.0
          },
          "text": {
            "beginOffset": 165,
            "content": "You are allowed to reprint them for educational and commercial purposes, with credit to learningenglish.voanews.com."
          }
        },
        {
          "sentiment": {
            "magnitude": 0.1,
            "score": 0.1
          },
          "text": {
            "beginOffset": 282,
            "content": "VOA photos are also in the public domain."
          }
        },
        {
          "sentiment": {
            "magnitude": 0.4,
            "score": -0.4
          },
          "text": {
            "beginOffset": 324,
            "content": "However, photos and video images from news agencies such as AP and Reuters are copyrighted, so you are not allowed to republish them."
          }
        },
        {
          "sentiment": {
            "magnitude": 0.7,
            "score": 0.7
          },
          "text": {
            "beginOffset": 459,
            "content": "If you are requesting one-time use of VOA Learning English content, please fill out the information in this form and we will respond to you as soon as possible."
          }
        },
        {
          "sentiment": {
            "magnitude": 0.2,
            "score": -0.2
          },
          "text": {
            "beginOffset": 620,
            "content": "For repeat use, please see the Content Usage FAQs on the page."
          }
        },
        {
          "sentiment": {
            "magnitude": 0.3,
            "score": 0.3
          },
          "text": {
            "beginOffset": 684,
            "content": "High-resolution audio and video files can be downloaded for free through USAGM Direct an online service providing original multimedia content from Voice of America for publication across all platforms: online, mobile, print and broadcast."
          }
        },
        {
          "sentiment": {
            "magnitude": 0.3,

    各種項目は今までに説明したものがメイン。大きな特徴はcontentが単語ではなく、文(センテンス)になっているということ。センテンス単位でmagnitudeや、scoreが算出されている。

    そのため、文を通して感情を数値として読み取る事ができる。

    コンテンツ分類

    ドキュメントを分析し、ドキュメント内で見つかったテキストに適用されるコンテンツカテゴリのリストを返す事ができる

    実施コマンド

    gcloud ml language classify-text --content-file=/tmp/voa.original > /tmp/voa.classify-text

    結果

    # head -n100 /tmp/voa.classify-text
    {
      "categories": [
        {
          "confidence": 0.81,
          "name": "/Reference/Language Resources/Foreign Language Resources"
        }
      ]
    }

    “リファレンス/言語リソース/外国語リソース”

    外国語コンテンツのリファレンスということが、なんとなくわかる。

    構文解析

    指定されたテキストを一連の文とトークン(通常は単語)に分解して、それらのトークンに関する言語情報を提供する

    実行コマンド

    gcloud ml language analyze-syntax --content-file=/tmp/voa.original > /tmp/voa.analyze-syntax
    

    結果

    # head -n200 /tmp/voa.analyze-syntax
    {
      "language": "en",
      "sentences": [
        {
          "text": {
            "beginOffset": 0,
            "content": "https://learningenglish.voanews.com/p/6861.html"
          }
        },
        {
          "text": {
            "beginOffset": 49,
            "content": "Requesting usage of VOA Learning English content"
          }
        },
        {
          "text": {
            "beginOffset": 99,
            "content": "Learning English texts, MP3s and videos are in the public domain."
          }
        },
        {
          "text": {
            "beginOffset": 165,
            "content": "You are allowed to reprint them for educational and commercial purposes, with credit to learningenglish.voanews.com."
          }
        },
        {
          "text": {
            "beginOffset": 282,
            "content": "VOA photos are also in the public domain."
          }
        },
        {
          "text": {
            "beginOffset": 324,
            "content": "However, photos and video images from news agencies such as AP and Reuters are copyrighted, so you are not allowed to republish them."
          }
        },
        {
          "text": {
            "beginOffset": 459,
            "content": "If you are requesting one-time use of VOA Learning English content, please fill out the information in this form and we will respond to you as soon as possible."
          }
        },
        {
          "text": {
            "beginOffset": 620,
            "content": "For repeat use, please see the Content Usage FAQs on the page."
          }
        },
        {
          "text": {
            "beginOffset": 684,
            "content": "High-resolution audio and video files can be downloaded for free through USAGM Direct an online service providing original multimedia content from Voice of America for publication across all platforms: online, mobile, print and broadcast."
          }
        },
        {
          "text": {
            "beginOffset": 923,
            "content": "Access to USAGM Direct requires user registration."
          }
        },
        {
          "text": {
            "beginOffset": 974,
            "content": "If you have any questions about our policies, or to let us know that you plan to use our materials, write to learningenglish@voanews.com."
          }
        }
      ],
      "tokens": [
        {
          "dependencyEdge": {
            "headTokenIndex": 0,
            "label": "ROOT"
          },
          "lemma": "https://learningenglish.voanews.com/p/6861.html",
          "partOfSpeech": {
            "aspect": "ASPECT_UNKNOWN",
            "case": "CASE_UNKNOWN",
            "form": "FORM_UNKNOWN",
            "gender": "GENDER_UNKNOWN",
            "mood": "MOOD_UNKNOWN",
            "number": "NUMBER_UNKNOWN",
            "person": "PERSON_UNKNOWN",
            "proper": "PROPER_UNKNOWN",
            "reciprocity": "RECIPROCITY_UNKNOWN",
            "tag": "X",
            "tense": "TENSE_UNKNOWN",
            "voice": "VOICE_UNKNOWN"
          },
          "text": {
            "beginOffset": 0,
            "content": "https://learningenglish.voanews.com/p/6861.html"
          }
        },
        {
          "dependencyEdge": {
            "headTokenIndex": 2,
            "label": "AMOD"
          },
          "lemma": "request",
          "partOfSpeech": {
            "aspect": "ASPECT_UNKNOWN",
            "case": "CASE_UNKNOWN",
            "form": "FORM_UNKNOWN",
            "gender": "GENDER_UNKNOWN",
            "mood": "MOOD_UNKNOWN",
            "number": "NUMBER_UNKNOWN",
            "person": "PERSON_UNKNOWN",
            "proper": "PROPER_UNKNOWN",
            "reciprocity": "RECIPROCITY_UNKNOWN",
            "tag": "VERB",
            "tense": "TENSE_UNKNOWN",
            "voice": "VOICE_UNKNOWN"
          },
          "text": {
            "beginOffset": 49,
            "content": "Requesting"
          }
        },
        {
          "dependencyEdge": {
            "headTokenIndex": 2,
            "label": "ROOT"
          },
          "lemma": "usage",
          "partOfSpeech": {
            "aspect": "ASPECT_UNKNOWN",
            "case": "CASE_UNKNOWN",
            "form": "FORM_UNKNOWN",
            "gender": "GENDER_UNKNOWN",
            "mood": "MOOD_UNKNOWN",
            "number": "SINGULAR",
            "person": "PERSON_UNKNOWN",
            "proper": "PROPER_UNKNOWN",
            "reciprocity": "RECIPROCITY_UNKNOWN",
            "tag": "NOUN",
            "tense": "TENSE_UNKNOWN",
            "voice": "VOICE_UNKNOWN"
          },
          "text": {
            "beginOffset": 60,
            "content": "usage"
          }
        },
        {
          "dependencyEdge": {
            "headTokenIndex": 2,
            "label": "PREP"
          },
          "lemma": "of",
          "partOfSpeech": {
            "aspect": "ASPECT_UNKNOWN",
            "case": "CASE_UNKNOWN",
            "form": "FORM_UNKNOWN",
            "gender": "GENDER_UNKNOWN",
            "mood": "MOOD_UNKNOWN",
            "number": "NUMBER_UNKNOWN",
            "person": "PERSON_UNKNOWN",
            "proper": "PROPER_UNKNOWN",
            "reciprocity": "RECIPROCITY_UNKNOWN",
            "tag": "ADP",
            "tense": "TENSE_UNKNOWN",
            "voice": "VOICE_UNKNOWN"
          },
          "text": {
            "beginOffset": 66,
            "content": "of"
          }
        },
        {
          "dependencyEdge": {
            "headTokenIndex": 6,
            "label": "NN"
          },
          "lemma": "VOA",
          "partOfSpeech": {
            "aspect": "ASPECT_UNKNOWN",
            "case": "CASE_UNKNOWN",
            "form": "FORM_UNKNOWN",
            "gender": "GENDER_UNKNOWN",
            "mood": "MOOD_UNKNOWN",
            "number": "SINGULAR",
            "person": "PERSON_UNKNOWN",
            "proper": "PROPER",
            "reciprocity": "RECIPROCITY_UNKNOWN",
            "tag": "NOUN",
            "tense": "TENSE_UNKNOWN",
            "voice": "VOICE_UNKNOWN"
          },
          "text": {
            "beginOffset": 69,
            "content": "VOA"
          }
        },
        {
          "dependencyEdge": {
            "headTokenIndex": 6,
            "label": "NN"

    文とトークンが抽出され、それらの文(sentences)と中盤以降にトークン(tokens)を含むレスポンスが返される。

    tagはNOUN(名詞)、VERB(動詞)、ADJ(形容詞)などがわかる。

    まとめ

    GCPが使えるようになっていれば非常に簡単にCloud Natural Language API を試す事ができ、使い方によっては非常に有益な解析ができそうだ。

  • 音声から日本語の文字起こしを行う

    音声から日本語の文字起こしを行う

    概要

    日本語の音声ファイルを文字起こししたい場合がある。真っ先に思い浮かんだのがAmazon transcribeだが、まだ日本語には対応していなかった。

    調べたところ、Google Speech APIが日本語に対応していたのでこちらを使って文字起こしをしてみた。

    サンプルの音声

    iPhoneに付属しているボイスメモというアプリで録音した

    https://itunes.apple.com/jp/app/%E3%83%9C%E3%82%A4%E3%82%B9%E3%83%A1%E3%83%A2/id1069512134?mt=8

    今回はあくまでもサンプルなので、今日の日付を読み上げた。


    加工

    ボイスメモで録音したファイルはm4aファイルになる。

    このフォーマットではGoogle Speech APIが対応していないのでwavファイルへ変換する。

    Speech APIが対応しているファイルフォーマットは以下にまとまっている

    https://cloud.google.com/speech-to-text/docs/encoding?hl=ja

    macでは標準で付属しているafconvertというソフトを使う事で手軽に変換できる。

    -d LEI16を指定する事で読み込める形になる。

    afconvert -f WAVE -d LEI16 sample.m4a sample.wav

    GCPの設定

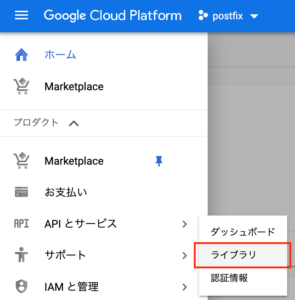
    コンソール画面左上の[ツールとサービス] > [APIとサービス] > [ライブラリ] を選択。


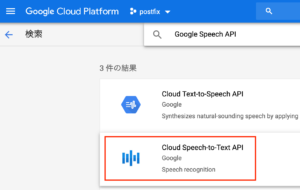
    APIの一覧から[Speech API]を選択し、[有効にする]を押して  を有効にする。

    音声ファイルを格納

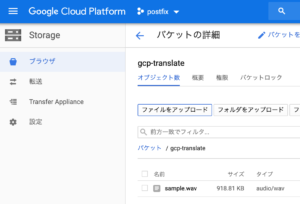
    先ほど変換したwavファイルをCloud Storageに格納する。

    文字起こし

    Cloud Shellをアクティブにする

    ジョブの登録

    $ gcloud ml speech recognize-long-running gs://gcp-translate/sample.wav --language-code='ja-JP' --async
    

    以下のようなレスポンスが来る

    Check operation [441557619774374990] for status.
    {
      "name": "441557619774374990"
    }

    ステータス確認

    $ gcloud ml speech operations describe 441557619774374990

    以下のようなレスポンスが来る

    {
      "name": "441557619774374990",
      "metadata": {
        "@type": "type.googleapis.com/google.cloud.speech.v1.LongRunningRecognizeMetadata",
        "progressPercent": 23,
        "startTime": "2019-06-01T16:39:03.805780Z",
        "lastUpdateTime": "2019-06-01T16:43:43.954310Z"
      }
    }

    この画面で進捗率23%という事がわかる。

    時間をおいて実施すると進捗率は変わる。

    {
      "name": "441557619774374990",
      "metadata": {
        "@type": "type.googleapis.com/google.cloud.speech.v1.LongRunningRecognizeMetadata",
        "progressPercent": 86,
        "startTime": "2019-06-01T16:39:03.805780Z",
        "lastUpdateTime": "2019-06-01T16:52:40.778647Z"
      }
    }


    進捗率が100%になったら、リダイレクトさせてtextに出力。

    gcloud ml speech operations describe 441557619774374990 > test

    ファイルを開き、中身を確認

    cat test
    {
      "done": true,
      "metadata": {
        "@type": "type.googleapis.com/google.cloud.speech.v1.LongRunningRecognizeMetadata",
        "lastUpdateTime": "2019-06-10T14:28:36.384592Z",
        "progressPercent": 100,
        "startTime": "2019-06-10T14:28:32.372249Z"
      },
      "name": "441557619774374990",
      "response": {
        "@type": "type.googleapis.com/google.cloud.speech.v1.LongRunningRecognizeResponse",
        "results": [
          {
            "alternatives": [
              {
                "confidence": 0.9525875,
                "transcript": "\u4eca\u65e5\u306f2019\u5e746\u670811\u65e5\u3067\u3059"
              }
            ]
          }
        ]
      }
    }

    ファイルを開いた際、descriptionがエンコードされていなかったら適宜エンコードする必要がある。

    最も手軽なのは、jqコマンドに渡す事で読めるフォーマットになる

    $ cat test | jq -r '.'
    {
      "done": true,
      "metadata": {
        "@type": "type.googleapis.com/google.cloud.speech.v1.LongRunningRecognizeMetadata",
        "lastUpdateTime": "2019-06-10T14:28:36.384592Z",
        "progressPercent": 100,
        "startTime": "2019-06-10T14:28:32.372249Z"
      },
      "name": "441557619774374990",
      "response": {
        "@type": "type.googleapis.com/google.cloud.speech.v1.LongRunningRecognizeResponse",
        "results": [
          {
            "alternatives": [
              {
                "confidence": 0.9525875,
                "transcript": "今日は2019年6月11日です"
              }
            ]
          }
        ]
      }
    }


    今日は2019年6月11日です

    という音声が無事取れた。

    音声が綺麗に拾えていれば、これを使って文字起こしをする事ができそうだ。

  • BigQueryのpartitioned-tables(分割テーブル)について

    BigQueryのpartitioned-tables(分割テーブル)について

    はじめに

    BigQueryは従量課金のモデルのため、スキャン量に応じて課金される。

    いかにスキャン対象を減らすかが非常に重要になる。

    通常のwhereで絞ったとしても、スキャンはされてしまうため課金を回避することができない。

    そこで、partitioned-tables(分割テーブル)である。

    partitioned-tables(分割テーブル)について

    現時点で大きく2つ存在している

    • 取り込み時間分割テーブル:
      データを取り込んだ(読み込んだ)日付またはデータが着信した日付に基づいて分割されたテーブル。
    • 分割テーブルTIMESTAMP 列または DATE 列を基準にして分割されたテーブル

    詳細はこちら

    https://cloud.google.com/bigquery/docs/creating-partitioned-tables

    通常のwhereのように使い、課金額を減らすのが目的であれ”取り込み時間分割テーブル”ではなく”分割テーブル”のが便利そうだ

    やってみた

    テーブル定義

    まずはテーブル定義

    [
      {
        "mode": "NULLABLE", 
        "name": "register_day", 
        "type": "STRING"
      }, 
      {
        "mode": "NULLABLE", 
        "name": "rtime", 
        "type": "STRING"
      }, 
      {
        "mode": "NULLABLE", 
        "name": "lesson_date", 
        "type": "TIMESTAMP"
      }
    ]

    テーブルを作成する

    bq mk --table --expiration 3600 --description "This is my table" --time_partitioning_field=lesson_date --time_partitioning_type=DAY --label organization:development logs.cccc bbbb 

    lesson_dateが分割テーブルのパーティションとなる

    読み込み

    データはこんな感じ

    {"register_day":"3320915", "rtime":"tsukada", "lesson_date": "2019-04-30 14:02:04"}
    {"register_day":"3320915", "rtime":"tsukada", "lesson_date": "2019-05-30 14:02:04"}
    {"register_day":"3320915", "rtime":"tsukada", "lesson_date": "2019-06-30 14:02:04"}
    {"register_day":"3320915", "rtime":"tsukada", "lesson_date": "2019-07-30 14:02:04"}

    読み込ませる

    bq load --source_format=NEWLINE_DELIMITED_JSON logs.cccc cccc.json 

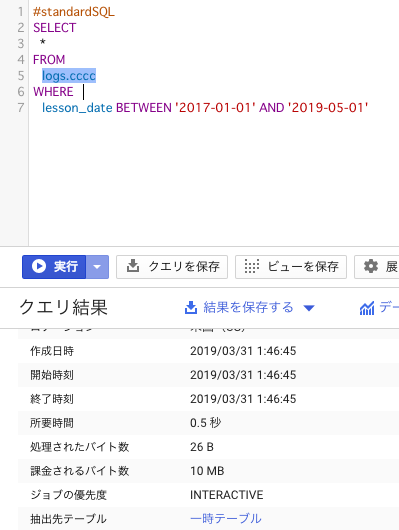
    使ってみる

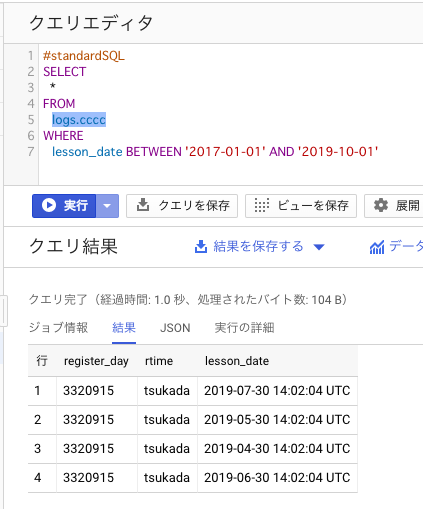
    #standardSQL
    SELECT
      *
    FROM
      logs.cccc
    WHERE  
      lesson_date BETWEEN '2017-01-01' AND '2019-10-01'

    少数のデータなので記事としては微妙だが、最小単位の10Mが課金対象となる。