月: 2019年2月

  • EC2(Amazon Linux 2)のディスクサイズをオンラインで拡張する

    EC2(Amazon Linux 2)のディスクサイズをオンラインで拡張する

    作業前

    ディスクサイズを確認する

    $ df -h
    Filesystem      Size  Used Avail Use% Mounted on
    /dev/xvda1       20G   20G  291M  99% /

    Elastic block storeで割り当てDISKを増やす
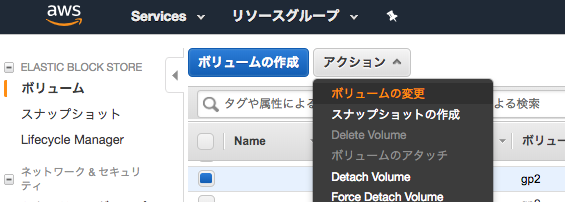
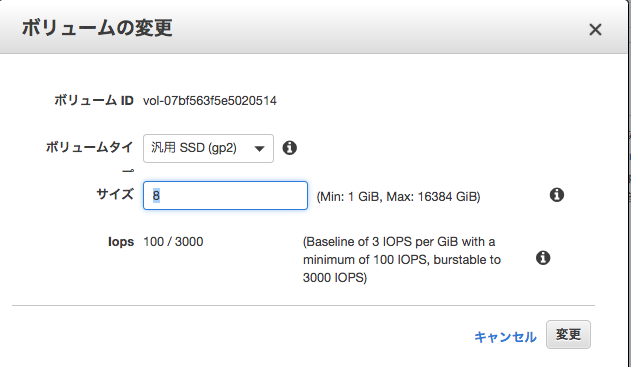
    何ギガに増やしたいのかサイズを指定する

    (増やす容量ではなく、現在のDISKと併せてトータルの容量にする)
    ブロックデバイスの変更作業

    ブロックデバイスの一覧を表示する

    $ lsblk
    NAME    MAJ:MIN RM SIZE RO TYPE MOUNTPOINT
    xvda    202:0    0  40G  0 disk 
    └─xvda1 202:1    0  20G  0 part /

    ブロックデバイスを拡張する

    (ここの手順がAmazon Linux1と2で異なる)

    以下の手順はAmazon Linux2。

    $ sudo growpart /dev/xvda 1
    CHANGED: disk=/dev/xvda partition=1: start=4096 old: size=41938910,end=41943006 new: size=83881950,end=83886046

    ブロックデバイス一覧を表示する。

    変更された事を確認する。

    $ lsblk
    NAME    MAJ:MIN RM SIZE RO TYPE MOUNTPOINT
    xvda    202:0    0  40G  0 disk 
    └─xvda1 202:1    0  40G  0 part /

    パーティションを拡張する

    $ sudo xfs_growfs /dev/xvda1
    meta-data=/dev/xvda1             isize=512    agcount=11, agsize=524159 blks
             =                       sectsz=512   attr=2, projid32bit=1
             =                       crc=1        finobt=0 spinodes=0
    data     =                       bsize=4096   blocks=5242363, imaxpct=25
             =                       sunit=0      swidth=0 blks
    naming   =version 2              bsize=4096   ascii-ci=0 ftype=1
    log      =internal               bsize=4096   blocks=2560, version=2
             =                       sectsz=512   sunit=0 blks, lazy-count=1
    realtime =none                   extsz=4096   blocks=0, rtextents=0
    data blocks changed from 5242363 to 10485243

    パーティションが拡張された事を確認する

    $ df -h
    Filesystem      Size  Used Avail Use% Mounted on
    /dev/xvda1       40G   20G   21G  50% /

    参考情報

    https://dev.classmethod.jp/cloud/aws/expand-ebs-in-online/


  • go routine/channelを整理する

    go routine/channelを整理する

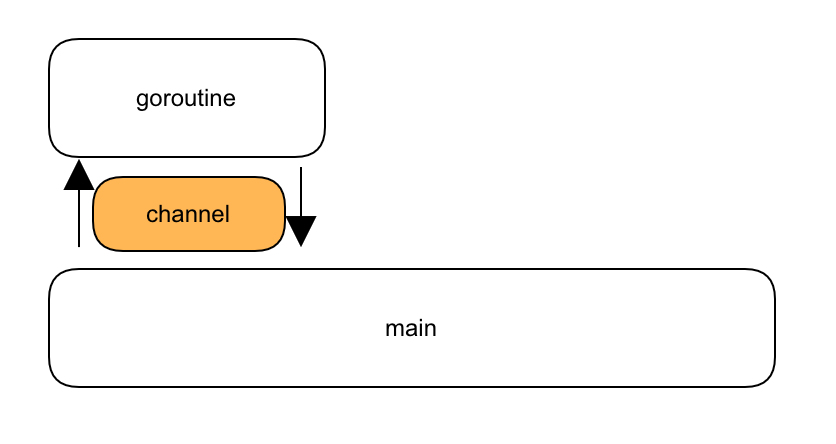
    go routineのchannelについて勉強したので整理する

    package main
    
    import (
    	"fmt"
    )
    
    // sliceとchannelを受け付ける
    func goroutine(s []int, c chan int) {
    	sum := 0
    	for _, v := range s {
    		sum += v
    	}
    	// channelに送信
    	c <- sum
    }
    
    // channel
    
    func main() {
    	// スライスのinteger
    	s := []int{1, 2, 3, 4, 5}
    	// channel (makeで書く)
    	// makeはキューの働きをする
    	c := make(chan int)
    	go goroutine(s, c)
    
    	// チャネルを受信。ブロッキングの役割があるので、入ってくるまでずっと待っている状態
    	x := <-c
    	fmt.Println(x)
    }

    結果 “` 15 “`

  • wordpressをLoadBalancer配下にインストールする

    wordpressをLoadBalancer配下にインストールする

    はじめに

    WordPressをインストールする際、ブラウザ越しにポチポチする必要がある。

    しかし、既にLoadBalancerの配下にサーバが存在していて、

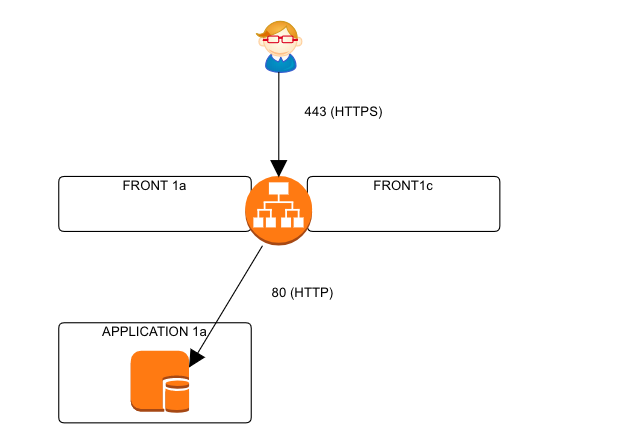
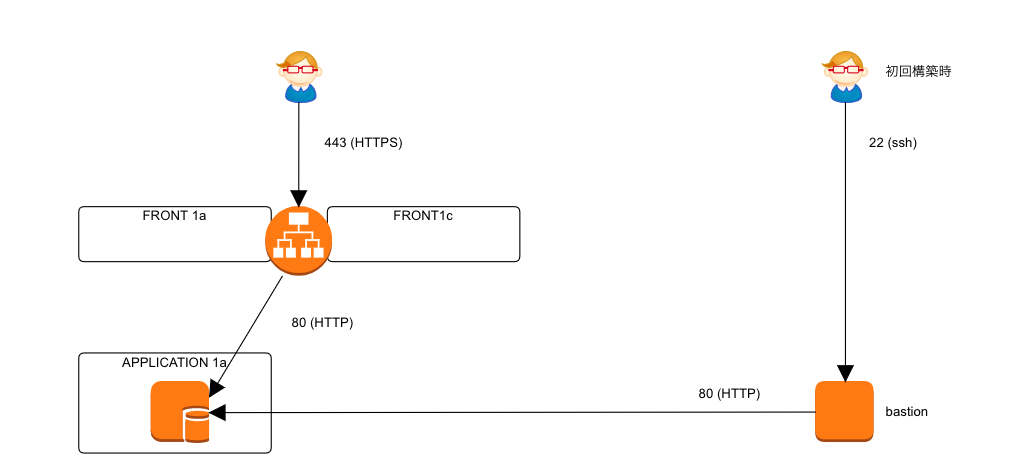
    LoadBalancerがHTTPSを受け止め、内部的にHTTPで通信している環境ではこのインストールが非常に悩ましい。

    対処

    この場合bastionサーバ(踏み台サーバ)を利用しプロキシさせる事でHTTPでブラウザ越しに接続する事ができる

    ssh -L Proxyポート:接続先サーバのIP:接続先サーバのPort bastionサーバ
    
    # ex) ssh -L 8080:wordpress-server:80 bastion.sumito.jp

    これで自分の端末とbastionサーバ(踏み台サーバ)がトンネリングを張ることができる。

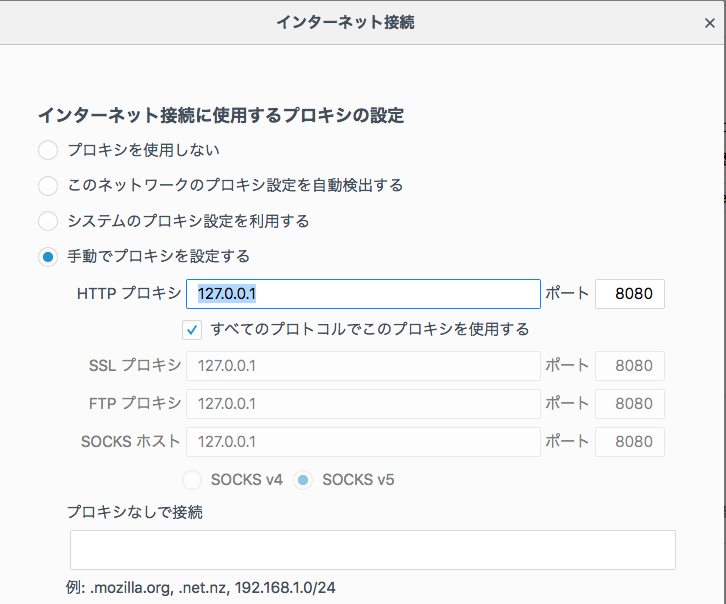
    自身の端末のブラウザでproxy設定をする

    また、wordpressのインストールの際は、HTTPのリクエストヘッダが重要になる。

    /etc/hostsに以下を記載

    127.0.01    FQDN
    
    # ex) 127.0.0.1   wordpress.sumito.jp

    ブラウザで wordpress.sumito.jp へ接続する事でインストール画面になる。


  • ERROR 1045 (28000): Access denied for user ‘root’@’localhost’ (using password: YES)

    ERROR 1045 (28000): Access denied for user ‘root’@’localhost’ (using password: YES)

    はじめに

    kusanagiを使いインスタンスを増やそうとすると、上記のようなエラーに遭う事がある。

    原因

    kusanagiに登録されているmysqlのrootパスワードと、実際のmysqlのrootパスワードに違いがある。

    kusanagiに登録されているrootパスワードを変えるには?

    /etc/kusanagi.d ディレクトリあたりにあるかとおもったら、全く違う所にあった。

    /root/.my.cnf だ。

    [mysqladmin]
    password = "**********"
    user = root

    このpasswordを実際のパスワードに変更する事で、解決することができる。


  • CloudStorageへAPI経由でファイルをuploadする

    CloudStorageへAPI経由でファイルをuploadする

    はじめに

    Google Cloud StorageへAPI経由でファイルをuploadする。

    Introduction to APIs in Google を受講して、基本的な使い方を覚えたのでメモを残す

    https://www.qwiklabs.com/focuses/3473?catalog_rank=%7B%22rank%22%3A15%2C%22num_filters%22%3A0%2C%22has_search%22%3Atrue%7D&locale=ja&parent=catalog&search_id=2013206

    前準備

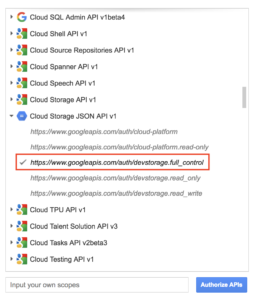
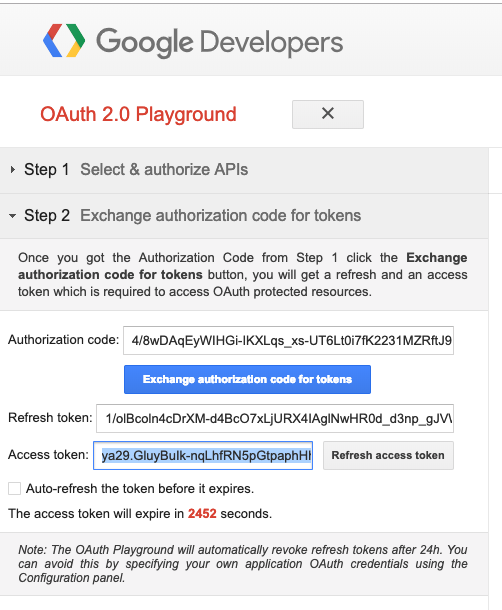
    OAuthのアクセストークンを生成する

    https://developers.google.com/oauthplayground/


    バケットの作成

    頻繁に使うので認証を環境変数に入れる

    export OAUTH2_TOKEN=<YOUR_TOKEN>

    プロジェクトIDも入れる

    export PROJECT_ID=<YOUR_PROJECT_ID>

    バケット生成の定義のjsonファイルを作成、読み込む

    {  "name": "<YOUR_BUCKET_NAME>",
       "location": "us",
       "storageClass": "multi_regional"
    }
    
    
    curl -X POST --data-binary @values.json \
        -H "Authorization: Bearer $OAUTH2_TOKEN" \
        -H "Content-Type: application/json" \
        "https://www.googleapis.com/storage/v1/b?project=$PROJECT_ID"

    画像をuploadする

    wget https://gcpstaging-qwiklab-website-prod.s3.amazonaws.com/bundles/assets/138f92c75d08d0705e3853c1d790453f37fdfff38afad7fb4b431b9fa690f1fc.png
    mv 138f92c75d08d0705e3853c1d790453f37fdfff38afad7fb4b431b9fa690f1fc.png demo-image.png

    フルパスを確認する

    realpath demo-image.png

    結果を環境変数に入れる

    export OBJECT=<DEMO_IMAGE_PATH>

    バケット名を環境変数に入れる
    (先ほど作成したやつ)

    export BUCKET_NAME=<YOUR_BUCKET>

    cloud storageにuploadする

    curl -X POST --data-binary @$OBJECT \
        -H "Authorization: Bearer $OAUTH2_TOKEN" \
        -H "Content-Type: image/png" \
        "https://www.googleapis.com/upload/storage/v1/b/$BUCKET_NAME/o?uploadType=media&name=demo-image"


    参考情報

    JSONの構文チェックに便利なサイト

    https://jsonlint.com/


    Cloud StorageのAPIリファレンス(英語)

    https://cloud.google.com/storage/docs/json_api/v1/


  • postgresのシーケンス一覧を取得ならびに変更する

    postgresのシーケンス一覧を取得ならびに変更する

    はじめに

    redashの内部のDBはpostgresだが、version upを繰り返すうちにDB構成がバグってしまった。具体的には外部キーや、Indexなのが外れてしまった。

    根本対応としては再度イチからredashを作り、そこにデータを一個一個転送することになるとおもうが、なかなかその対応にたどり着けず、一時対応でとりあえず問題を先送りしている。

    ちなみにusersテーブルの場合、以下の部分がごっそり無くなっていた

    Indexes:
        "users_pkey" PRIMARY KEY, btree (id)
        "users_api_key_key" UNIQUE CONSTRAINT, btree (api_key)
        "users_org_id_email" UNIQUE, btree (org_id, email)
    Foreign-key constraints:
        "users_org_id_fkey" FOREIGN KEY (org_id) REFERENCES organizations(id)
    Referenced by:
        TABLE "access_permissions" CONSTRAINT "access_permissions_grantee_id_fkey" FOREIGN KEY (grantee_id) REFERENCES users(id)
        TABLE "access_permissions" CONSTRAINT "access_permissions_grantor_id_fkey" FOREIGN KEY (grantor_id) REFERENCES users(id)
        TABLE "alert_subscriptions" CONSTRAINT "alert_subscriptions_user_id_fkey" FOREIGN KEY (user_id) REFERENCES users(id)
        TABLE "alerts" CONSTRAINT "alerts_user_id_fkey" FOREIGN KEY (user_id) REFERENCES users(id)
        TABLE "api_keys" CONSTRAINT "api_keys_created_by_id_fkey" FOREIGN KEY (created_by_id) REFERENCES users(id)
        TABLE "changes" CONSTRAINT "changes_user_id_fkey" FOREIGN KEY (user_id) REFERENCES users(id)
        TABLE "dashboards" CONSTRAINT "dashboards_user_id_fkey" FOREIGN KEY (user_id) REFERENCES users(id)
        TABLE "events" CONSTRAINT "events_user_id_fkey" FOREIGN KEY (user_id) REFERENCES users(id)
        TABLE "favorites" CONSTRAINT "favorites_user_id_fkey" FOREIGN KEY (user_id) REFERENCES users(id)
        TABLE "notification_destinations" CONSTRAINT "notification_destinations_user_id_fkey" FOREIGN KEY (user_id) REFERENCES users(id)
        TABLE "queries" CONSTRAINT "queries_last_modified_by_id_fkey" FOREIGN KEY (last_modified_by_id) REFERENCES users(id)
        TABLE "queries" CONSTRAINT "queries_user_id_fkey" FOREIGN KEY (user_id) REFERENCES users(id)
        TABLE "query_snippets" CONSTRAINT "query_snippets_user_id_fkey" FOREIGN KEY (user_id) REFERENCES users(id)
    

    その結果、Edit Visualizationで保存ができなくなった。

    コンテナのログを見たら、本来1つしかないはずが2つ以上ヒットするよ。とエラーになっているのが原因だとわかった。

    シーケンスで指している数字が、すでにレコードとして存在していたのが問題だ。

    今回はシーケンスを変更することで対処した。

    Postgresのシーケンス一覧を表示する

    “` SELECT c.relname FROM pg_class c LEFT join pg_user u ON c.relowner = u.usesysid WHERE c.relkind = ‘S’; relname  “` で表示できる。

    redashに限らず、どのPostgresでも対応可能。

    postgres=# SELECT c.relname FROM pg_class c LEFT join pg_user u ON c.relowner = u.usesysid WHERE c.relkind = 'S';
                 relname              
    ----------------------------------
     access_permissions_id_seq
     alert_subscriptions_id_seq
     alerts_id_seq
     api_keys_id_seq
     changes_id_seq
     dashboards_id_seq
     data_source_groups_id_seq
     data_sources_id_seq
     events_id_seq
     favorites_id_seq
     groups_id_seq
     notification_destinations_id_seq
     organizations_id_seq
     queries_id_seq
     query_results_id_seq
     query_snippets_id_seq
     users_id_seq
     visualizations_id_seq
     widgets_id_seq
    (19 rows)
    
    postgres=#

    シーケンスの値を確認する

    postgres=# select nextval('visualizations_id_seq');                                                                                                                                                                  nextval 
    ---------
          56
    (1 row)

    56ということがわかる

    シーケンスの値を変更する

    ALTER SEQUENCEコマンドで変更が可能

    postgres=# ALTER SEQUENCE visualizations_id_seq RESTART WITH 251;
    ALTER SEQUENCE


    結果、redashが正常に動くようになった。

    おそらくversion upを繰り返しているうちに、どこかでDBスキーマが壊れてしまった可能性がある。


    関連記事

    https://tsukada.sumito.jp/2018/10/11/redash_all-queries_loading/

    redash を専門に扱っている唯一の本

  • Kubernetesでスケールアップ・ローリングアップデートを行う

    Kubernetesでスケールアップ・ローリングアップデートを行う

    はじめに

    Kubernetesはバズワードになりつつあるが、スケールアップ・ローリングアップデートを含む運用のノウハウはまだまだそれほど多くないのでまとめる。

    Node.js サーバーを作成する

    var http = require('http');
    var handleRequest = function(request, response) {
      response.writeHead(200);
      response.end("Hello World!");
    }
    var www = http.createServer(handleRequest);
    www.listen(8080);

    起動

    node server.js

    Docker コンテナ イメージを作成する

    FROM node:6.9.2
    EXPOSE 8080
    COPY server.js .
    CMD node server.js

    docker hubからnodeのversion 6.9.2をダウンロード。
    8080ポートを外部に公開、
    先ほど作ったserver.jsをdocker内にコピー、
    nodeコマンドでserver.jsを起動する。と言った内容。

    Dockerイメージをビルドする

    docker build -t gcr.io/PROJECT_ID/hello-node:v1 .

    動作確認

    docker run -d -p 8080:8080 gcr.io/PROJECT_ID/hello-node:v1

    curlで自身に接続し接続確認をする

    curl http://localhost:8080

    非公開リポジトリ Google Container Registry にpushする

    gcloud docker -- push gcr.io/PROJECT_ID/hello-node:v1

    Kubernetesのクラスタを作成する

    クラスタはGCPで用意する。

    gcloud config set project PROJECT_ID

    2 つの n1-standard-1 ノードのあるクラスタ

    gcloud container clusters create hello-world \
                    --num-nodes 2 \
                    --machine-type n1-standard-1 \
                    --zone us-central1-a

    ポッドを作成する

    こちらは先ほど作ったクラスタの中につくられる。

    Kubernetesのコマンドkubectlを使って作っていく。

    kubectl run hello-node \
        --image=gcr.io/PROJECT_ID/hello-node:v1 \
        --port=8080

    デプロイメントオブジェクトが作成される。

    確認のコマンドはこちら

    kubectl get deployments

    デプロイメントによって作成されたポッドは以下のコマンドで確認

    kubectl get pods

    Kubernetesの状態を確認するコマンド

    kubectl cluster-info
    
    kubectl config view
    
    kubectl get events
    
    kubectl logs <pod-name>


    外部トラフィックを許可する

    デフォルトではポッドにはクラスタ内部IPからしかアクセスできないようになっている。kubectl exposeコマンドと –type=”LoadBalancer”で公開する事ができる。

    kubectl expose deployment hello-node --type="LoadBalancer"

    (ポッドを直接公開する手順ではなく、デプロイメントを公開の手順)

    公開IPを確認

    kubectl get services

    サービスのスケールアップ

    今までは2つのレプリカを用意していたが、それをさらに増やしたい場合以下のコマンドでスケールアップする事が可能

    kubectl scale deployment hello-node --replicas=4

    確認

    kubectl get deployment

    podの状態を確認

    kubectl get pods

    新しいコンテナをデプロイする

    再度nodeで作ったserver.jsを適当に編集し、保存する。

    その後buildしてpush

    docker build -t gcr.io/PROJECT_ID/hello-node:v2 .
    gcloud docker -- push gcr.io/PROJECT_ID/hello-node:v2

    その後、kubectlコマンドでデプロイするコンテナイメージのタグを変更する

    kubectl edit deployment hello-node

    変更するフィールドは

    spec.template.spec.containers.image

          containers:
          - image: gcr.io/PROJECT_ID/hello-node:v1 

    をv1からv2へ変更する

    kubectl get deployments

    を行うと順次ポッドがローリングアップデートされる。

    古いポッドは削除されてしまうので注意。

    管理画面を見る

    gcloud container clusters get-credentials hello-world \
        --zone us-central1-a --project <PROJECT_ID>

    トークンを取得する

    kubectl -n kube-system describe $(kubectl -n kube-system \
       get secret -n kube-system -o name | grep namespace) | grep token:

    8081ポートを使うことにする(どこでもよい)

    kubectl proxy --port 8081

    コンソール画面でchange portをクリックし、8081ポートに変更する。

    ?authuser=0を削除し、以下のとおり/uiに変更する

    例: 

    https://8081-dot-6387619-dot-devshell.appspot.com/ui

    参考情報

    https://google.qwiklabs.com/focuses/564?locale=ja&parent=catalog

  • RDSをawsコマンドで削除する

    RDSをawsコマンドで削除する

    はじめに

    RDSをaws cliで削除したいことがある。認証さえ登録されていれば1行でできる。

    コマンド

    普通にdatabaseが消えるので要注意。

    aws rds delete-db-instance --db-instance-identifier [インスタンス名] --skip-final-snapshot

    確認

    作業前

    作業後

  • Vimでインデントを整形する

    Vimでインデントを整形する

    はじめに

    vimでフォーマット(インデント)を自動で整えたい時があるので、その方法を紹介。

    gg=G

      gg でファイルの先頭に移動
    =  がインデント修正
    G  で最後まで実施する

    という意味になる

  • route 53をCLIで登録する

    route 53をCLIで登録する

    はじめに

    route 53の登録をコマンドで実行したい時がある。

    コマンドをまとめる。

    準備

    jsonファイルを作成

    {
     "Changes": [
     {
      "Action": "UPSERT",
      "ResourceRecordSet": {
       "Name": "server-original.stg.rds.sumito.jp",
       "TTL": 300,
       "Type": "CNAME",
       "ResourceRecords": [
       {
        "Value": "server-original-stg-rds.aaaddcda.ap-northeast-1.rds.amazonaws.com"
       }
       ]
       }
      }
      ]
    }

    aws route53コマンドで読み込ませる

    #変数登録
    DB_JSON=create_db.json
    HOST_ZONE_ID=`aws --profile staging route53 list-hosted-zones | jq -r '.[][] | select (.Name == "stg.rds.sumito.jp.") | .Id'`
    
    SDBM_ID=`aws --profile staging route53 change-resource-record-sets --hosted-zone-id ${HOST_ZONE_ID} --change-batch file://${DB_JSON} `

    ステータス確認

    echo $SDBM_ID | jq -r '.ChangeInfo.Status'
    PENDING